
Is your kitchen faucet spraying water everywhere or flowing too weakly? The problem might be your faucet aerator.
Replacing it is easier than you think and can save you money on water bills while improving your sink’s performance. In this guide, you’ll learn simple, step-by-step instructions to replace your kitchen faucet aerator quickly and without stress. Keep reading to fix that drip and enjoy a better kitchen experience today!
Tools And Materials Needed
Replacing a kitchen faucet aerator needs some basic tools and materials. Having everything ready makes the job quick and smooth. The right tools help avoid damage and ensure a proper fit for the new aerator.
Many of these items are common household tools. The aerator itself must match your faucet for best results. Below is a list of what you need before starting the replacement.
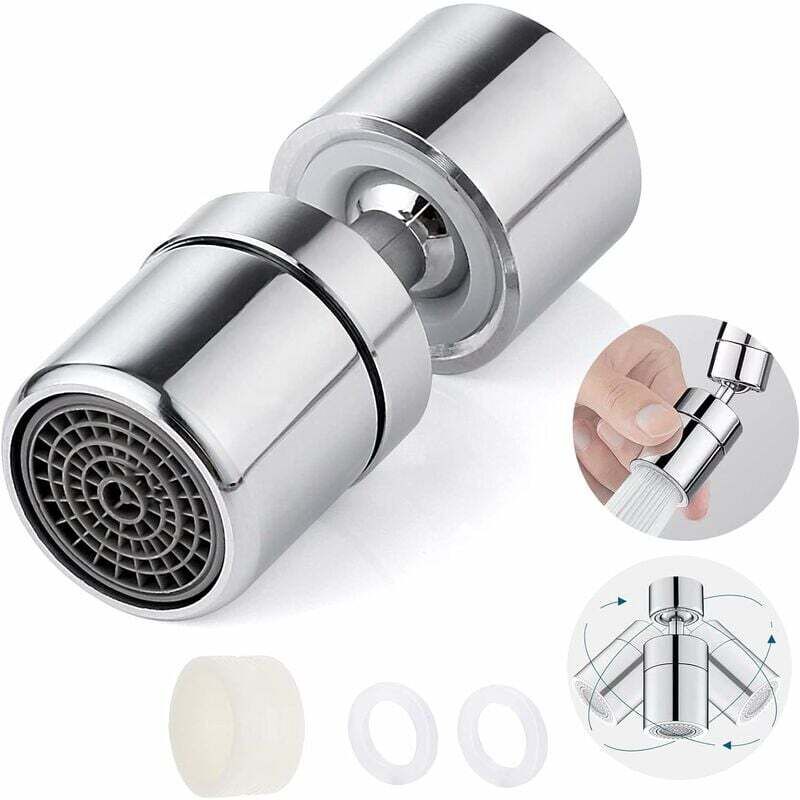
Replacement Aerator
- Choose the correct size and thread type
- Look for water-saving models if desired
- Check the flow rate marked on the aerator
Adjustable Wrench
- Used to loosen and tighten the aerator
- Adjust to fit different aerator sizes
- Helps avoid scratching the faucet finish
Rubber Gloves
- Protect your hands from dirt and water
- Improve grip on slippery parts
- Keep hands clean during the process
Soft Cloth Or Tape
- Wrap around aerator to protect finish
- Prevents scratches when using wrench
- Also useful for cleaning the faucet tip
Bucket Or Small Container
- Catch any water that drips during removal
- Keep the area clean and dry
- Place under the faucet before starting
Identifying The Aerator Type
Identifying the aerator type is the first step in replacing your kitchen faucet aerator. Different aerators have unique sizes, threads, and designs. Knowing the right type helps you buy the correct replacement. It also makes installation easier and faster.
Look closely at the aerator attached to your faucet. It usually sits at the tip of the spout. You might need to unscrew it carefully to see the details. Check for markings or numbers on the aerator. These can give clues about its type and size.
Thread Size And Type
Aerators come with two main thread types: male and female. Male threads screw onto the outside of the faucet spout. Female threads fit inside the spout. Measure the diameter of the threads with a ruler or tape. Common sizes include 15/16 inch and 55/64 inch.
Aerator Shape And Design
Aerators can be round, flat, or tapered. Round aerators are the most common. Flat types are slim and fit into shallow spouts. Some have a built-in screen or flow restrictor. Note the shape to find a perfect match.
Flow Rate And Function
Check the flow rate printed on the aerator, usually in gallons per minute (GPM). Typical flow rates are 1.5 or 2.2 GPM. Some aerators offer spray or stream functions. Identifying these helps maintain water pressure and efficiency.
Material And Finish
Aerators come in plastic, brass, or stainless steel. Choose the same material to avoid corrosion. The finish should match your faucet for a neat look. Common finishes include chrome, nickel, and brushed metal.
Removing The Old Aerator
Removing the old kitchen faucet aerator is a simple task that prepares your faucet for a fresh new part. This step ensures better water flow and saves water. The aerator can get clogged or damaged over time. Taking it off carefully avoids damage to the faucet threads. Use the right tools and follow these tips for a smooth removal.
Loosening The Aerator
Start by checking if the aerator is hand-tight or stuck. Use your fingers to try turning it counterclockwise. If it feels tight, avoid forcing it. Wrap a cloth around the aerator to protect its finish. Use an adjustable wrench or pliers gently. Turn slowly to loosen the aerator without scratching it.
Unscrewing The Aerator
Once loose, continue unscrewing the aerator by hand. Hold the faucet firmly to keep it steady. If water drips, keep a towel handy to catch it. Inspect the aerator for any rubber washers or screens inside. Remove these parts carefully to clean or replace them. Keep these pieces safe for reassembly or replacement.
Credit: www.tiktok.com
Cleaning The Faucet Threads
Cleaning the faucet threads is a crucial step in replacing your kitchen faucet aerator. Over time, mineral deposits and grime can build up on the threads, making it hard to screw the new aerator on properly. Ignoring this can lead to leaks or a loose fit, which defeats the purpose of your effort to improve your faucet’s performance.
Gathering The Right Tools For Thread Cleaning
Before you start, make sure you have the right tools ready. A small wire brush, an old toothbrush, and some white vinegar work wonders to remove deposits. You might also want a cloth to wipe away loosened debris and some plumber’s tape for reassembly.
Soaking And Scrubbing The Threads
Dip the wire brush or toothbrush in white vinegar to help dissolve mineral buildup. Gently scrub the threads to clear away any crusty residue. If the deposits are stubborn, soak the threaded part in vinegar for about 10 minutes before scrubbing again.
Checking For Damage And Ensuring A Clean Surface
After cleaning, inspect the threads closely. Look for cracks or worn-out spots that could cause leaks later. If the threads are damaged, you might need to replace the entire faucet part or consult a plumber.
Drying And Preparing Threads For New Aerator Installation
Use a dry cloth to wipe the threads thoroughly after cleaning. Make sure there’s no moisture left, as it could affect the seal. Applying plumber’s tape around the threads can help create a tighter, leak-free connection when you install your new aerator.
Have you noticed your faucet leaking even after replacing the aerator? Often, the problem lies in dirty or damaged threads. Taking time to clean and inspect them can save you from repeated repairs and water waste.
Selecting The New Aerator
Choosing the right aerator for your kitchen faucet is more important than you might think. The aerator controls water flow, prevents splashing, and can even save water. Picking the wrong one can lead to leaks or poor performance, so it pays to know what to look for.
Understanding Aerator Sizes And Threads
Not all aerators fit every faucet. You need to match the size and threading to your faucet’s spout. Most aerators come in standard sizes like 15/16″-27 for male threads and 55/64″-27 for female threads.
Check your old aerator or faucet manual to find the correct size. If you’re unsure, bring the old aerator to the store or measure the faucet opening with a ruler. This small step prevents buying an incompatible part.
Choosing The Right Flow Rate
Aerators come with different flow rates, usually measured in gallons per minute (GPM). A typical kitchen aerator flows at 1.5 to 2.2 GPM. Lower flow rates save water but might reduce pressure.
Think about your daily water use. Do you want to conserve water or prefer a stronger flow for washing dishes? Some models offer adjustable flow settings, giving you flexibility.
Material And Finish Options
Aerators are made from materials like plastic or metal. Metal aerators tend to last longer and resist corrosion better. Consider finishes that match your faucet, such as chrome, brushed nickel, or stainless steel.
I once switched to a metal aerator and noticed it stayed cleaner and looked better over time. It’s a small upgrade that can improve both function and style in your kitchen.
Special Features To Consider
Some aerators come with extra features like water filtration, swivel heads, or easy-clean designs. These can add convenience or improve water quality.
Think about your needs: Would a swivel aerator help you rinse dishes better? Or maybe a filter aerator could improve your tap water taste. Adding these features might make your kitchen tasks easier.

Credit: www.reddit.com
Installing The New Aerator
Installing the new aerator is a simple task that improves water flow and saves water. This step requires careful positioning and securing of the aerator to avoid leaks. Follow these instructions to fit the new aerator perfectly on your kitchen faucet.
Positioning The Aerator
Start by aligning the new aerator with the faucet’s spout. Check that the rubber washer is inside the aerator to create a tight seal. Hold the aerator gently but firmly against the spout. Make sure it sits straight and flat to prevent water leaks.
Securing The Aerator
Turn the aerator clockwise to screw it onto the faucet. Tighten it by hand until it feels snug. Avoid using tools that can damage the aerator or faucet. If needed, wrap a cloth around the aerator and gently tighten with pliers. Test the faucet by turning on the water to check for leaks. If water drips, tighten the aerator a little more.
Testing The Faucet
Testing the faucet after replacing the aerator ensures everything works properly. It helps find leaks, low water pressure, or unusual noises. This step confirms the new aerator fits well and functions as expected.
Start by turning on the faucet slowly. Watch the water flow carefully. Check if the stream is steady and smooth without splashing. A good aerator creates a soft, even flow.
Look for any water dripping around the connection. Leaks here mean the aerator isn’t sealed tightly. Tighten gently if needed, but avoid over-tightening, which can cause damage.
Listen for odd sounds like whistling or rattling. These noises may mean the aerator parts are loose or clogged. Cleaning or adjusting might be necessary.
Check Water Pressure And Flow
- Turn faucet on full to test pressure.
- Notice if the flow is strong and steady.
- Weak flow may indicate blockage or incorrect aerator.
- Replace or clean aerator if water is too low.
Inspect For Leaks Around The Aerator
- Look closely at the aerator connection.
- Spot any water droplets or wetness.
- Tighten or reseal with plumber’s tape if leaking.
- Leaks can waste water and cause damage.
Listen For Unusual Noises
- Turn faucet on and listen carefully.
- Whistling or rattling sounds suggest problems.
- Remove and clean aerator if noises persist.
- Replace damaged parts to restore quiet function.
Credit: militarymedical.com
Troubleshooting Common Issues
Troubleshooting common issues with your kitchen faucet aerator can save you time and water. Identifying the exact problem helps you fix it faster without calling a plumber. Let’s look at two frequent issues that you might face and how to handle them effectively.
Leaks And Drips
Leaks around your faucet aerator are often caused by worn-out washers or damaged threads. If you notice water dripping even when the faucet is off, check if the aerator is screwed on tightly. Sometimes, mineral deposits build up and prevent a proper seal, causing leaks.
Take the aerator off and inspect it closely. Clean any deposits with vinegar and a soft brush. If the washer looks cracked or flattened, replace it with a new one that fits your faucet model.
Have you ever tightened the aerator only to find the leak persists? This usually means the internal parts need replacement or the faucet itself has a deeper issue. Testing with a new aerator can help you decide if you need a professional fix.
Weak Water Flow
Low water pressure is a common complaint linked to clogged aerators. Dirt, sand, and mineral deposits can block the tiny holes inside the aerator screen, restricting water flow. You might feel frustrated when your kitchen faucet barely streams water during busy cooking times.
Removing and soaking the aerator in vinegar for 30 minutes can dissolve many deposits. After soaking, rinse it well and use a small brush or toothpick to clear stubborn debris. Reinstall the aerator and check if the flow improves.
If the water pressure is still weak, look beyond the aerator. Sometimes, the issue comes from your home’s plumbing or water supply. Do you know when you last checked your pipes for buildup? Regular maintenance can prevent this problem from sneaking up on you.
Maintaining Your Faucet Aerator
Maintaining your faucet aerator keeps water flow smooth and clean. Dirt and mineral deposits can clog the aerator over time. This reduces water pressure and causes uneven spray. Regular care extends the life of your faucet and saves water.
Regular Cleaning
Remove the aerator every few months to clean it. Soak the aerator parts in vinegar for 30 minutes. This helps dissolve mineral buildup. Use a soft brush to scrub away stubborn deposits. Rinse all parts under running water before reinstalling. Cleaning prevents blockages and keeps water fresh.
Periodic Replacement
Replace the aerator if cleaning does not restore water flow. Aerators wear out or become damaged over time. Choose a replacement that fits your faucet model. Installing a new aerator is quick and improves water efficiency. Regular replacement ensures consistent water pressure and quality.
Frequently Asked Questions
How Do I Remove A Kitchen Faucet Aerator?
To remove a kitchen faucet aerator, first turn off the water supply. Then, grip the aerator with pliers or by hand and twist it counterclockwise. If stuck, use a cloth to protect the finish and apply gentle force until it loosens.
What Tools Are Needed To Replace An Aerator?
You typically need adjustable pliers or a wrench, a cloth, and a replacement aerator. The cloth prevents scratching the faucet. Sometimes, no tools are required if the aerator can be unscrewed by hand. Always check the faucet size before buying a new aerator.
How Often Should I Replace My Kitchen Faucet Aerator?
Replace your kitchen faucet aerator every 6 to 12 months. Regular replacement ensures optimal water flow and prevents clogging. If you notice reduced water pressure or irregular spray patterns, it’s time to replace the aerator to maintain efficiency and cleanliness.
Can A Clogged Aerator Cause Low Water Pressure?
Yes, a clogged aerator can reduce water pressure significantly. Mineral deposits and debris block water flow through the aerator holes. Cleaning or replacing the aerator restores normal water pressure and improves faucet performance quickly and easily.
Conclusion
Replacing a kitchen faucet aerator is simple and quick. It keeps water flow smooth and saves water. Just remove the old aerator, clean the threads, and screw in the new one. No special tools are needed. Regular checks help avoid clogs and leaks.
A small fix that makes a big difference in your kitchen sink’s performance. Try it yourself and enjoy better water flow every day.


