If your Moen kitchen faucet is leaking, loose, or just needs an upgrade, knowing how to remove it yourself can save you time and money. You might think it’s complicated, but with the right steps, you can handle it easily.
This guide will walk you through the process, step by step, so you can tackle the job with confidence. Keep reading, and you’ll discover how simple it is to remove your single handle Moen kitchen faucet without calling a plumber.
Tools And Materials Needed
Removing a single handle Moen kitchen faucet requires specific tools and materials. Having everything ready saves time and prevents frustration. This list helps prepare you for the job.
Basic Tools
- Adjustable wrench for loosening nuts and bolts
- Phillips and flathead screwdrivers for screws
- Basin wrench to reach tight spaces under the sink
- Allen wrench set for any hex screws
- Slip-joint pliers for gripping and twisting
Materials Needed
- Towel or small bucket to catch water drips
- Replacement faucet parts or new faucet
- Plumber’s tape to seal pipe threads
- Cleaning cloth to wipe surfaces
Safety And Preparation Items
- Work gloves to protect your hands
- Flashlight for better visibility under the sink
- Shut-off valve tool to close water supply
Preparing The Workspace
Before you start removing your single handle Moen kitchen faucet, preparing your workspace is essential. A well-organized area reduces stress and prevents accidents. It also makes the entire process smoother and faster.
Clear The Area
Begin by removing everything from under the sink and around the faucet. Clear out cleaning supplies, trash bins, and any clutter that could get in your way. This gives you ample space to move and access plumbing components easily.
Don’t forget to wipe down the sink and countertop. Moisture or grease can cause slips or make tools harder to grip. A clean surface helps you spot leaks or parts more quickly as you work.
Safety Precautions
Safety should be your top priority. Always turn off the water supply before touching any plumbing parts. This prevents unexpected water sprays that could damage your kitchen or cause injury.
Wear protective gloves to avoid cuts from sharp edges or tools. If you’re working in tight spaces, consider safety goggles to protect your eyes from debris or splashes.
Have a bucket or towel ready to catch any residual water when disconnecting hoses. Have you ever been surprised by a sudden gush of water? Being prepared saves you from that mess.
Turning Off The Water Supply
Turning off the water supply is a key step before removing a single handle Moen kitchen faucet. It prevents water from spilling and causing damage. Taking time to shut off water carefully keeps your work area dry and safe.
Locate Shut-off Valves
First, find the shut-off valves under the sink. These small knobs control the water flow to the faucet. Usually, there are two valves—one for hot water and one for cold. Turn both valves clockwise to close them. If no valves exist under the sink, shut off the main water supply to the house.
Release Water Pressure
After closing the valves, open the faucet handle fully. This action lets any trapped water flow out. Wait until no more water comes from the spout. Releasing pressure stops leaks when you disconnect the faucet. Keep a towel nearby to catch any leftover drips.

Credit: www.reddit.com
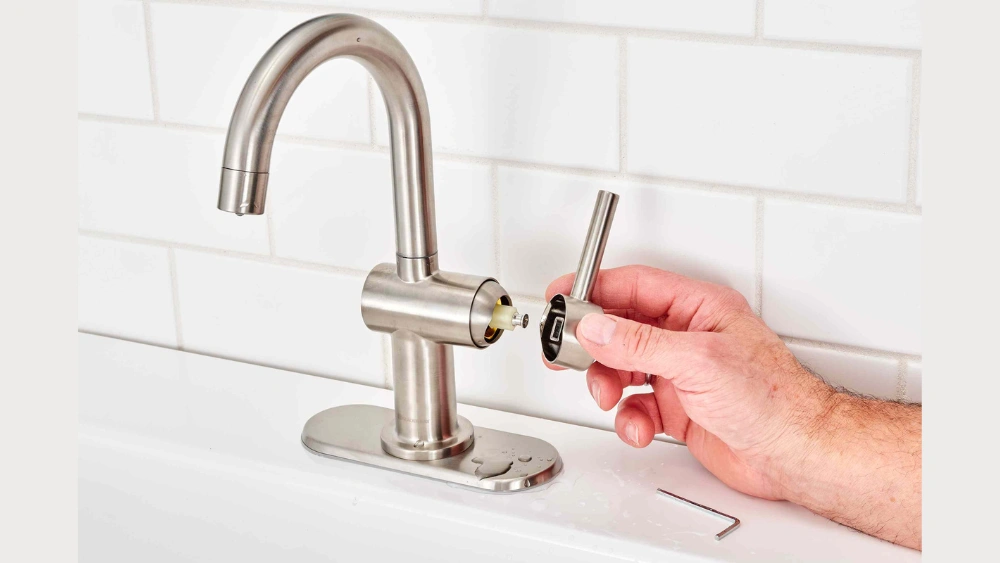
Removing The Handle
Removing the handle from your single-handle Moen kitchen faucet is a key step before tackling any deeper repairs or replacements. It might seem tricky at first, but with the right approach, you can do it smoothly without damaging your faucet. Let’s focus on how to get that handle off safely and efficiently.
Accessing The Handle Screw
Most Moen single-handle faucets hide the screw under a decorative cap on the handle. This cap usually blends in, so look carefully for a small indentation or a spot where you can pry it off gently with a flathead screwdriver or a plastic tool.
Once the cap is removed, you’ll see the handle screw clearly. This screw holds the handle tightly in place, so you’ll need to loosen it with the correct tool. Have you noticed how many times you overlook this simple cover and try to pull the handle off directly? Avoid that—it can cause damage.
Using Proper Tools
Using the right tools makes the process easier and prevents stripping the screw or scratching your faucet. Usually, an Allen wrench (hex key) fits the handle screw perfectly. Make sure the wrench size matches the screw to avoid slipping.
If you don’t have an Allen wrench, a precision screwdriver set can also work, depending on the screw type. Remember to turn the screw counterclockwise gently; forcing it can strip the threads or break the screw head.
Have you ever tried removing a faucet handle with the wrong tool? It’s frustrating and often leads to extra repairs. Take a moment to gather the right tools before you begin—it saves time and headaches.
Detaching The Faucet Body
Detaching the faucet body is a key part of removing a single-handle Moen kitchen faucet. This step requires care and the right tools. It involves loosening the mounting nuts under the sink and lifting the faucet out carefully.
Loosening Mounting Nuts
Start by locating the mounting nuts under the sink. These nuts hold the faucet firmly in place. Use a basin wrench or adjustable wrench to turn the nuts counterclockwise. Work slowly to avoid damaging the sink or pipes.
Sometimes, the nuts can be tight or stuck. Spray a little penetrating oil if needed. Let it sit for a few minutes to loosen the nuts. Keep your hand steady and apply even pressure while turning.
Lifting Out The Faucet
After removing the mounting nuts, gently lift the faucet body from the sink. Hold the faucet base firmly and pull straight up. Avoid twisting or forcing it, which could cause damage.
Check for any remaining connections or hoses. Detach these carefully before fully removing the faucet. Place the faucet on a soft surface to prevent scratches.
Credit: www.youtube.com
Cleaning And Maintenance Tips
Keeping your Moen kitchen faucet clean and well-maintained improves its performance. Regular care prevents leaks and build-up. Simple steps help extend your faucet’s life and keep your sink area neat.
Inspecting For Leaks
Check around the faucet base and under the sink for water drops. Even small leaks waste water and cause damage. Tighten connections gently if you spot any leaks. Use a dry cloth to find hidden drips. Regular inspection helps catch problems early.
Cleaning The Sink Area
Remove dirt and grime from the faucet and sink daily. Use mild soap and a soft cloth to avoid scratches. Avoid harsh chemicals that damage finishes. Clean aerators to keep water flow steady. Wipe down handles to prevent build-up. A clean area looks better and works smoother.
Reinstallation Considerations
After removing your single handle Moen kitchen faucet, it’s time to think about reinstallation. This step is crucial to ensure your new or existing faucet works flawlessly and lasts for years. Paying attention to the right details now can save you from leaks and future repairs.
Choosing A New Faucet
Are you upgrading to a new faucet or reinstalling the old one? If you’re picking a new model, consider your kitchen’s style and how you use your sink daily.
Look for features that matter to you, like pull-out sprayers or water-saving technology. Remember, not all faucets fit every sink—check the number of mounting holes and the size of your countertop opening.
Think about the finish too. A stainless steel faucet might hide fingerprints better than a chrome one, which is handy if you cook a lot. Have you checked if your water pressure works well with the new faucet? It’s a detail often overlooked.
Installation Tips
Before installing, clean the sink area thoroughly. Old putty or debris can cause uneven sealing or leaks.
Use plumber’s tape on threaded connections to prevent leaks. Tighten screws and nuts just enough to hold the faucet firmly—over-tightening can crack the sink or damage the faucet.
Always test for leaks before finishing up. Turn on the water slowly and watch under the sink for drips. If you find any, tighten connections a bit more or add sealant where needed.
Remember, patience pays off. Rushing installation can lead to mistakes that are costly and frustrating. How confident do you feel about handling small adjustments during installation?

Credit: www.ebay.com
Frequently Asked Questions
How Do I Remove A Single Handle Moen Kitchen Faucet?
Turn off the water supply first. Use an Allen wrench to loosen the handle set screw. Remove the handle and then unscrew the retaining nut to lift off the faucet body.
What Tools Are Needed To Remove A Moen Kitchen Faucet?
You typically need an adjustable wrench, Allen wrench, and a basin wrench. A screwdriver may also be helpful for removing mounting clips or screws.
Can I Remove The Faucet Without Shutting Off Water?
No, always turn off the water supply before removal. This prevents leaks and water damage during the process.
How Long Does It Take To Remove A Moen Kitchen Faucet?
Removing a single handle Moen faucet usually takes about 15 to 30 minutes. It depends on your experience and tool availability.
Conclusion
Removing a single handle Moen kitchen faucet is simple with clear steps. Turn off the water supply first. Use the right tools and work carefully to avoid damage. Take your time to loosen all parts gently. Clean the area before installing a new faucet or finishing the job.
This task saves money and gives you control over repairs. You can handle it yourself, even with little experience. Just follow the steps, and you will get the job done smoothly.


