
Are you thinking about updating your floors but worried about the hassle of removing your existing hardwood? You might be wondering if you can simply put vinyl flooring over your hardwood to save time and money.
The idea sounds simple, but there are important things you need to know before making this decision. You’ll discover whether vinyl over hardwood is a smart choice, what factors to consider, and how to make sure your new floor looks great and lasts long.
Keep reading to find out how to transform your space without the extra work.

Credit: www.youtube.com
Vinyl Flooring Basics
Understanding vinyl flooring is crucial before deciding if you can lay it over hardwood. Vinyl is a popular choice for many homeowners because it’s versatile, durable, and affordable. Knowing the basics will help you make an informed decision about your flooring project.
Types Of Vinyl Flooring
Vinyl flooring comes in several forms, each with unique features:
- Sheet Vinyl:A continuous, flexible sheet that covers large areas with minimal seams.
- Vinyl Tiles:Square pieces that mimic natural materials like stone or wood and offer easy replacement.
- Luxury Vinyl Planks (LVP):Designed to look like hardwood planks, these are thicker and more durable.
Choosing the right type depends on the look you want and the room’s traffic level.
Benefits Of Vinyl Flooring
Vinyl flooring offers several advantages that make it a smart choice for many homes.
- Water Resistance:Unlike hardwood, vinyl stands up well to moisture, which is great for kitchens and bathrooms.
- Easy Maintenance:You can clean vinyl floors with just a damp mop, no special treatments needed.
- Comfort:Vinyl has a softer feel underfoot compared to hardwood, reducing fatigue if you stand for long periods.
- Cost-Effective:Vinyl is generally less expensive to purchase and install than hardwood.
Have you considered how these benefits might change your daily experience with your floors?
Hardwood Floors As A Base
Using hardwood floors as a base for vinyl flooring can be a smart choice if the underlying surface is solid and well-maintained. Hardwood provides a stable, flat foundation that can help vinyl flooring lay smoothly and last longer. However, before you decide to install vinyl over hardwood, it’s crucial to assess the condition of your hardwood floors carefully.
Condition Check For Hardwood
Start by inspecting the hardwood surface for any damage or uneven areas. Look for loose boards, squeaks, or gaps that could affect the vinyl’s stability. If you notice any wobbling or movement when you walk across the floor, it’s a red flag. You want a firm base that won’t shift under the vinyl.
Also, check for moisture issues. Hardwood can warp or swell if exposed to water, and that moisture can transfer to your vinyl, causing bubbles or lifting. Using a moisture meter can help you detect hidden dampness beneath the surface.
Common Hardwood Issues
Several problems might need fixing before laying vinyl:
- Scratches and dents:While vinyl can hide minor imperfections, deep scratches or gouges can create unevenness.
- Loose or squeaky boards:These must be secured to avoid movement that damages the vinyl over time.
- Water damage:Signs include discoloration, warping, or a musty smell. Ignoring this can ruin your new flooring quickly.
- Uneven surfaces:Hardwood floors that aren’t level can cause vinyl to wrinkle or peel.
Have you checked your hardwood floors lately? Taking the time to fix these issues can save you from costly repairs or replacing your vinyl flooring prematurely. Your vinyl deserves a strong, even base to look and perform its best.
Compatibility Factors
Understanding the compatibility factors between vinyl flooring and hardwood is key before making the switch. These factors affect how well the vinyl will lay down and last over your existing hardwood floor. Let’s break down the most important points you need to check.
Surface Smoothness
Your hardwood floor’s surface must be smooth and even for vinyl to adhere properly. Any bumps, gaps, or rough patches can cause the vinyl to bubble or wear unevenly. You might need to sand down or fill in imperfections to create a flat base.
Think about it like laying wallpaper—you want no lumps underneath. Have you checked your hardwood floor for scratches or dents that might interfere with the vinyl? Addressing these now saves you headaches later.
Moisture Considerations
Moisture is a silent enemy when placing vinyl over hardwood. Hardwood can trap moisture, leading to mold or warping beneath your new vinyl layer. It’s crucial to test your floor for moisture levels before installation.
If your home tends to be humid, consider adding a vapor barrier. Have you experienced any previous water damage on the hardwood? That history could affect how well your vinyl performs.
Height And Thickness
Adding vinyl over hardwood increases your floor’s height, which can cause problems with doors, transitions, and baseboards. Measure the combined thickness to ensure doors still open smoothly. You might need to trim door bottoms or adjust trim to accommodate the new layer.
Choosing a thinner vinyl can help avoid these issues but might impact durability. What’s more important to you: a sleek look or long-lasting strength? Balancing thickness with practicality is part of the decision process.
Preparation Steps
Preparing the hardwood floor before installing vinyl flooring is essential. Proper preparation ensures the new floor lays flat and lasts longer. It involves cleaning, fixing damages, and making the surface even. These steps help avoid problems like bubbling or uneven wear later on.
Cleaning And Repairing Hardwood
Start by removing dirt, dust, and debris from the hardwood floor. Use a broom or vacuum to clear all particles. Next, wash the floor with a mild cleaner and a damp mop. Avoid soaking the wood with water. Check for any cracks, holes, or loose boards. Fill small holes with wood filler and sand smooth once dry. Nail down any loose boards to stop movement under the vinyl.
Leveling The Surface
The hardwood must be flat for vinyl installation. Use a long straightedge to find high or low spots. Sand down any raised areas carefully. For low spots, apply a floor leveling compound. Spread it evenly and let it dry completely. Check the floor again to confirm it is smooth and level. A level surface prevents damage and creates a professional finish for vinyl flooring.
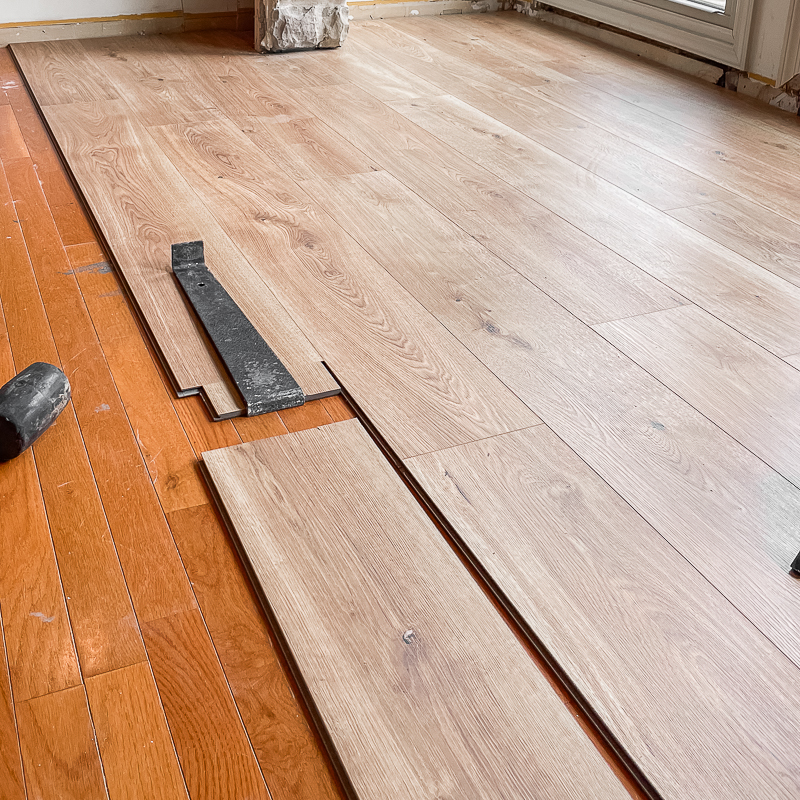
Installation Methods
Choosing the right installation method for putting vinyl flooring over hardwood can make a huge difference in how your floor looks and lasts. Each technique has its own benefits and challenges, depending on your skill level and the condition of your existing hardwood. Let’s break down the main options so you can decide which one fits your project best.
Glue-down Vinyl
Glue-down vinyl requires spreading adhesive directly on the hardwood before laying the vinyl. This method creates a very stable and durable floor, making it ideal for high-traffic areas.
However, preparation is key. Your hardwood must be clean, smooth, and free of any finish that could prevent the glue from sticking properly. If you’ve ever dealt with sticky glue or uneven floors, you know how important surface prep is here.
Think about whether you want a permanent solution. Removing glue-down vinyl later can be tough and might damage the hardwood underneath.
Click-lock Vinyl Planks
Click-lock vinyl planks snap together without the need for glue or nails. This floating floor method is popular because it’s easy to install and can be done quickly, even if you’re new to DIY.
It also allows for some flexibility if your hardwood expands or contracts due to temperature changes. You can even take it apart to replace a damaged plank, which is a huge advantage.
Have you noticed any uneven areas on your hardwood? Click-lock floors can sometimes highlight these spots, so make sure your base is as level as possible.
Peel-and-stick Options
Peel-and-stick vinyl is the simplest to install, thanks to its adhesive backing. You just peel off the protective layer and press the vinyl onto your hardwood.
This method is great for small rooms or quick updates, but it may not hold up well in areas with moisture or heavy foot traffic. You might find the stickiness wears off over time, especially if the hardwood surface isn’t perfectly smooth.
If you’re considering peel-and-stick, test a small section first to see how well it adheres and how easy it is to clean.

Credit: www.facebook.com
Potential Challenges
Putting vinyl flooring over hardwood may seem easy. Yet, some challenges can arise. Knowing these helps you avoid costly mistakes. Here are key issues to consider before starting.
Adhesion Problems
Vinyl needs a smooth, clean surface to stick well. Hardwood with old finish or uneven texture can cause weak adhesion. Loose or damaged hardwood planks make vinyl prone to lifting. Moisture trapped between layers leads to bubbles and peeling. Proper surface preparation is crucial for a strong bond.
Floor Height Issues
Adding vinyl over hardwood raises the floor height. This change can affect door clearance and transition strips. Uneven flooring edges may create tripping hazards. Cabinets and appliances might not fit as before. Measure carefully and plan for adjustments to avoid problems.
Long-term Durability
Vinyl over hardwood may hide problems like warping or rot. These issues worsen under vinyl and become costly to fix. Wear and tear on the hardwood beneath can shorten vinyl’s lifespan. Vinyl can also crack or peel if the base moves. Regular checks and maintenance extend the floor’s life.
Maintenance Tips
Maintaining vinyl flooring over hardwood is key to keeping your space looking fresh and prolonging the life of your floors. Proper care doesn’t have to be complicated or time-consuming. A few simple habits can make a big difference in durability and appearance.
Cleaning Vinyl Floors
Cleaning vinyl floors is easier than you might think. Use a soft broom or vacuum without a beater bar to remove dirt and dust daily. Avoid harsh chemicals; instead, mop with warm water mixed with a mild detergent.
Stains come off best when addressed quickly. A damp cloth with a little baking soda paste can tackle tougher marks without damaging the surface. Have you ever noticed how quickly spills can become permanent? Acting fast can save you a lot of effort later.
Protecting The Flooring
Protect your vinyl floors by placing felt pads under furniture legs to prevent scratches. Avoid dragging heavy items across the floor; instead, lift them to move. Area rugs in high-traffic zones can also shield your flooring from wear and tear.
Sunlight can fade vinyl over time. Consider using curtains or blinds during peak sunlight hours to preserve color. What steps do you take to protect your floors from everyday damage? Small changes in daily routines make a surprising impact.
Credit: crystelmontenegrohome.com
Cost And Time Considerations
Assessing cost and time is crucial before installing vinyl over hardwood. Vinyl is often cheaper than replacing hardwood entirely. Installation time varies, but it can be quicker than refinishing wood floors.
Putting vinyl flooring over hardwood can be an attractive option for many homeowners, but before diving into the project, it’s crucial to consider the costs and time involved. Understanding what you’ll spend and how long it will take can help you make a more informed decision, ensuring your new floor isn’t just a dream but a reality you can enjoy sooner rather than later.Budgeting For Materials
When it comes to budgeting for vinyl flooring, materials can significantly impact your overall cost. Vinyl comes in various styles and qualities, ranging from budget-friendly options to high-end selections. You might find the inexpensive versions appealing, but remember that durability and aesthetics often correlate with price. Evaluate your needs carefully. Do you want something that lasts for years or a quick fix that looks good for now? Factor in additional costs like underlayment and transition strips, which can add to your budget unexpectedly.Installation Timeframe
The timeframe for installing vinyl flooring over hardwood isn’t just a matter of laying down the planks. Preparation plays a crucial role. Ensuring the hardwood is level and clean can take time, especially if repairs are needed. Once the prep work is complete, the actual installation can be surprisingly quick. However, if you plan to do it yourself, consider the learning curve. Do you have the tools and skills needed, or will you need to hire a professional? Hiring someone might speed up the process but could also increase costs. Thinking about these factors can save you from surprises and help you plan effectively. Would you prefer to spend a weekend tackling the project, or do you envision it being done in a day by an expert?Frequently Asked Questions
Can Vinyl Flooring Be Installed Over Hardwood?
Yes, vinyl flooring can be installed over hardwood if the surface is clean, dry, and level. Proper preparation ensures good adhesion and durability.
Will Vinyl Flooring Damage Hardwood Underneath?
No, vinyl flooring typically does not damage hardwood underneath if installed correctly. It acts as a protective layer and can be removed later.
What Are The Benefits Of Vinyl Over Hardwood?
Vinyl is waterproof, more affordable, and easier to maintain than hardwood. It offers versatile designs and adds comfort with a softer feel.
Do I Need To Remove Hardwood Before Vinyl Installation?
Removing hardwood is not always necessary. If the hardwood is smooth and stable, vinyl can be installed directly on top with proper underlayment.
Conclusion
Vinyl flooring can go over hardwood with the right steps. Make sure the hardwood is smooth and clean before starting. Any damage or uneven spots can cause problems later. Vinyl is easy to install and looks great over wood. It offers a fresh, modern feel without removing old floors.
This method saves time and cuts costs too. Always check for moisture or damage under the wood first. With care, vinyl over hardwood is a smart choice for many homes. A simple update that changes your room’s style quickly and nicely.


