Are you struggling with a leaky or stubborn Moen kitchen faucet? One of the easiest ways to fix it is by removing and replacing the cartridge inside.
But if you’ve never done it before, the idea can feel a bit intimidating. Don’t worry—this guide will walk you through each simple step so you can handle the job yourself. By the end, you’ll save money, avoid a plumber’s visit, and have your faucet working like new again.
Ready to get started? Let’s dive in and make this repair quick and stress-free.
Tools Needed
Removing a cartridge from a Moen kitchen faucet requires a few simple tools. Having the right tools makes the job easier and faster. It also helps prevent damage to the faucet parts.
Gathering these tools before starting the task saves time and frustration. Most tools are common and easy to find at home or in hardware stores.
Adjustable Wrench
An adjustable wrench fits various sizes of nuts and bolts. It helps loosen and tighten connections on the faucet. Choose one with a comfortable grip for better control.
Allen Wrench (hex Key)
A small Allen wrench removes the set screw on the faucet handle. Moen faucets often use a 3/32 inch size. This tool is essential to access the cartridge.
Flathead Screwdriver
A flathead screwdriver helps pry off the decorative cap on the handle. It also assists in loosening clips or retaining nuts. Use it gently to avoid scratches.
Needle-nose Pliers
Needle-nose pliers grip small parts and pull out the cartridge. They offer precision and control in tight spaces. Choose pliers with non-slip handles for safety.
Bucket Or Bowl
Use a bucket or bowl to catch any water that leaks during removal. It keeps the work area clean and dry. Prepare this before disassembling the faucet.

Credit: www.walmart.com
Safety Precautions
Safety comes first when removing the cartridge from a Moen kitchen faucet. Taking the right precautions helps avoid damage and injury. It also ensures the process goes smoothly and saves time. Follow these safety tips before starting your repair.
Turn Off The Water Supply
Locate the water valves under the sink. Turn both hot and cold water valves clockwise until tight. This stops water flow and prevents leaks or sprays. Never skip this step to avoid water damage.
Protect Your Hands
Wear gloves to protect your skin from sharp edges and chemicals. Gloves also improve grip on small parts. Use rubber or latex gloves for the best protection.
Clear The Work Area
Remove items from under the sink before starting. A clean area gives you space to work and prevents accidents. Keep towels handy to catch drips or spills.
Use Proper Tools
Select the right tools for the job, such as an Allen wrench or pliers. Using the wrong tools can damage the faucet or cartridge. Handle tools carefully to avoid injury.
Follow Manufacturer Instructions
Read Moen’s guide before removing the cartridge. Instructions provide important safety and repair tips. Follow each step carefully to avoid mistakes.
Shutting Off Water Supply
Before you start removing the cartridge from your Moen kitchen faucet, shutting off the water supply is a crucial step. It prevents water from spraying all over your sink and causing a mess. Taking a moment to properly turn off the water ensures a smooth and stress-free repair process.
Locating The Water Shutoff Valves
Most kitchens have shutoff valves under the sink that control the water flow to the faucet. These are usually small knobs or levers attached to the pipes. If you can’t find them, check near the water meter or main water line for the house.
Turning Off The Valves Correctly
To stop the water, turn the valve clockwise until it stops. Use gentle but firm pressure to avoid damaging the valve. If the valve hasn’t been used in a while, it might be stiff—take your time to avoid breaking it.
Verifying The Water Is Off
After shutting the valves, turn on the faucet to confirm no water is coming out. Sometimes, residual water may drip for a few seconds—wait until it completely stops. This step helps you avoid surprises when you start removing the cartridge.
Dealing With Stubborn Or Missing Valves
If the shutoff valves are stuck or missing, you can turn off the main water supply for your home. This might be less convenient but is necessary to avoid water damage. Remember to open the faucet afterward to release any pressure in the lines.
Removing Faucet Handle
Removing the faucet handle is the essential first step when you need to get to the cartridge inside your Moen kitchen faucet. It might seem tricky at first, but with a little patience and the right tools, you can do it yourself without calling a plumber. Understanding how to remove the handle properly helps you avoid damaging parts and makes the cartridge replacement smoother.
Accessing The Screw
Most Moen faucet handles hide the screw underneath a decorative cap or cover. Look closely near the base or top of the handle for a small round cap. Gently pry it off using a flathead screwdriver or a butter knife, being careful not to scratch the finish.
Once the cap is removed, you’ll see the screw holding the handle in place. Use the right size Allen wrench or screwdriver to loosen it. If the screw feels stuck, try applying a little penetrating oil and let it sit for a few minutes before trying again.
Lifting The Handle Off
After the screw is loose or removed, you can lift the handle off the faucet. Sometimes the handle might be tight or stuck due to mineral build-up or age. Wiggle it gently side to side while pulling upward to free it.
If it doesn’t budge, avoid using excessive force that could break the handle. Instead, try using a handle puller tool or wrap the base with a cloth to protect the finish and get a better grip. Have you noticed any stiffness in your faucet handle before? That’s often a sign it needs cleaning or lubrication to come off easier.
Taking Out The Cartridge
Taking out the cartridge from your Moen kitchen faucet is a key step to fixing leaks or improving water flow. It might seem tricky at first, but with the right approach, you can handle this task yourself without calling a plumber. Understanding how to identify and loosen the cartridge will save you time and frustration.
Identifying The Cartridge
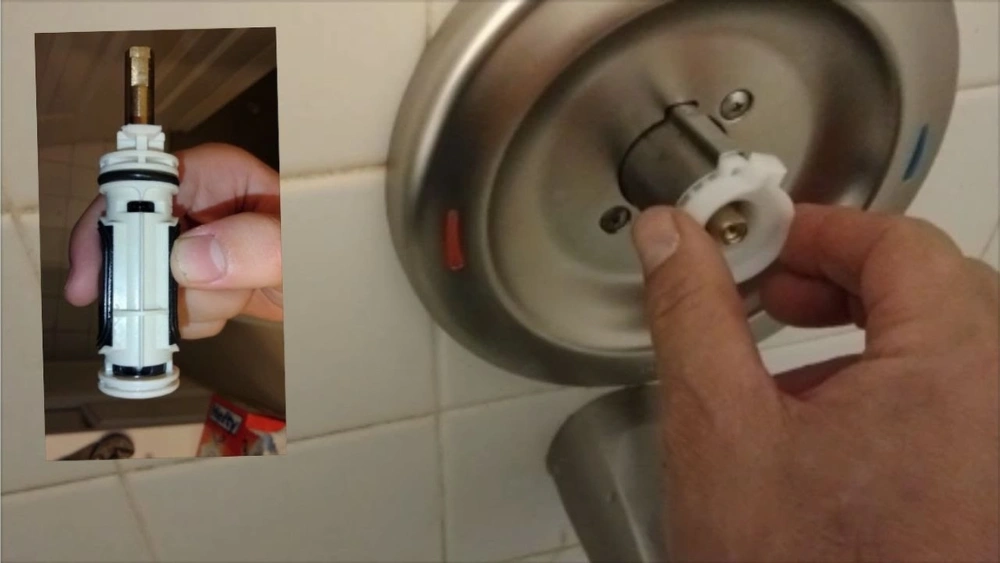
Before you remove anything, you need to know exactly what the cartridge looks like inside your faucet. Moen cartridges vary depending on the model, but most are cylindrical and made of plastic or metal. You’ll usually find it right beneath the handle, secured inside the faucet body.
Look for a small retaining clip or nut that holds the cartridge in place. If you’ve ever dealt with a stuck drawer, you know the importance of spotting the right part before pulling it out. Taking a clear photo before removal can help you remember how everything fits back together.
Loosening The Cartridge
Once you’ve identified the cartridge, the next step is to loosen it carefully. Start by turning off the water supply to avoid any mess. Use an adjustable wrench or pliers wrapped in tape to protect the finish when loosening the retaining nut or clip.
Sometimes the cartridge might feel stuck due to mineral buildup or corrosion. Applying a little penetrating oil and waiting a few minutes can make a big difference. If you meet resistance, don’t force it—gentle rocking motion usually helps loosen the cartridge without damage.
Have you ever struggled with a part that just wouldn’t budge? Patience and the right tools will make this step easier than you expect. Removing the cartridge smoothly sets you up for a quick and successful faucet repair.

Credit: www.reddit.com
Inspecting The Cartridge
After removing the cartridge from your Moen kitchen faucet, the next critical step is to carefully inspect it. This inspection helps you identify any problems that might be causing leaks or poor water flow. Taking the time to check the cartridge can save you from unnecessary replacements and ensure your faucet works smoothly.
Checking For Damage
Look closely at the cartridge for cracks, worn-out seals, or mineral buildup. Even small cracks can cause leaks, so don’t overlook any imperfections. If the cartridge looks brittle or parts seem loose, it’s a sign that replacement is necessary.
Pay special attention to the rubber O-rings and seals. These are common trouble spots that wear out over time. Damaged seals often cause dripping, so replacing them can fix the issue without changing the entire cartridge.
Cleaning The Cartridge
Sometimes, your cartridge just needs a good cleaning to restore proper function. Use a soft brush and a mixture of vinegar and water to remove mineral deposits. Avoid harsh chemicals that could damage the cartridge materials.
Rinse the cartridge thoroughly after cleaning to remove any residue. This simple step often improves water flow and stops leaks caused by debris. Have you noticed how a little cleaning can sometimes solve a problem that seemed much bigger?
Installing New Cartridge
Installing a new cartridge in your Moen kitchen faucet can dramatically improve its performance and stop annoying leaks. The key is to handle the cartridge carefully and ensure it fits perfectly into place. Let’s look at how you can align and secure the cartridge properly for smooth faucet operation.
Aligning The Cartridge
Start by checking the cartridge for any markings or tabs that match the faucet’s body. These indicators help you position the cartridge correctly without forcing it. Gently slide the cartridge into the faucet housing, making sure the tabs fit into their slots.
If you feel resistance, pause and double-check the alignment. Forcing the cartridge can damage the internal parts. Imagine fitting a puzzle piece; it should slide in smoothly if aligned right.
Securing The Cartridge In Place
Once aligned, you need to secure the cartridge firmly to prevent leaks and ensure proper function. Use the retaining clip or nut that came with your faucet model. Tighten it snugly but avoid overtightening, which can crack the cartridge or housing.
After securing, test the faucet handle movement before reassembling everything. Does it move smoothly without wobbling? If not, revisit the alignment step. Taking a moment here saves you time and frustration later.

Credit: www.reddit.com
Reassembling The Faucet
Reassembling the faucet is the final part after removing and cleaning the cartridge. This step restores the faucet’s function and prevents leaks. Follow each task carefully to ensure a proper fit and smooth operation. Take your time and handle parts gently.
Reattaching The Handle
Place the handle back over the cartridge stem. Align it carefully to fit the grooves. Press the handle down firmly but gently. Secure it with the screw you removed earlier. Tighten the screw using a screwdriver. Avoid over-tightening to prevent damage.
Turning On Water Supply
Locate the water valves under the sink. Turn both hot and cold water valves slowly to open. Check the faucet for leaks as water flows. Test the handle for smooth movement. If leaks appear, tighten connections or recheck assembly. Enjoy your fully functional Moen kitchen faucet again.
Testing The Faucet
Testing the faucet after removing and replacing the cartridge is essential. It confirms the faucet works properly and prevents future problems. This step involves checking water flow and inspecting for leaks. Simple tests help ensure your kitchen faucet is fully functional and safe to use.
Ensuring Proper Water Flow
Turn the water supply back on slowly. Open the faucet handle fully. Watch the water stream closely. It should be steady and strong without sputtering or weak spots. Test both hot and cold water to confirm balanced pressure. If water flow is uneven, the cartridge may not be seated correctly. Repeat the installation steps if needed.
Checking For Leaks
Look carefully around the base of the faucet and under the sink. Use a dry cloth to spot wet areas quickly. Watch for any drips or moisture when the faucet runs and is off. Leaks often appear near the cartridge or supply lines. Tighten connections gently if you find leaks. Persistent leaks mean the cartridge or seals need adjustment or replacement.
Troubleshooting Common Issues
Troubleshooting common issues with your Moen kitchen faucet cartridge can save you time and money. Some problems may seem tricky at first, but often they have simple fixes. Understanding these issues helps you tackle them confidently and avoid unnecessary replacements.
Handle Difficulties
If your faucet handle feels stiff or hard to move, the cartridge might be clogged or worn out. Mineral deposits can build up inside, making the handle tough to turn. Try soaking the cartridge in vinegar for a few hours to dissolve the buildup.
Sometimes, the handle may not return to its original position after use. This often means the cartridge’s internal parts are damaged. Check for cracks or wear, and replace the cartridge if needed. Have you noticed any unusual noises when turning the handle? That can also indicate cartridge problems.
Water Flow Problems
Weak or inconsistent water flow usually points to a clogged cartridge or aerator. Remove and clean both parts to clear any debris blocking the water. Running water through them or using a soft brush can help remove stubborn particles.
If water flow stops completely from one side of the faucet, it could be a sign that the cartridge is faulty or incorrectly installed. Double-check the cartridge placement and ensure all seals are intact. Are you using the right cartridge model? Using the wrong one can cause flow issues.
Frequently Asked Questions
How Do I Remove A Moen Kitchen Faucet Cartridge?
First, turn off the water supply. Remove the handle, then use pliers to pull out the cartridge carefully. Clean the area before installing a new cartridge.
What Tools Are Needed To Remove Moen Faucet Cartridge?
You’ll need an Allen wrench, adjustable pliers, and a flat-head screwdriver. These tools help remove the handle and pull out the cartridge safely.
How To Identify If Moen Cartridge Needs Replacement?
If your faucet leaks or has low water flow, the cartridge may be damaged. Removing and inspecting it can confirm if replacement is necessary.
Can I Remove A Moen Cartridge Without Turning Off Water?
No, always turn off the water supply before removing the cartridge. This prevents water damage and makes the process safer.
Conclusion
Removing the cartridge from your Moen kitchen faucet is simple with the right steps. Take your time and follow each instruction carefully. Use basic tools and stay organized to avoid losing parts. This task helps fix leaks and improves faucet performance.
Regular maintenance keeps your kitchen running smoothly. Now you know how to handle this repair yourself. No need to call a plumber every time. Save money and gain confidence with these easy tips. Your kitchen faucet will work like new again.


