Are you looking to brighten up your outdoor space and add a touch of charm to your garden or walkway? Installing an outdoor post light is a simple and effective way to enhance your home’s curb appeal and improve safety after dark.
But if you’ve never done it before, the process might seem a bit tricky. Don’t worry—you’re about to discover an easy, step-by-step guide that will help you install your outdoor post light quickly and confidently. By the end of this article, you’ll have the know-how to transform your yard with beautiful, functional lighting that welcomes guests and keeps your property safe.
Let’s get started!
Choosing The Right Post Light
Choosing the right outdoor post light is crucial for enhancing your exterior space. The perfect post light provides both style and functionality. It’s essential to consider various factors before purchasing. This section will guide you through the choices and help you make an informed decision.
Types Of Outdoor Post Lights
Outdoor post lights come in various types to suit different needs. Here are some common options:
- Solar-powered lights are eco-friendly and cost-effective.
- Hardwired lights offer consistent illumination and durability.
- Battery-operated lights are versatile and easy to install.
Consider the energy source when choosing a light type. It affects maintenance and overall cost.
Materials And Finishes
Materials and finishes play a key role in the durability and appearance of post lights. Popular materials include:
- Metal, which offers durability and a modern look.
- Glass, which provides elegant transparency and light diffusion.
- Plastic, which is lightweight and budget-friendly.
Finishes vary from polished to matte. Choose one that complements your home’s exterior.
Considering Light Brightness And Style
Brightness affects the ambiance and functionality of your space. Consider:
- Low brightness for a cozy, intimate setting.
- High brightness for security and visibility.
Style is another important factor. It should match the architectural theme of your home. Options range from classic to contemporary designs. Choose a style that adds charm and elegance to your surroundings.
Gathering Tools And Materials
Before you start installing your outdoor post light, gathering the right tools and materials is crucial. Having everything at hand saves time and prevents frustration during the process. It also ensures your installation is safe, efficient, and long-lasting.
Essential Tools Checklist
Make sure you have these tools ready to avoid interruptions:
- Drill and drill bits:For making holes in the post and ground.
- Screwdrivers:Both flathead and Phillips for fastening screws.
- Wire strippers:To safely strip electrical wires.
- Voltage tester:To check if wires are live before working on them.
- Measuring tape:To ensure correct placement and height of the post light.
- Level:To keep the post perfectly vertical.
- Shovel or post hole digger:To dig the hole where the post will stand.
Safety Gear To Use
Your safety should never be overlooked. Wearing the right gear protects you from accidents and injuries.
- Safety glasses:Shield your eyes from flying debris and dust.
- Gloves:Protect your hands from sharp edges and electrical shocks.
- Closed-toe shoes:Prevent injuries in case heavy tools or materials fall.
- Dust mask:Useful if you are digging or working with dusty materials.
Have you ever underestimated the importance of safety gear and paid the price? Don’t let that be your story.
Selecting Compatible Electrical Components
Choosing the right electrical parts is key to a safe and functional outdoor post light. Check that the wiring and fixtures are rated for outdoor use to withstand weather conditions.
Use waterproof connectors and weatherproof boxes to protect connections. Make sure the voltage and wattage ratings match your post light specifications.
Think about compatibility: Are your wires and connectors designed to work together? Using mismatched components can cause shorts or failures down the line.
Preparing The Installation Site
Preparing the installation site is a crucial first step for mounting outdoor post lights. This phase ensures safety and optimal placement. It helps avoid future problems and makes the installation smooth. Careful preparation creates a solid foundation for the light post.
Selecting The Perfect Location
Choose a spot that enhances your outdoor space. Consider areas near pathways, driveways, or garden features. The location should provide enough light without blocking views. Avoid spots too close to trees or large bushes. Think about the light’s reach and the post’s height.
Checking Underground Utilities
Before digging, locate any buried cables or pipes. Contact local utility companies for maps or use a cable detector. This prevents damage to water, gas, or electrical lines. Avoiding these hazards keeps the installation safe and legal. Take your time to ensure the area is clear.
Marking And Measuring Placement
Mark the exact spot for the post with spray paint or stakes. Measure the distance from nearby structures and pathways. Use a level or tape measure for accuracy. Double-check measurements to ensure even spacing and alignment. Proper marking saves time and avoids mistakes during installation.

Credit: www.englishlampposts.co.uk
Installing The Post
Installing the post is a key part of setting up your outdoor post light. It ensures the light stands firm and looks great. Proper installation avoids wobbling and keeps the light safe during bad weather.
Digging The Hole
Start by digging a hole for the post. The hole should be deep enough to hold the post steady. Usually, 1/3 of the post length goes underground. Make the hole wider than the post to fit concrete later.
Setting The Post Securely
Place the post in the hole. Use a level to check if it is straight. Hold the post steady while preparing for concrete. Make sure the post does not move or tilt.
Using Concrete For Stability
Mix concrete according to the package instructions. Pour the concrete around the post in the hole. Fill the hole completely and tap the sides to remove air bubbles. Let the concrete dry for at least 24 hours before attaching the light.
Wiring The Outdoor Light
Wiring an outdoor post light requires care and attention to ensure safety and proper function. Electrical work outside must resist weather and moisture. Follow basic wiring rules and use the right tools for a secure setup. Understanding the wiring process makes installation easier and safer.
Running Electrical Cables
Choose outdoor-rated cables designed for underground or exposed use. Plan the cable path from the power source to the post light. Avoid sharp bends or places where the cable can be damaged. Use conduit to protect the wires, especially if buried underground. Leave enough cable length at the post for easy connections.
Connecting Wires Safely
Turn off the power at the breaker before starting any connections. Strip the wire ends carefully without damaging the copper. Match wire colors: black (hot), white (neutral), and green or bare (ground). Use waterproof wire connectors or gel-filled wire nuts to prevent moisture entry. Secure all connections tightly and place them inside a weatherproof junction box.
Testing Electrical Connections
Restore power after all connections are complete. Use a voltage tester to check if the light receives power. Turn the light switch on and off to confirm operation. Look for flickering or dim light, which may indicate loose wiring. If problems appear, switch off power and recheck all connections carefully.
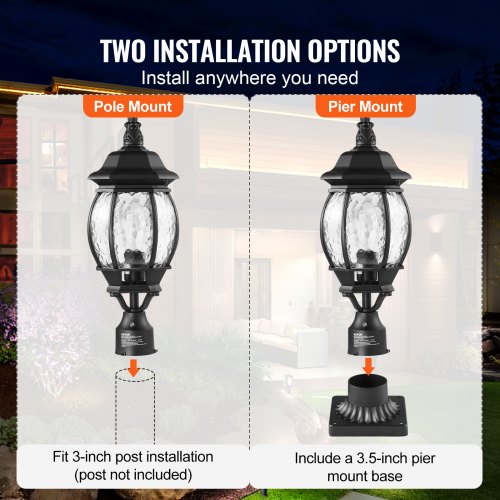
Credit: www.vevor.com
Mounting The Light Fixture
Mounting the light fixture on your outdoor post is a crucial step that ensures your lighting is both functional and visually appealing. It’s not just about attaching the fixture; you want it stable, secure, and protected against the elements. Paying attention to the details here will save you headaches down the road.
Attaching The Fixture To The Post
Start by aligning the mounting bracket with the top of the post. Most fixtures come with pre-drilled holes, making it easy to match up with your post. Use screws that are suitable for outdoor use, such as stainless steel or coated screws, to prevent rust.
Make sure the fixture is level before fully tightening the screws. A crooked light not only looks unprofessional but can affect how the light spreads. If the post surface is uneven, use shims or weather-resistant sealant to stabilize the base.
Securing Bulbs And Shades
Once the fixture is firmly attached, focus on installing the bulbs and shades. Use bulbs recommended by the manufacturer to avoid overheating or electrical issues. LED bulbs are a great choice for energy efficiency and durability outdoors.
Secure the shades carefully; loose shades can rattle in the wind or fall off. Some fixtures use clips, screws, or twist locks—make sure these are tightened properly. Have you noticed how a simple loose shade can turn a beautiful fixture into an eyesore?
Weatherproofing The Installation
Outdoor fixtures face rain, wind, and temperature changes daily. Apply silicone caulk or a waterproof sealant around the base of the fixture to block moisture from seeping in. Don’t forget to seal around screw holes and wiring entry points.
Check that any rubber gaskets or seals included with your fixture are positioned correctly. These act as the first defense against water intrusion. You can test your work by gently spraying water over the fixture and looking for leaks inside.
Final Touches And Maintenance
Final touches and maintenance keep your outdoor post light working well. Proper care improves light quality and extends its life. Small adjustments and regular cleaning make a big difference. Troubleshooting helps solve common problems fast.
Adjusting Light Direction
Set the light angle to cover the area you want. Tilt or rotate the fixture to avoid glare. Aim the light downwards for safety and better visibility. Check the direction at night to ensure proper coverage. Adjust as seasons change for the best effect.
Cleaning And Care Tips
Clean the light regularly to remove dust and dirt. Use a soft cloth and mild soap with water. Avoid harsh chemicals that can damage the finish. Check for insects or debris blocking the light. Replace bulbs as soon as they dim or burn out.
Troubleshooting Common Issues
- Light does not turn on: Check the power source and wiring connections.
- Flickering light: Replace the bulb or inspect loose wires.
- Light stays on all night: Adjust the timer or sensor settings.
- Rust or corrosion: Clean the affected area and apply a protective coating.
- Fixture loose or wobbly: Tighten screws and secure the post firmly.
Credit: www.tiktok.com
Frequently Asked Questions
How Do I Choose The Right Outdoor Post Light?
Select a post light that suits your outdoor style and size. Consider weather resistance, brightness, and energy efficiency for durability and cost savings.
What Tools Are Needed To Install A Post Light?
You will need a drill, screwdriver, wire strippers, voltage tester, and mounting hardware. These tools ensure safe and secure installation.
Can I Install An Outdoor Post Light Myself?
Yes, with basic electrical knowledge and safety precautions, you can install it yourself. Always turn off power before working with wiring.
How Do I Connect Wiring Safely For Post Lights?
Turn off power, strip wire ends, connect matching wires using wire nuts, and secure connections with electrical tape to prevent shorts or shocks.
Conclusion
Installing outdoor post lights can brighten your yard and improve safety. Follow the steps carefully for the best results. Use the right tools and materials to avoid mistakes. Double-check your work to ensure everything is secure and safe. Enjoy the warm glow your new lights provide at night.
With a little effort, your outdoor space will look inviting and well-lit. Keep maintenance simple to extend the life of your lights. Bright evenings are just a few steps away.


