
Drilling a hole in ceramic tile might seem tricky, but you can do it right with the right tips. Whether you want to hang a picture, install a shelf, or fix something in your bathroom or kitchen, knowing how to drill without cracking the tile is key.
In this guide, you’ll learn simple, step-by-step methods that make the job easier and safer for your tiles. Keep reading, and you’ll gain the confidence to handle this task like a pro.

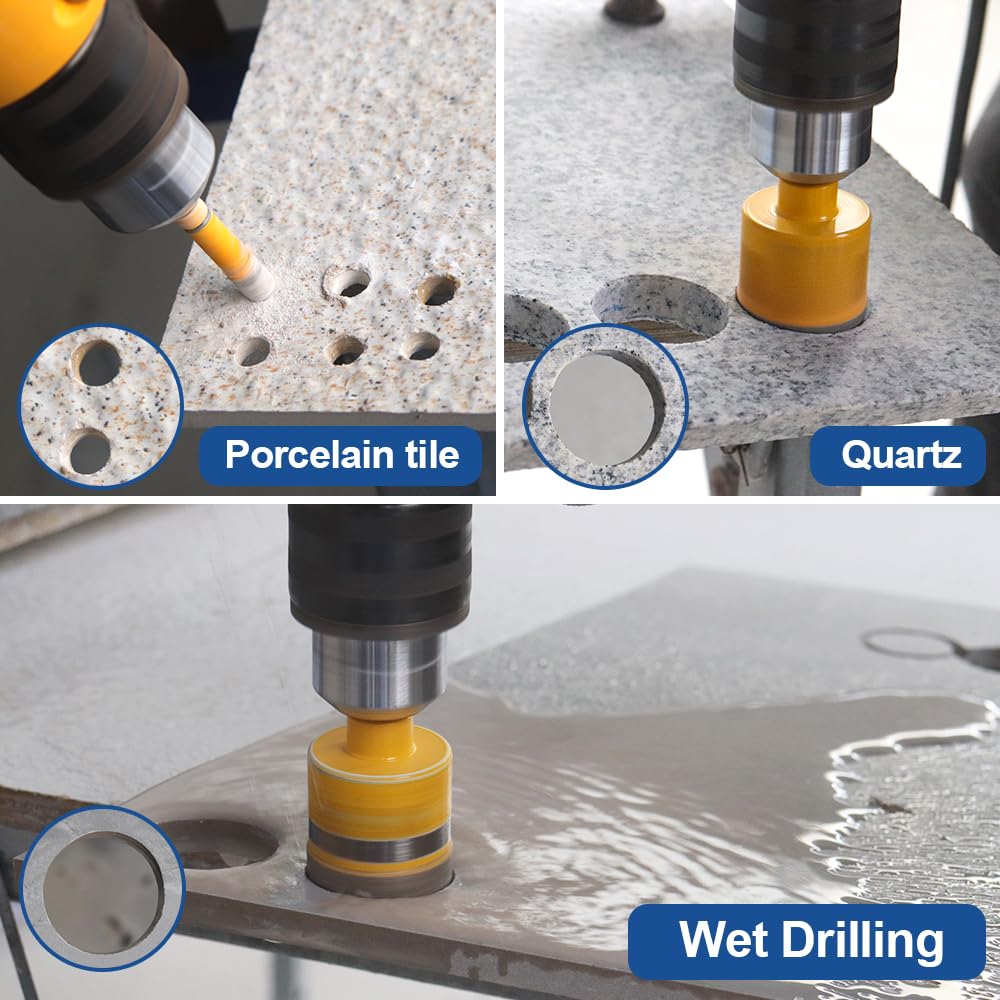
Credit: www.amazon.ca
Tools Needed
Drilling a hole in ceramic tile requires more than just a drill and a bit of luck. Using the right tools not only makes the task easier but also prevents damage to your tile. Before you start, make sure you have everything you need to get the job done cleanly and safely.
Drill
A reliable drill is your main tool. A cordless drill offers flexibility, but a corded drill provides consistent power. Choose one with adjustable speed settings so you can start slow and avoid cracking the tile.
Tile Drill Bits
Regular drill bits won’t cut it. You need special tile drill bits, usually made of carbide or diamond-tipped. These bits are designed to grind through hard surfaces without breaking the tile.
Masking Tape
Masking tape helps keep your drill bit from slipping on the smooth tile surface. Apply a small piece right where you want to drill. This simple step can save you from ruining the tile with a misplaced hole.
Marker Or Pencil
Mark the exact spot for your hole with a pencil or a non-permanent marker. Accuracy here is key, as once you start drilling, it’s hard to adjust. A clear mark ensures you drill exactly where you want.
Safety Gear
Protect yourself with safety glasses and gloves. Ceramic shards can fly when drilling, and you don’t want them in your eyes or cuts on your hands. Safety gear keeps you focused and injury-free.
Water Or Lubricant
Keeping the drill bit cool is vital. Use water or a specialized lubricant to reduce heat buildup. This prevents the bit from dulling and protects the tile from cracking due to overheating.
Credit: www.amazon.ca
Safety Precautions
Drilling into ceramic tile requires more than just the right tools—it demands careful attention to safety. Tiles can shatter easily, and the dust created can be harmful if inhaled. Taking the right precautions protects both you and your home from damage and injury.
Wear Protective Gear
Always wear safety goggles to shield your eyes from flying shards and dust. A dust mask is essential to prevent inhaling fine particles that can irritate your lungs. Gloves help protect your hands from sharp edges and provide a better grip on your tools.
Secure The Tile And Work Area
Make sure the tile is firmly held in place before you start drilling. Movement can cause the drill bit to slip, increasing the risk of cracking the tile or hurting yourself. Clear your workspace of any clutter that could cause accidents or distractions.
Use The Right Tools For The Job
Choose a drill bit specifically designed for ceramic or glass tiles. Using the wrong bit can lead to uneven holes or broken tiles. Check your drill’s speed settings; slower speeds reduce heat buildup and prevent tile damage.
Keep Your Drill Steady And Cool
Hold the drill firmly and keep it perpendicular to the tile surface. Applying too much pressure or angling the drill can cause cracks. Use water or a lubricant to cool the drill bit and tile—it reduces dust and prevents overheating.
Prepare For Emergencies
Have a first aid kit nearby for any minor cuts or scrapes. Know where your circuit breaker is in case you need to quickly shut off power. Think about what you will do if the tile cracks—do you have a spare tile or repair kit ready?
Preparing The Tile
Preparing the tile properly is crucial before you start drilling. It ensures accuracy and prevents damage like cracking or chipping. Taking a few extra minutes at this stage can save you from costly mistakes later.
Cleaning The Surface
Start by wiping the tile with a damp cloth to remove dust, dirt, and grease. A clean surface helps the drill bit grip better and prevents slipping. If the tile has any residue from previous work, use a mild detergent and rinse thoroughly.
Have you ever tried drilling on a dusty tile? The drill bit tends to wander, making it harder to hit the exact spot. Keeping the surface spotless is a simple trick that improves your control significantly.
Marking The Spot
Use a pencil or a fine-tip marker to mark where you want to drill. Avoid using a pen or anything permanent that might stain the tile. If you want extra precision, place a piece of masking tape over the spot before marking.
The tape adds a slight texture that stops the drill bit from slipping at the start. It’s a small step but can make a huge difference when drilling into glossy ceramic. Have you ever experienced your drill bit sliding off the tile’s smooth surface? Masking tape is your best friend here.
Choosing The Right Drill Bit
Choosing the right drill bit is crucial when working with ceramic tile. The wrong bit can cause cracks, chips, or even damage the drill itself. Picking the right tool saves you time and keeps your tile looking flawless.
Types Of Drill Bits
Not all drill bits are made for ceramic tiles. You need a bit designed to cut through hard, brittle surfaces without breaking them.
- Masonry Bits:Often used for concrete or brick, but not ideal for delicate ceramic tiles.
- Carbide-Tipped Bits:Strong and sharp, these handle ceramic tiles better than masonry bits.
- Diamond-Tipped Bits:Designed specifically for hard materials like ceramic and glass, they offer precision and durability.
- Spade Bits:Not recommended since they can easily crack tiles.
Which type you choose depends on your tile’s hardness and the hole size needed. Have you ever struggled with bits that just wouldn’t cut through your tile?
Diamond Vs. Carbide
Diamond and carbide bits are the most popular choices for ceramic tile. But which one fits your project better?
| Feature | Diamond-Tipped Bit | Carbide-Tipped Bit |
|---|---|---|
| Durability | Extremely durable, stays sharp longer | Less durable, wears out faster |
| Cost | More expensive upfront | More affordable |
| Cutting Precision | High precision, cleaner holes | Good precision but may chip edges |
| Ease of Use | Requires slower speed, steady pressure | Can be used at moderate speeds |
If you want a clean, professional finish and are willing to invest a bit more, diamond bits make sense. On a recent project, I switched to diamond bits after struggling with carbide ones that chipped the tile edges. The difference was clear—clean holes without damage saved me hours of patching.
Ask yourself: is it better to spend a little more now to avoid frustration and extra work later? Your choice of drill bit affects not just the hole, but the whole project’s success.
Setting Up The Drill
Setting up your drill correctly is key to making a clean hole in ceramic tile without cracks or damage. The right adjustments and tools can save you a lot of frustration and help you achieve professional results. Let’s look at how to prepare your drill for this delicate task.
Adjusting Speed
Start by setting your drill to a low speed. Ceramic tiles are fragile and high speed can cause them to crack or shatter. A slow, steady pace lets the drill bit cut through the tile smoothly without overheating.
Many drills have variable speed triggers—use them to maintain control. If your drill only has fixed speeds, choose the lowest setting available. You want to avoid applying too much pressure; let the drill do the work.
Have you noticed how a steady, gentle approach in other tasks often leads to better results? Drilling tile is no different.
Using A Guide
Keeping the drill bit from slipping is one of the biggest challenges when starting a hole in ceramic tile. To prevent this, use a guide to mark your spot precisely.
- Masking Tape:Place a small piece of masking tape over the spot where you want to drill. The tape adds grip and stops the bit from skidding.
- Template or Jig:If you need multiple holes or precise alignment, a drilling template or jig can help keep everything straight.
- Center Punch:For extra precision, gently tap a center punch to make a small indentation on the tile. This acts as a physical guide for the drill bit.
Using these simple tools can drastically improve your accuracy and reduce the risk of mistakes. Have you ever tried drilling without a guide and ended up with a crooked hole? This step can prevent that frustration.

Credit: www.tilemountain.co.uk
Drilling Technique
Drilling into ceramic tile requires a careful technique to avoid cracks and ensure a clean hole. The key lies in controlling the drill’s pressure and managing heat buildup. Understanding these aspects will help you achieve professional results, even if you’re new to DIY projects.
Applying Pressure
Use steady, gentle pressure while drilling. Pressing too hard can crack the tile or damage the drill bit.
Let the drill do the work. If you find yourself pushing harder, slow down and check your drill bit’s condition.
A good tip is to start with a slow speed to create a small guide hole, then gradually increase speed and pressure. This approach keeps you in control and reduces the risk of slipping.
Cooling The Bit
Heat buildup is a common cause of drill bit wear and tile damage. To prevent this, keep the bit cool by periodically dipping it in water.
You can also spray water on the tile surface while drilling. This not only cools the bit but also reduces dust and debris.
Have you tried drilling without cooling? You might notice the drill bit gets dull quickly and the tile heats up, increasing the chance of cracks. Cooling might seem like extra work, but it saves time and money in the long run.
Handling Cracks And Chips
Cracks and chips can quickly turn a simple tile drilling job into a frustrating experience. Handling these issues carefully ensures your tile stays intact and looks professional. Knowing how to prevent damage and fix minor mishaps can save you time, money, and a lot of headaches.
Prevention Tips
Start by choosing the right drill bit—diamond-tipped or carbide-tipped bits work best for ceramic tiles. Always use a low-speed setting and apply gentle, steady pressure to avoid sudden cracks.
Place masking tape over the drilling spot to add grip and reduce slipping. This simple trick also helps prevent the drill bit from wandering, which often causes chips.
Keep the tile cool by spraying water frequently during drilling. Heat build-up can weaken the tile and increase the risk of cracking.
Repair Methods
If you notice small chips or cracks, don’t panic. Clear away any loose debris and use a clear epoxy or ceramic filler to seal the damage. These products dry hard and blend well with the tile surface.
For hairline cracks, applying a thin layer of clear nail polish can prevent them from spreading further. It’s a quick fix that many DIYers overlook.
Have you ever tried patching a chip only to make it more noticeable? Matching the color and texture can be tricky, but taking your time and using fine brushes for application can make a huge difference.
Post-drilling Care
After drilling a hole in ceramic tile, taking proper care of the area is crucial to maintain the tile’s appearance and durability. Neglecting post-drilling care can lead to damage, stains, or even water seepage over time. Let’s look at two important steps to protect your tile and keep your work looking professional.
Cleaning The Area
Immediately after drilling, you’ll notice dust and debris around the hole. Use a soft brush or vacuum to remove loose particles gently. Avoid wiping with a dry cloth first, as it might spread dust over the tile surface.
Next, dampen a clean cloth with water and mild soap to wipe the area carefully. This removes any remaining dust and prevents the tile from becoming scratched by abrasive particles. Make sure the tile dries completely before moving on.
Sealing The Edges
Have you ever seen water stains or discoloration around drilled holes? This often happens because the edges aren’t sealed. Applying a clear silicone sealant around the hole protects the tile from moisture and prevents cracks from developing.
Use a small brush or a fine nozzle tube to apply the sealant evenly around the hole’s edge. Don’t forget to smooth it out with a damp finger or tool for a clean finish. This step adds an extra layer of defense and keeps your tile looking flawless for years.
Frequently Asked Questions
How Do You Start Drilling A Ceramic Tile?
Begin by marking the spot clearly. Use masking tape to prevent slipping. Start with a small drill bit at low speed to create a guide hole.
What Drill Bit Is Best For Ceramic Tiles?
Use a carbide-tipped or diamond-tipped drill bit. These bits are designed to cut through hard, brittle surfaces without cracking the tile.
How To Avoid Cracking Ceramic Tiles While Drilling?
Apply gentle pressure and keep the drill speed low. Use water to cool the drill bit and reduce heat buildup during drilling.
Can I Use A Regular Drill For Ceramic Tiles?
A regular drill works if equipped with the right bit. Ensure you use a specialized tile drill bit and maintain low speed to avoid damage.
Conclusion
Drilling a hole in ceramic tile is simple with the right tools. Use a drill bit made for tiles to avoid cracks. Take your time and keep the drill steady. Apply light pressure and let the drill do the work.
Always wear safety glasses to protect your eyes. With patience, you can create clean holes easily. Practice on a spare tile first if unsure. Now, you have the basics to start your tile project confidently.


