Are you tired of flickering lights or high energy bills from your old fluorescent fixtures? Switching to ballast bypass LED bulbs could be the perfect solution for you.
But the idea of installing them might seem tricky or confusing right now. Don’t worry—this guide will walk you through each simple step to help you upgrade your lighting safely and quickly. By the end, you’ll know exactly how to install ballast bypass LED bulbs and enjoy brighter, more efficient lighting in your space.
Keep reading—you’re just moments away from a smarter, cleaner lighting setup!
Understanding Ballast Bypass Led Bulbs
Understanding ballast bypass LED bulbs is key before you start installing them. These bulbs are designed to work without the traditional fluorescent ballast, making them different from regular LED replacements. Knowing what they are and how they work helps you avoid common installation mistakes and ensures you get the most out of your lighting upgrade.
What Are Ballast Bypass Bulbs?
Ballast bypass bulbs, also called direct wire LED tubes, skip the fluorescent ballast entirely. Instead, you wire the bulb directly to the main power supply. This means the old ballast is removed or disconnected during installation.
These bulbs look similar to traditional fluorescent tubes but run on a different principle. Because they don’t rely on a ballast, they often last longer and use less energy. Have you ever had a fluorescent light flicker and thought it was the bulb? Often, it’s the ballast failing, which these bulbs avoid.
Benefits Of Ballast Bypass Led Bulbs
- Energy Savings:Without a ballast consuming power, your lighting system becomes more efficient.
- Reduced Maintenance:No ballast means fewer parts that can fail, lowering repair costs and effort.
- Improved Light Quality:These bulbs deliver steady, flicker-free light, enhancing comfort in your space.
- Longer Lifespan:Direct wiring reduces heat and electrical stress, helping your bulbs last much longer.
- Cost-Effective:While the initial installation may take a bit longer, you save money on replacement ballasts and energy bills over time.
Imagine cutting your lighting maintenance in half while boosting brightness and saving on electricity. Wouldn’t that be a smart upgrade for your home or business?

Credit: www.lepro.com
Safety Precautions
Installing ballast bypass LED bulbs can save energy and reduce maintenance, but safety must be your top priority. Skipping safety steps can lead to electrical shocks or damage to your lighting system. Before you start, understanding the right tools and protective measures is essential to keep you safe and ensure a smooth installation.
Tools And Equipment Needed
Gathering the right tools beforehand makes the process faster and safer. You’ll need:
- Voltage tester– to confirm the power is off before you touch any wires.
- Screwdrivers– both flathead and Phillips to open fixtures and secure connections.
- Wire strippers– for cleanly removing insulation from wires.
- Electrical tape– to insulate wire connections after bypassing the ballast.
- Wire nuts– to safely join wires together.
Having these tools ready means you won’t have to stop midway, reducing the risk of accidents. What tools do you usually overlook before starting electrical work?
Safety Gear And Measures
Protecting yourself is non-negotiable during electrical work. Always wear insulated gloves to guard against shocks. Safety goggles protect your eyes from dust or sparks, especially when working overhead.
Turn off the power at the circuit breaker before you begin. Use the voltage tester to double-check that no current is flowing in the fixture. Never rely on just switching off the light switch.
Work in a well-lit area and avoid standing on unstable surfaces. A sturdy ladder or platform ensures you stay balanced. Have a phone nearby in case you need help quickly.
Preparation Steps
Preparing to install ballast bypass LED bulbs is essential for safety and success. Proper preparation avoids electrical shocks and damage to the fixture. Follow these key steps to get ready.
Turning Off Power
Always turn off the power before touching any electrical parts. Use the circuit breaker or switch to cut power to the light fixture. Confirm that the light is off by flipping the switch. This step prevents electrical accidents and protects you during installation.
Removing The Old Bulb
Carefully remove the old fluorescent bulb from the fixture. Wear gloves to protect your hands from broken glass. Gently twist or pull the bulb, depending on the fixture type. Dispose of the old bulb properly, following local guidelines.
Wiring Instructions
Wiring ballast bypass LED bulbs requires careful attention to detail to ensure safety and proper function. You’ll need to modify the existing fixture wiring by removing the ballast and connecting the wires correctly. This process might seem intimidating, but with clear instructions, you can handle it confidently.
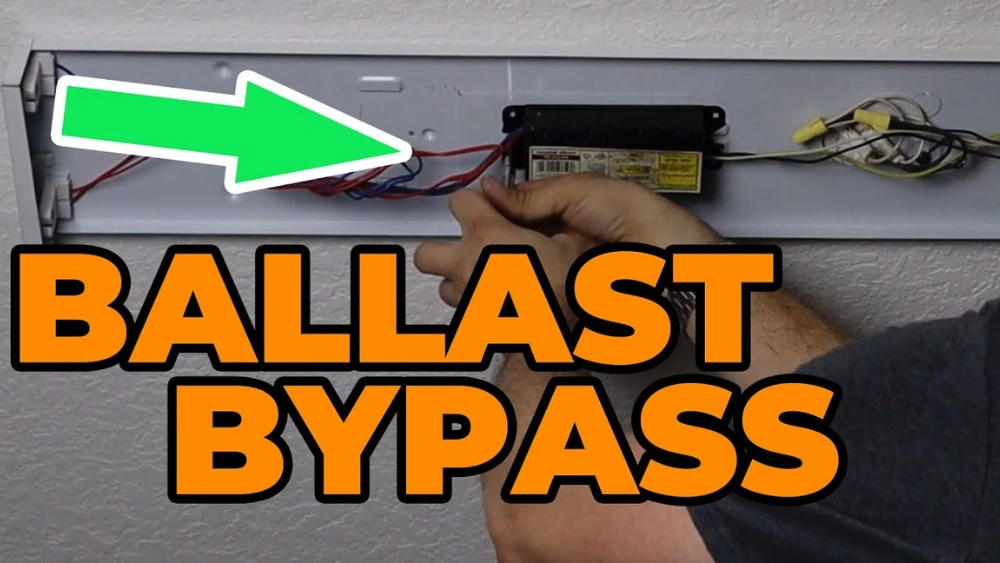
Removing The Ballast
First, turn off the power to your light fixture at the breaker box to avoid any electrical hazards. Open the fixture cover and locate the ballast, which is usually a rectangular box connected to the wires inside.
Disconnect the wires attached to the ballast by cutting or unscrewing them. Remove the ballast from the fixture entirely, freeing up space for your LED bulb wiring. Keep in mind that ballasts can vary in size and shape, so take a photo before removal to help with your wiring later.
Connecting The Wires
After removing the ballast, you’ll see the fixture’s input wires—typically black (hot), white (neutral), and green or bare (ground). Connect the black wire from the power source directly to the black wire on the LED bulb socket.
Next, attach the white wire from the power source to the white wire on the socket. Make sure to secure all wire connections using wire nuts or electrical tape to prevent loose contacts.
Don’t forget to connect the ground wire to the metal fixture or grounding point if available. Proper grounding reduces the risk of electrical shock and ensures your installation meets safety codes.
Have you checked your bulb’s wiring diagram? Always compare your fixture’s wires to the LED bulb’s instructions. This simple step can prevent common wiring mistakes and save you time troubleshooting later.
Installing The Led Bulb
Installing the LED bulb is a straightforward process, but it requires careful attention to detail to ensure safety and optimal performance. Handling the bulb with care and knowing exactly how to fit it can save you time and prevent damage. Let’s focus on the crucial steps to position and secure your ballast bypass LED bulb properly.
Positioning The Bulb
Start by carefully aligning the LED bulb with the socket. The pins should fit smoothly into the fixture without forcing them. If you feel resistance, double-check the orientation—LED bulbs often have specific directions to ensure correct electrical contact.
Make sure the bulb sits flush against the fixture to avoid any gaps. This helps in proper heat dissipation and stable light distribution. Have you noticed uneven lighting or flickering? Incorrect positioning could be the culprit.
Securing The Bulb
Once the bulb is correctly positioned, gently twist or push it into place, depending on the fixture type. Your goal is a snug fit that won’t wobble but also isn’t too tight to risk breaking the bulb.
Check for any locking mechanisms or clips in your fixture and engage them to hold the bulb securely. This prevents accidental dislodging, especially in areas with vibrations or movement. Have you ever had a light flicker because the bulb wasn’t secured? Avoid that hassle by taking this step seriously.

Credit: www.amazon.com
Testing The Installation
Testing the installation of ballast bypass LED bulbs is essential to ensure everything works correctly. This step confirms the wiring is safe and the bulbs function as expected. Follow these guidelines to check the setup thoroughly and avoid any issues.
Turning The Power Back On
Start by switching the circuit breaker or fuse back on. This restores electricity to the lighting fixture. Avoid touching any wires or bulbs during this process to stay safe. Listen for any unusual sounds or smells that might indicate a problem.
Checking The Light Functionality
Turn on the light switch and watch the LED bulbs carefully. They should light up immediately without flickering. If the bulbs do not turn on, double-check the wiring connections. Make sure the bulbs are fully inserted into the sockets. Look for any signs of dimming or inconsistent light output. Proper functioning means the installation is successful and safe to use.
Troubleshooting Common Issues
Troubleshooting common issues is key to a smooth ballast bypass LED bulb installation. These problems can stop your lights from working properly. Fixing them quickly saves time and frustration. Below are common problems and easy fixes to get your lights shining bright again.
Flickering Bulbs
Flickering bulbs often mean a loose connection or wrong wiring. Double-check the bulb is firmly in place. Inspect the wiring for any loose or exposed wires. Make sure the fixture’s power switch is fully on.
Sometimes, leftover ballast components cause flickering. Remove all ballast parts completely as they can interfere with the LED bulb. If flickering continues, try another bulb in the same socket to rule out a faulty bulb.
No Light Emission
No light usually means no power or wrong installation. Confirm the power supply to the fixture is active. Test the switch and circuit breaker to ensure they are working.
Check that the LED bulb is compatible with ballast bypass setup. The socket wiring must be direct to power, bypassing the ballast entirely. If unsure, consult the bulb’s instructions or a professional.

Credit: www.lepro.com
Maintenance Tips
Maintaining ballast bypass LED bulbs ensures they work efficiently for a long time. Proper care helps avoid flickering and early failure. Simple checks and cleaning keep your lighting bright and safe.
Regular Cleaning
Dust and dirt reduce light output and bulb lifespan. Use a soft, dry cloth to wipe bulbs and fixtures carefully. Avoid water or harsh chemicals that may damage the LEDs. Clean bulbs every few months or more often in dusty areas.
Long-term Performance Checks
Test bulbs regularly to spot issues early. Look for flickering, dimming, or color changes. Check the wiring and connections to ensure they are secure. Replace any faulty bulbs or parts promptly to prevent electrical problems. Monitor energy use to confirm bulbs work efficiently.
Frequently Asked Questions
What Is A Ballast Bypass Led Bulb?
A ballast bypass LED bulb is an LED lamp that operates without a fluorescent ballast. It connects directly to line voltage, improving energy efficiency and reducing flickering. This type requires rewiring the fixture to remove or bypass the ballast.
How Do You Install Ballast Bypass Led Bulbs?
Turn off power and remove the fluorescent tubes and ballast. Rewire the fixture to connect the lamp holders directly to line voltage. Insert the ballast bypass LED bulb and restore power. Follow specific wiring diagrams and safety guidelines for your fixture.
Why Choose Ballast Bypass Leds Over Traditional Bulbs?
Ballast bypass LEDs save energy by eliminating the ballast’s power consumption. They reduce maintenance costs and increase lighting efficiency. These LEDs also avoid flickering and extend bulb lifespan, making them a cost-effective, eco-friendly lighting upgrade.
Can I Install Ballast Bypass Leds Myself Safely?
Yes, if you have basic electrical skills and follow safety rules. Always turn off power before rewiring. Use the correct wiring diagram and tools. If unsure, consult a licensed electrician to avoid hazards and ensure proper installation.
Conclusion
Installing ballast bypass LED bulbs saves energy and cuts costs. The process is simple and safe when you follow steps carefully. Always turn off power before starting to avoid accidents. Double-check connections to ensure bulbs work properly. Enjoy brighter, more efficient lighting in your space.
This upgrade lasts long and requires little maintenance. A small effort brings big benefits to your home or office. Try it yourself and see the difference today.


