
Are you ready to brighten up your outdoor space with a stylish light post? Installing an outdoor light post might seem tricky, but with the right steps, you can do it yourself and add charm and safety to your yard.
Imagine coming home to a warm, welcoming glow every evening—it’s easier than you think. In this guide, you’ll find simple, clear instructions that will help you install your light post quickly and confidently. Keep reading, and soon your outdoor area will shine just the way you want it.
Choosing The Right Light Post
Choosing the right light post ensures safe and bright outdoor spaces. Focus on size, style, and material to match your area. Proper installation keeps the light steady and long-lasting.
Choosing the right light post is crucial for enhancing outdoor spaces. The perfect light post can illuminate your garden, driveway, or patio while adding a touch of elegance. Consider various factors to ensure the light post complements your home and meets your needs.
Materials And Styles
Outdoor light posts come in various materials. Common choices include metal, wood, and plastic. Metal posts, like aluminum and steel, offer durability and resistance to weather. Wood provides a classic and natural look, blending well with gardens. Plastic is lightweight and often more affordable. Style is equally important. Traditional designs feature ornate details, while modern styles focus on sleek lines. Choose a style that matches your home’s architecture.
Height And Size Considerations
Height affects the light spread and visibility. Taller posts illuminate larger areas, ideal for driveways and paths. Shorter posts create ambiance in gardens or patios. Consider the size of the light fixture itself. Larger fixtures provide more light, while smaller ones offer subtle illumination. Ensure the post size fits the space without overwhelming it. Measure the area where you plan to install the post.
Matching Your Outdoor Decor
Select a light post that complements your outdoor decor. Consider the color and finish. Bronze or black posts often match traditional settings. White or silver might suit modern landscapes. Think about existing features like fences or furniture. The light post should blend seamlessly with these elements. A cohesive look enhances the overall appearance of your outdoor space.
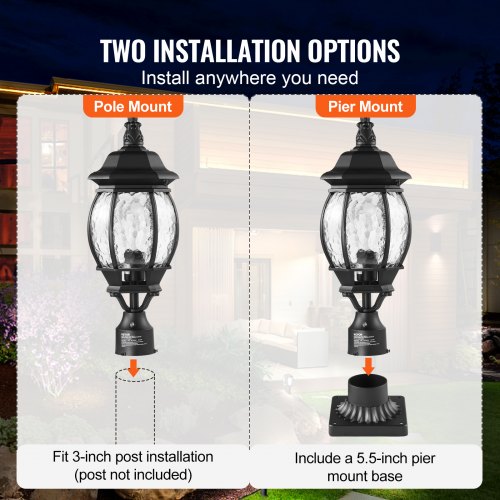
Credit: www.vevor.ca
Gathering Necessary Tools
Gathering the right tools is the first step to installing an outdoor light post. Having everything ready makes the process smoother and faster. It helps avoid interruptions and keeps the work safe.
Focus on tools that fit your specific light post model and outdoor conditions. Proper tools ensure a stable and lasting installation. Safety gear is just as important to protect yourself during the project.
Basic Tools Checklist
- Shovel or post hole digger for digging the hole
- Level to keep the post straight
- Measuring tape for accurate depth and placement
- Concrete mix to secure the post in the ground
- Wrench or screwdriver for assembling parts
- Wire stripper and electrical tape for wiring
- Drill with bits suitable for outdoor materials
Safety Equipment
- Gloves to protect your hands from sharp edges
- Safety glasses to shield eyes from debris
- Sturdy shoes to prevent injuries from heavy tools
- Long sleeves and pants to guard against scrapes
- Hearing protection if using loud power tools
Preparing The Installation Site
Preparing the installation site is the first and crucial part of setting up an outdoor light post. This step ensures safety and proper placement for the best lighting effect. Taking time to prepare the site will save effort and prevent issues later.
Selecting The Location
Choose a spot that provides good illumination for pathways or garden areas. Avoid places too close to trees or structures that may block the light. The location should also allow easy access for wiring and maintenance.
Consider the height of the light post and how it fits with the surroundings. Pick a place where the light can cover the desired area without creating shadows or glare.
Checking For Underground Utilities
Before digging, check for underground utilities like water, gas, or electric lines. Contact your local utility company or use a utility locator service to mark any buried cables. This step prevents accidents and damage.
Ignoring this can cause serious hazards. Take your time to verify the area is safe for digging. Use appropriate tools to detect hidden pipes or wires.
Marking The Spot
Use spray paint, stakes, or flags to mark the exact spot for the light post. This makes digging easier and more precise. Ensure the marks are visible and stay in place during installation.
Check the marks from different angles to confirm the placement looks correct. This simple step keeps the project organized and helps avoid mistakes.
Installing The Post Foundation
Installing the post foundation is the most crucial part of setting up your outdoor light post. A solid foundation ensures stability and longevity, especially when facing weather changes. Taking the time to prepare this base correctly saves you from future repairs and wobbly posts.
Digging The Hole
Start by digging a hole deep enough to support your light post firmly. The depth usually depends on the height of the post—generally, one-third of the post’s length should go underground. Make sure the hole is wider than the post base to allow room for concrete and proper alignment.
Use a post hole digger or a shovel, and check the hole’s depth regularly with a tape measure. Is your soil sandy or clay-heavy? That affects how deep and wide the hole should be. You might want to dig a little extra in loose soil to ensure stability.
Setting The Post Base
Once the hole is ready, position the post base or anchor inside it. If your post has a metal base, make sure it sits level and upright. Use a carpenter’s level to check both vertical and horizontal alignment—this step determines how straight your post will stand.
Sometimes, small adjustments are necessary to get it perfectly straight. Don’t rush this part; a slight tilt now can cause bigger problems later. Secure the base temporarily with stakes or braces before moving on.
Pouring Concrete
Mix concrete according to the package instructions or buy pre-mixed concrete for convenience. Pour the concrete into the hole around the post base, filling it up to ground level. Tap the sides of the hole gently to release any air pockets for a stronger hold.
After pouring, smooth the surface and slope it slightly away from the post to prevent water pooling. Let the concrete cure for at least 24 to 48 hours before attaching the post or applying any weight. Have you planned for weather delays? Cold or wet days can extend curing time significantly.
Mounting The Light Post
Mounting the light post properly is key to its durability and appearance. This process makes sure the post stands firm and looks great in your outdoor space. Careful mounting prevents future tilting or damage from weather.
Follow these steps to secure the post safely and keep it perfectly aligned. Taking time here saves effort later and ensures your light post serves well for years.
Securing The Post
Start by digging a hole at least 2 feet deep for stability. Use gravel at the bottom for drainage. Place the post in the hole. Use concrete to fill around it for a strong hold.
- Mix concrete according to package instructions.
- Pour concrete around the post evenly.
- Check the post position before concrete sets.
- Allow concrete to cure fully, usually 24 to 48 hours.
Ensuring Level Alignment
Use a level tool to check the post’s vertical position. Adjust the post until it stands perfectly straight. This step avoids leaning or crooked light posts.
- Place the level on two sides of the post.
- Shift the post gently if it is off-level.
- Double-check after concrete sets to confirm alignment.
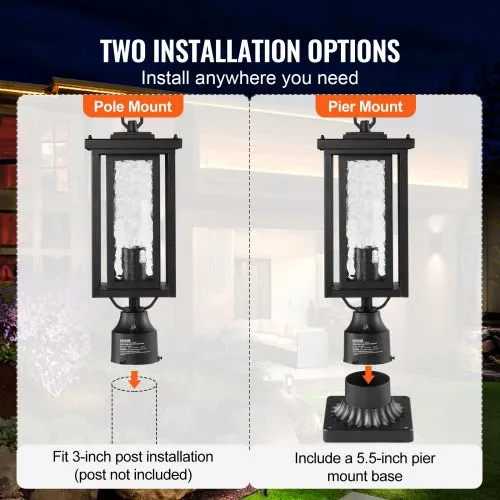
Credit: www.vevor.ca
Wiring The Outdoor Light
Wiring your outdoor light post correctly is essential for safety and functionality. It ensures your light operates smoothly and lasts for years. Let’s dive into the key steps that make wiring straightforward and reliable.
Running Electrical Cable
Start by choosing the right type of cable, usually outdoor-rated UF (underground feeder) cable for durability. Dig a trench at least 18 inches deep from your power source to the light post to protect the cable from damage and moisture.
Lay the cable in the trench without sharp bends, then cover it with soil. Don’t forget to leave extra cable length at both ends for easy connections.
Connecting Wires Safely
Always turn off the power at the circuit breaker before handling any wiring. Strip about half an inch of insulation from each wire end to prepare for connection.
Match wire colors carefully: black to black (hot), white to white (neutral), and green or bare copper to ground. Use waterproof wire connectors or electrical tape to secure the connections and protect them from moisture.
Enclose all wiring inside a weatherproof junction box attached to the post. This prevents exposure to rain and keeps your connections safe.
Testing The Electrical Connection
Before burying the trench completely, turn the power back on and test the light. Use a voltage tester to confirm current flows correctly to your light post.
If the light doesn’t turn on, double-check your wire connections and the breaker. Testing early helps avoid digging up the trench again later.
Finishing Touches
Finishing touches complete the look and function of your outdoor light post. These steps ensure safety, durability, and style. Pay attention to detail for a clean, polished result.
Installing The Light Fixture
Attach the light fixture securely to the post’s top bracket. Follow the manufacturer’s instructions carefully. Connect the wiring using wire nuts and electrical tape. Double-check all connections for safety. Use a screwdriver to tighten screws firmly. Test the light by turning the power on. Adjust the fixture angle for the best lighting effect.
Sealing And Weatherproofing
Apply silicone caulk around the fixture base to block moisture. Seal all gaps where water might enter. Use weatherproof electrical tape on exposed wires. Check the post base for cracks or holes. Fill any openings with waterproof sealant. This step protects the light post from rain and snow. Proper sealing extends the life of your installation.
Adding Decorative Elements
Enhance your light post with decorative features. Consider planting flowers or shrubs around the base. Add a decorative post cap for style and protection. Use solar-powered lanterns or hanging plants for charm. Choose elements that match your outdoor theme. Keep decorations simple to avoid clutter. Decorative touches create an inviting outdoor space.
Maintenance Tips
Maintaining your outdoor light post is key to keeping it bright and safe. Regular care prevents damage and extends the fixture’s life. Simple checks and cleaning keep the light working well all year.
Regular Cleaning
Dust and dirt reduce light brightness and cause wear. Clean the post and glass with a soft cloth and mild soap. Avoid harsh chemicals that can damage the surface. Clean at least twice a year or after storms.
Checking Electrical Components
Inspect wires and connections for damage or corrosion. Make sure all parts are dry and secure. Look for cracks or loose fittings. Turn off power before checking to avoid shocks. Fix any issues promptly to prevent failures.
Replacing Bulbs
Light bulbs burn out over time and need replacing. Choose bulbs that match the fixture’s specifications. Turn off power before changing bulbs. Handle bulbs gently and avoid touching glass with bare hands. Replace bulbs as soon as they dim or go out.
Credit: www.tiktok.com
Frequently Asked Questions
How Do I Prepare The Ground For An Outdoor Light Post?
Clear the area of debris and level the ground. Dig a hole at least 2 feet deep for stability. Use gravel for drainage and prevent water damage before setting the post.
What Materials Are Needed To Install A Light Post Outdoors?
You will need a light post kit, concrete mix, gravel, a shovel, a level, and electrical wiring tools. Safety gear like gloves and goggles is also essential.
How Long Does It Take To Install An Outdoor Light Post?
Installation typically takes 2 to 4 hours. This includes digging, setting the post in concrete, wiring, and allowing concrete to cure.
Can I Install An Outdoor Light Post Myself Safely?
Yes, with basic DIY skills and proper safety measures. Follow electrical codes and use a voltage tester to ensure safe wiring.
Conclusion
Installing an outdoor light post can brighten your yard and improve safety. Follow each step carefully to ensure a sturdy setup. Use the right tools and materials for best results. Take your time with digging and wiring to avoid mistakes.
Once installed, enjoy the warm glow and added charm it brings. Outdoor lighting makes your space more inviting at night. Keep maintenance simple by checking the post regularly. A well-installed light post lasts for years. Start your project today and see the difference it makes.


