Are you looking to keep a close eye on your home or office without constantly checking your phone? Connecting your security camera directly to your TV can give you a clear, real-time view of what matters most.
It’s easier than you might think, and once set up, you’ll have peace of mind right on your big screen. In this guide, you’ll discover simple steps to link your security camera to your TV quickly and effortlessly. Ready to boost your security and simplify monitoring?
Let’s get started!

Credit: www.eufy.com
Types Of Security Cameras
Security cameras come in various types, such as wired, wireless, and IP cameras. Connecting them to a TV often involves using cables or wireless adapters. Each type has different steps for setup, depending on its design and compatibility with your TV.
When connecting a security camera to a TV, understanding the types of cameras is crucial. Different cameras offer varying features and installation processes. Knowing these differences helps choose the best option for your needs.Wired Cameras
Wired cameras connect directly to a TV using cables. They provide stable and secure video signals. These cameras often require professional installation due to complex wiring. They are ideal for permanent setups and large areas. Wired cameras are less prone to interference.Wireless Cameras
Wireless cameras transmit video signals without cables. They use Wi-Fi or Bluetooth technology. These cameras are easy to install and move around. They are perfect for temporary setups or small spaces. Wireless cameras may face signal interference.Ip Cameras Vs Analog Cameras
IP cameras use digital signals for video transmission. They offer high-resolution images and remote access. These cameras connect to the internet, enabling viewing from anywhere. Analog cameras use traditional video signals. They are often cheaper and simple to use. Analog cameras require direct connection to a TV. IP cameras provide advanced features and better image quality.Tv Connection Options
Connecting your security camera to your TV can be straightforward if you understand the different connection options available. Each type of connection offers unique benefits and compatibility based on your camera and TV models. Let’s look at the most common ways to link your security camera to a TV.
Using Hdmi
HDMI is the most popular and reliable connection for high-quality video and audio. If your security camera or its DVR system has an HDMI output, you can plug it directly into your TV’s HDMI port.
This connection delivers crisp images and sound with minimal lag. Plus, HDMI cables are widely available and easy to use—you just need to select the correct HDMI input on your TV.
Have you checked if your camera supports HDMI? This is often the best choice if you want simple, plug-and-play functionality.
Using Rca Cables
Older security cameras or DVRs may use RCA cables with red, white, and yellow connectors. The yellow cable carries video, while red and white carry audio signals.
Many TVs still include RCA ports, especially older models. While the video quality won’t match HDMI, RCA is a reliable way to connect without extra adapters.
Make sure to match the colors correctly on both ends to avoid signal issues. Have you noticed how RCA connections limit you to standard definition? That’s something to consider if you want clearer images.
Using Vga Or Other Ports
Some security systems and monitors use VGA ports to transmit video signals. VGA supports video only, so you’ll need separate audio connections if your system includes sound.
If your TV has a VGA input, this can be an option, but many modern TVs have phased out VGA in favor of HDMI. Other ports like component video (red, green, blue cables) might also be available on certain cameras and TVs.
Have you explored your TV’s input options? Identifying the available ports can save you from buying unnecessary adapters and help you choose the most efficient connection.
Connecting Wired Cameras To Tv
Connecting wired security cameras to your TV allows you to monitor footage in real-time without relying on additional devices. It’s a straightforward process if you know where to look and what cables to use. Let’s break down the steps to get your wired camera image showing on your TV screen clearly.
Locate Camera Output
First, find the output port on your wired security camera. Most cameras have either an RCA (yellow) output or a BNC connector. Check the back or side of the camera for these ports; sometimes, they’re labeled as “video out.”
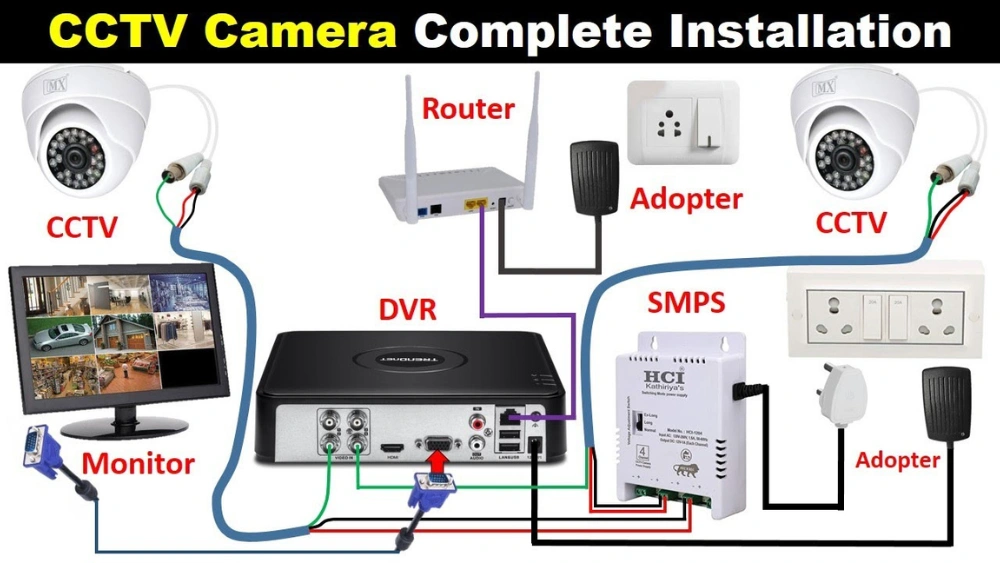
If you have a DVR system connected to multiple cameras, the output might come from the DVR instead of the camera itself. Identifying the correct output source is key to connecting your camera to the TV successfully.
Connect With Appropriate Cable
Once you’ve found the output, match it with the right cable. RCA cables are common and usually have yellow connectors for video. BNC connectors require a coaxial cable with matching ends.
Make sure the cable length is enough to reach your TV without stretching or tangling. If your TV doesn’t have a direct matching input, you may need an adapter, like BNC to RCA.
- Check the camera port type.
- Choose matching cable (RCA or coaxial).
- Use adapters if needed.
Adjust Tv Input Settings
After connecting the camera, turn on your TV and switch to the correct input source. Use your TV remote to cycle through inputs like AV1, AV2, or HDMI if you used an adapter. The camera’s live feed should appear once you select the right input.
If you don’t see the feed immediately, double-check cable connections and try another input port. Some TVs require you to manually enable or fine-tune the input settings for analog signals.
Connecting Wireless Cameras To Tv
Connecting wireless security cameras to your TV allows easy monitoring without extra cables. Wireless cameras send video signals through Wi-Fi or radio waves. TVs can display these signals in real-time for convenience and security.
Several ways exist to connect wireless cameras to a TV. The choice depends on your TV type and camera model. Each method offers a simple setup to view footage quickly.
Using Wireless Receiver
Wireless receivers capture signals from your security camera. They act as a bridge between the camera and the TV. Connect the receiver to your TV using HDMI or RCA cables. The receiver pairs with your camera automatically or by pressing a button.
This method works well for cameras without smart features. The video feeds appear on your TV screen instantly. The receiver range varies, so place the camera and receiver nearby.
Smart Tv Apps
Many smart TVs support apps for wireless cameras. Download the camera’s app from your TV’s app store. Open the app and connect to the camera’s Wi-Fi network or use your home Wi-Fi.
The app shows live video streams and recorded clips. It offers controls like zoom, pan, or alerts. This method needs an internet connection and a compatible smart TV.
Using Streaming Devices
Streaming devices like Roku, Fire TV, or Chromecast can show camera feeds on your TV. Install the camera’s app on the streaming device. Use the device’s interface to connect to your camera via Wi-Fi.
Streaming devices provide easy access to multiple cameras. They support screen mirroring and casting from mobile apps too. This option works well if your TV lacks smart functions.
Troubleshooting Common Issues
Troubleshooting common issues when connecting your security camera to your TV can save you time and frustration. Problems like no signal, poor video quality, or connection drops are often easy to fix once you know what to check. Let’s dive into some practical solutions that you can try right away.
No Signal On Tv
If your TV shows no signal from the security camera, first check that all cables are securely plugged in. Loose HDMI or RCA connections are a frequent cause of this problem.
Make sure your TV input source matches the port where the camera is connected. Sometimes, the TV remains on the wrong input, causing a blank screen.
Also, verify the power supply to your camera. A camera without power won’t send any signal. Have you checked if the camera’s indicator light is on?
Poor Video Quality
Blurry or pixelated video can result from weak cable connections or using low-quality cables. Try swapping out your current cables for higher-grade ones designed for video transmission.
Distance between the camera and TV matters too. Long cable runs can degrade the signal. Could you try a shorter cable or use a signal booster?
Sometimes, the camera’s settings may affect video quality. Adjust brightness, contrast, or resolution settings on the camera or your TV menu to improve clarity.
Connection Drops
If your video feed frequently cuts out, interference might be the culprit. Wireless cameras are especially prone to interference from other devices like routers or cordless phones.
Try moving the camera or router further apart to reduce interference. Also, check for firmware updates for your camera, as manufacturers often fix connection stability issues in updates.
Power supply interruptions can cause drops too. Have you ensured your camera’s power adapter is functioning properly and plugged into a reliable outlet?

Credit: www.weilailifetech.com
Tips For Optimal Setup
Setting up your security camera to connect with your TV isn’t just about plugging in cables. A well-planned setup can enhance your viewing experience and ensure your system works reliably. These tips will help you make smart choices that keep your footage clear and your installation tidy.
Camera Placement
Position your camera where it captures the widest and most important areas without obstructions. Avoid facing it directly towards bright lights or windows, as glare can reduce image quality. Think about the angle—higher spots often give a better overview and reduce tampering risks.
Have you noticed how some entrances or driveways are missed by cameras placed too low or too far? Adjust placement to cover these blind spots effectively. Consider testing different angles during daylight to find the best view before final installation.
Cable Management
Messy cables not only look unprofessional but can also cause connection issues. Use cable clips, sleeves, or conduits to keep wires neat and prevent accidental unplugging. Running cables along walls or baseboards keeps them out of sight and reduces tripping hazards.
If you’ve ever tripped over a loose wire or lost signal due to a damaged cable, you know how important good management is. Label your cables for easier troubleshooting later and avoid stretching wires too tight, which can lead to breaks.
Power Supply Considerations
Ensure your camera’s power source is stable and protected from weather if installed outdoors. Using a surge protector can safeguard your equipment from power spikes. If your camera supports Power over Ethernet (PoE), this can simplify power and data transfer through one cable.
Think about backup options like a UPS (Uninterruptible Power Supply) to keep your system running during outages. Have you experienced missing footage due to a power cut? Planning your power setup can prevent this frustrating problem.
Credit: oncallbookings.medium.com
Frequently Asked Questions
How Do I Connect A Security Camera To My Tv?
Use an HDMI or RCA cable to connect the camera’s output to the TV input. Power on both devices and select the correct input source on your TV to view the camera feed.
Can I Connect Wireless Security Cameras To A Tv?
Yes, use a wireless receiver or smart TV with Wi-Fi. Connect the camera’s receiver to the TV or use an app on smart TVs for live streaming.
What Cables Are Needed To Connect Security Cameras To Tvs?
Common cables include HDMI, RCA, BNC, or VGA, depending on the camera and TV ports. Choose the cable matching both devices for a proper connection.
Is It Possible To View Multiple Cameras On One Tv?
Yes, use a video multiplexer or DVR system. These devices combine multiple camera feeds into one screen for simultaneous viewing on your TV.
Conclusion
Connecting your security camera to your TV is simple and useful. It helps you watch live footage clearly on a big screen. Just follow the steps carefully to set up the cables and settings right. Check your camera and TV ports to match them well.
This way, you can keep an eye on your home anytime. Watching security videos on your TV adds extra comfort and safety. Take time to test the connection and adjust the view as needed. Stay secure and aware with this easy setup.


