
Your kitchen sink faucet head works hard every day, but when was the last time you gave it a proper clean? Over time, buildup from minerals, soap, and grime can clog your faucet, making your water flow weak and your sink less hygienic.
Imagine turning on your tap and enjoying a strong, steady stream of clean water every time—no more annoying drips or blockages. In this guide, you’ll discover simple, effective steps to clean your kitchen sink faucet head quickly and easily. Keep reading to bring back that fresh, sparkling flow and keep your kitchen running smoothly!

Credit: www.yahoo.com
Materials Needed
Gathering the right materials before cleaning your kitchen sink faucet head makes the process smoother and more effective. You want to avoid stopping midway to find something you forgot. Having everything ready also ensures you use products that won’t damage your faucet’s finish.
Think about what you already have at home. You might be surprised how simple ingredients like vinegar or baking soda can do wonders. Plus, using common household items saves money and reduces chemical exposure.
Cleaning Solutions
- White vinegar:Great for breaking down mineral deposits and limescale.
- Baking soda:Acts as a gentle abrasive to remove grime without scratching surfaces.
- Mild dish soap:Cuts through grease and everyday dirt effectively.
Tools For Scrubbing And Wiping
- Soft toothbrush:Perfect for reaching small crevices and scrubbing without damage.
- Microfiber cloth:Ideal for polishing and drying the faucet without leaving lint.
- Old towel or rag:Useful for soaking the faucet head in cleaning solution.
Additional Items You Might Need
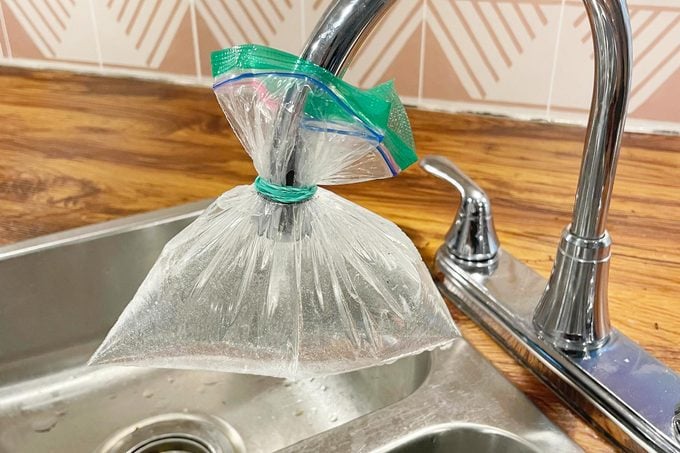
- Plastic bag:To hold vinegar around the faucet head during soaking.
- Rubber band or twist tie:To secure the plastic bag in place.
- Pin or needle:For unclogging tiny holes in the faucet aerator if needed.
Have you ever skipped preparing your materials and then realized the cleaning took twice as long? I have, and it’s frustrating. Taking a few minutes to gather these items upfront saves time and gives your faucet a thorough clean every time.
Initial Preparations
Preparing to clean your kitchen sink faucet head sets the stage for an easy and effective process. Taking time to organize and clear the area helps avoid mess and frustration. A clean workspace ensures you reach every spot on the faucet with ease.
Gathering the right tools and supplies is essential. Using the proper items saves time and protects your faucet from damage. Clearing the sink area creates space to work comfortably and keeps your kitchen neat.
Gather Tools And Supplies
- Soft cloth or sponge
- Old toothbrush or small brush
- White vinegar or mild cleaner
- Plastic bag or small bowl
- Rubber band or twist tie
- Gloves to protect your hands
- Paper towels or dry cloth
Clear The Sink Area
Remove dishes and utensils from the sink and countertop. Wipe down the sink surface to remove any dirt or grime. Ensure good lighting to spot buildup on the faucet head. This space helps you clean without interruptions or spills.
Removing The Faucet Head
Removing the faucet head is an important step before cleaning it thoroughly. This process helps access hard-to-reach areas where dirt and mineral deposits build up. Proper removal protects the faucet from damage and ensures a better clean.
The faucet head connects to the water supply and may be secured tightly. Careful handling prevents scratches or leaks. Follow these simple steps to detach the faucet head safely.
Turn Off Water Supply
Stop water flow to avoid spills and water damage. Locate the shut-off valves under the sink. Turn them clockwise until fully closed.
Test the faucet by turning it on briefly. No water should come out. This confirms the supply is off and safe to proceed.
Detach The Faucet Head
Check the faucet head for a retaining nut or screw. Some models twist off by hand, while others need a tool.
- Use a wrench or pliers if needed, but protect the faucet with a cloth to prevent scratches.
- Turn the faucet head counterclockwise to loosen it.
- If stuck, apply gentle pressure and avoid forcing it hard.
Once loosened, pull the faucet head straight off. Set it on a clean surface for cleaning.
Credit: www.rd.com
Cleaning Techniques
Cleaning your kitchen sink faucet head doesn’t have to be a chore. With the right techniques, you can easily remove buildup and keep it sparkling. Here are some practical and effective ways to get the job done.
Soak In Vinegar Solution
Vinegar is a powerful natural cleaner that dissolves mineral deposits quickly. Fill a small bowl or plastic bag with white vinegar and submerge the faucet head. If using a bag, secure it with a rubber band and let it soak for 30 to 60 minutes.
This simple step can make a huge difference, especially if you notice reduced water flow or uneven spray. Have you ever wondered why vinegar works so well? Its acidity breaks down hard water stains without harsh chemicals.
Scrub With A Brush
After soaking, grab a soft-bristled brush to scrub away loosened grime. An old toothbrush works perfectly, reaching into tiny crevices where buildup hides. Apply gentle pressure to avoid scratching the faucet’s finish.
Scrubbing helps remove stubborn deposits and restores the faucet’s shine. Have you noticed how a little brushing can turn a dull faucet into one that looks brand new? It’s a quick step that pays off.
Rinse Thoroughly
Once you’ve scrubbed, rinse the faucet head under warm running water. This washes away loosened debris and vinegar residue. Make sure no particles remain in the holes to maintain smooth water flow.
Dry the faucet with a clean cloth to prevent new spots from forming. Have you ever skipped rinsing and ended up with a sticky residue? Taking this extra moment ensures your faucet stays clean and fresh longer.
Reinstalling The Faucet Head
After thoroughly cleaning your kitchen sink faucet head, it’s time to put it back in place. Reinstalling the faucet head might seem straightforward, but ensuring it’s secure and leak-free takes a bit of attention. Taking a careful approach can save you from future drips and water damage.
Reattach The Faucet Head
Start by aligning the faucet head with the faucet body. Most faucet heads screw on, so gently twist it clockwise until it feels snug. Avoid forcing it too hard; cross-threading can damage the connection and cause leaks.
If your faucet has a locking mechanism or a clip, make sure to engage it properly. Sometimes, small washers or O-rings need to be positioned correctly before reattaching. Missing this step can lead to water escaping from unexpected spots.
Check For Leaks
Once the faucet head is secured, turn the water supply back on slowly. Watch closely for any water seeping around the connection point. Even a tiny leak can waste water and cause stains or damage over time.
Try using the faucet at different angles and pressure levels. Does the water spray evenly? Is there any dripping after you turn it off? Testing this way ensures your faucet is fully functional and leak-free.
Have you noticed your faucet dripping after a previous reinstallation? Paying attention to these small details now can prevent that frustrating scenario from happening again.

Credit: www.yahoo.com
Maintenance Tips
Keeping your kitchen sink faucet head in top shape doesn’t have to be a chore. Simple maintenance can save you from costly repairs and keep your water flowing smoothly. Let’s dive into some practical tips that make a real difference.
Regular Cleaning Routine
Make it a habit to clean your faucet head weekly. Wiping it down with a soft cloth and mild soap removes grease and grime before they settle in. If you notice water flow slowing, it might be time for a deeper clean.
Detach the faucet head if possible, soak it in a vinegar solution for 15-20 minutes, then scrub gently with an old toothbrush. This routine prevents buildup and keeps the spray holes clear. Have you checked your faucet head lately?
Preventing Mineral Buildup
Mineral deposits from hard water can clog your faucet head and reduce water pressure. To avoid this, dry the faucet head after use, especially in areas with hard water. Small habits like this can extend the life of your faucet.
Consider installing a water softener or using a filter to reduce minerals. If you spot white, crusty deposits, tackle them quickly with vinegar or a commercial descaler. Waiting too long can make cleaning much harder, so why let minerals win?
Frequently Asked Questions
How Often Should I Clean My Kitchen Sink Faucet Head?
Clean your kitchen sink faucet head every 1-2 months. Frequent cleaning prevents buildup of limescale and bacteria. Regular maintenance ensures smooth water flow and extends faucet life.
What Household Items Are Best For Cleaning Faucet Heads?
Use vinegar, baking soda, and a soft brush to clean faucet heads. These items dissolve mineral deposits gently without damaging the finish. Avoid harsh chemicals to protect your faucet’s surface.
Can I Remove The Faucet Head For Cleaning?
Yes, most faucet heads can be removed easily. Unscrew the aerator gently to soak it in vinegar or clean it manually. This helps remove stubborn mineral buildup inside.
How Do I Prevent Mineral Buildup On Faucet Heads?
Wipe your faucet head dry after use to reduce water spots. Regular cleaning with vinegar also prevents mineral deposits. Installing a water softener helps in hard water areas.
Conclusion
Cleaning your kitchen sink faucet head keeps water flowing smoothly. Regular care stops buildup and prevents clogs. Use simple tools and natural cleaners for best results. Take a few minutes weekly to wipe and soak the faucet head. This small effort saves time and money later.
Enjoy a fresh, clean faucet that works well every day. Simple steps make a big difference in your kitchen’s hygiene and comfort. Keep your faucet shiny and healthy with easy, regular cleaning.


