Is your handheld shower head starting to drip or spray unevenly? Over time, mineral deposits and grime can build up, making your shower less refreshing and harder to use.
But don’t worry—you can fix this quickly with a simple cleaning routine. In this guide, you’ll learn easy, effective steps to restore your shower head’s flow and keep it working like new. Keep reading to discover how a clean shower head can improve your daily routine and save you money on replacements!

Credit: www.instagram.com
Preparation For Cleaning
Preparing to clean your handheld shower head sets the tone for an efficient and hassle-free process. Taking a moment to gather the right tools and ensure safety can save you time and prevent damage. Have you ever started a task only to realize halfway through that you’re missing something essential? Avoid that frustration by preparing thoroughly.
Gather Necessary Tools
Before you begin, collect all the items you will need. This usually includes:
- White vinegar or a mild descaling solution
- A plastic bag or bowl to soak the shower head
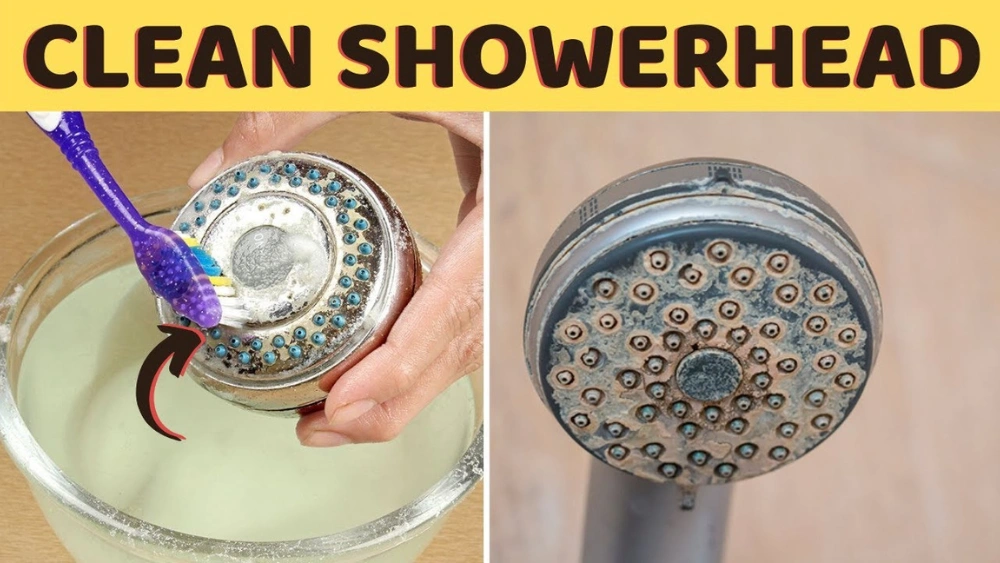
- An old toothbrush or soft brush for scrubbing
- A cloth or sponge for wiping
- A wrench or pliers, if you plan to remove the shower head
Having these tools within reach prevents interruptions and helps you stay focused. Think about the last time you cleaned your shower head—did you have everything at hand, or were you scrambling midway?
Ensure Safety Measures
Safety is crucial when working with plumbing fixtures. Start by turning off the water supply to avoid unexpected sprays or leaks. If you’re using vinegar or any cleaning solutions, make sure the area is well-ventilated to prevent irritation from fumes.
Wear gloves to protect your hands from harsh chemicals and dirt buildup. Remember, even a simple task can become tricky if you overlook safety. Are you prepared to protect yourself as well as your bathroom fixtures?
Detaching The Shower Head
Detaching your handheld shower head is the first key step to getting it properly cleaned. Knowing how to remove it without damage saves you time and keeps your bathroom fixtures in great shape. Let’s look at how to identify the type of attachment your shower head has and how to safely remove it.
Identify Attachment Type
Start by checking how your shower head is connected to the hose or wall pipe. Most handheld shower heads use either a threaded connection or a quick-release mechanism.
- Threaded connection:This looks like a screw-on fitting where you twist the shower head off by turning it counterclockwise.
- Quick-release mechanism:This often involves a button or clip that you press or slide to detach the shower head instantly.
Take a close look at your shower head’s base. Do you see threads or a small lever? Understanding this helps prevent unnecessary force that could break the fitting.
Carefully Remove The Shower Head
Once you know the attachment type, it’s time to remove the shower head gently. If it’s threaded, wrap a cloth around the connection to protect the finish and turn counterclockwise.
If it feels stuck, don’t force it harshly. Applying a bit of warm water or using a wrench with a soft cloth can help loosen it without scratching.
For quick-release types, press the release button firmly while pulling the shower head away from the hose or bracket.
Have you ever struggled with a stuck shower head? Taking a moment to identify the attachment can save you from unnecessary frustration and damage.
Cleaning Methods
Cleaning your handheld shower head doesn’t have to be a chore. Simple techniques can help you get rid of buildup and keep water flowing smoothly. Here are two effective methods that you can easily do at home.
Soaking In Vinegar Solution
Vinegar is a natural cleaner that breaks down mineral deposits quickly. To use this method, fill a plastic bag with white vinegar and secure it around the shower head using a rubber band. Let it soak for a few hours or overnight for tough buildup.
After soaking, remove the bag and run hot water through the shower head to flush out loosened debris. This method is gentle on your fixture but powerful enough to restore water pressure. Have you noticed how quickly vinegar cuts through hard water stains in your kitchen? It works just as well here.
Brushing Away Mineral Deposits
Sometimes soaking isn’t enough, especially if deposits have hardened. Use an old toothbrush or a small brush with soft bristles to scrub the nozzles and surface gently. Focus on areas where water sprays out, as these spots often clog first.
If you prefer, dip the brush in baking soda paste (mix baking soda with a little water) for extra scrubbing power. This abrasive, yet safe, method removes stubborn residue without scratching your shower head. What simple tools do you already have at home that could help with this cleaning?
Rinsing And Drying
Rinsing and drying your handheld shower head is an important part of cleaning. It removes leftover cleaning agents and water deposits. Proper rinsing and drying help keep your shower head working well and looking good.
Thoroughly Rinse Residues
After scrubbing, rinse the shower head under warm water. Make sure water flows through all holes. This clears away soap, vinegar, and loosened dirt. Use your fingers to wipe any stubborn spots. Avoid using too much force to prevent damage.
Check the water flow. If it still looks cloudy or blocked, repeat rinsing. Clean water should run freely without any particles.
Ensure Complete Drying
Dry the shower head with a soft cloth. Wipe all surfaces carefully to stop water spots. Focus on small crevices where water can hide. Leaving moisture can cause mineral buildup and rust.
Let the shower head air dry in a warm, dry place. This helps remove any leftover dampness. Do not put it back on the hose until fully dry.
Reattaching The Shower Head
After cleaning your handheld shower head, reattaching it correctly is crucial. A secure fit prevents leaks and ensures smooth water flow. Take time to align the shower head properly before tightening.
Check For Leaks
Once reattached, turn on the water gently. Watch closely for any dripping around the connection. Small leaks can waste water and cause damage over time. Tighten the connection if you see any water escaping. Use a cloth to avoid scratching the fixture.
Securely Reattach
Hand-tighten the shower head first to avoid cross-threading. Use a wrench or pliers with a cloth for a firmer grip. Do not overtighten, as it may damage the threads or the shower head. Ensure the shower head feels stable and does not wobble.

Credit: www.amazon.com
Maintenance Tips
Keeping your handheld shower head in top shape requires more than just occasional cleaning. Maintenance plays a crucial role in preventing issues like clogs and reduced water flow. Small, consistent efforts can save you from costly replacements and ensure a refreshing shower experience every time.
Regular Cleaning Schedule
Set a routine for cleaning your shower head every two to four weeks. This prevents dirt and soap scum from building up and affecting water pressure. You don’t need special tools—just basic household items like vinegar and a soft cloth work wonders.
Try soaking the shower head in a vinegar solution for about an hour to break down grime. After soaking, scrub gently with an old toothbrush to clear out any remaining residue. Does your water feel less powerful after a few weeks? That’s a clear sign it’s time for another cleaning session.
Preventing Mineral Buildup
Hard water can leave behind mineral deposits that clog your shower head nozzles. To stop this buildup, wipe down the shower head regularly with a damp cloth. Applying a vinegar soak monthly can dissolve minerals before they become a problem.
Consider installing a water softener if you notice frequent mineral buildup. It reduces the hardness of your water, extending the life of your shower head. How often do you inspect your shower head for tiny white spots or crusts? Catching them early makes cleaning much easier.

Credit: www.walmart.com
Frequently Asked Questions
How Often Should I Clean A Handheld Shower Head?
Clean your handheld shower head every 1-3 months. Regular cleaning prevents mineral buildup and maintains water flow. Frequent cleaning ensures better hygiene and extends the shower head’s lifespan.
What Is The Best Way To Remove Mineral Deposits?
Use white vinegar to soak the shower head. Vinegar dissolves mineral deposits effectively without harsh chemicals. Soak for 30 minutes, then scrub with a soft brush for best results.
Can I Clean A Shower Head Without Removing It?
Yes, you can clean it without removal. Fill a plastic bag with vinegar and secure it around the shower head. Let it soak for 30-60 minutes, then rinse thoroughly.
How Do I Prevent Clogging In My Shower Head?
Regular cleaning and using a water softener help. Soft water reduces mineral buildup. Also, wipe the shower head after each use to avoid residue buildup.
Conclusion
Cleaning your handheld shower head keeps water flow strong and fresh. Regular cleaning stops mineral build-up and extends its life. Use simple tools like vinegar and a soft brush for best results. Clean it every few weeks for smooth water spray.
A clean shower head makes your bathroom feel nicer and more hygienic. Small efforts bring big comfort to daily showers. Keep your shower head clean and enjoy better water every day.


