
Have you ever wanted to remove your shower head but didn’t have a wrench handy? You’re not alone.
Many people find themselves stuck, unsure how to get the job done without special tools. The good news is, you don’t need a wrench to remove your shower head. You’ll discover simple, practical methods that anyone can use. By the end, you’ll feel confident tackling this task yourself—saving time, money, and frustration.
Keep reading to learn how easy it can be!
Materials Needed
Removing a shower head without a wrench may sound tricky, but gathering the right materials can make the job much easier. Having simple household items on hand can save you from an unexpected trip to the hardware store. Let’s look at what you need before you start.
Soft Cloth Or Rag
A soft cloth or rag is essential to protect your shower head from scratches. Wrapping it around the connection point gives you better grip without damaging the finish. You might be surprised how much grip a simple cloth can add when you’re twisting by hand.
Rubber Gloves
Rubber gloves improve your grip significantly. They help you hold onto slippery surfaces, especially when dealing with water and soap residue. If you don’t have rubber gloves, even a piece of rubber shelf liner can work.
Penetrating Oil Or Wd-40
Stuck shower heads often need a little help loosening up. A spray of penetrating oil like WD-40 can break down mineral deposits and rust that hold the parts together. This small step can save you a lot of frustration and force.
Plastic Bag And Rubber Band
If mineral buildup is severe, soaking the connection in vinegar can help. Fill a plastic bag with vinegar, place it around the shower head joint, and secure it with a rubber band. Let it sit for an hour or two to soften the deposits.
Towel Or Small Bucket
Water will drip when you remove the shower head, so have a towel or small bucket ready. This simple preparation keeps your bathroom floor dry and prevents slips. Do you want to clean up water mess or keep your space tidy effortlessly?
Credit: www.tiktok.com
Preparation Steps
Preparing to remove a shower head without a wrench makes the process easier and safer. Taking a few simple steps before starting can save time and prevent damage. This preparation ensures a smooth and hassle-free removal.
Turn Off Water Supply
Stop the water flow to avoid leaks or spills. Locate the main water valve for your bathroom or house.
Turn the valve clockwise until it is fully closed. Test the shower to confirm no water comes out.
Clear The Area
Remove items around the shower to create space. Place a towel or cloth below the shower head.
This protects the floor and catches any water that might drip. Clearing the area helps you work comfortably and safely.
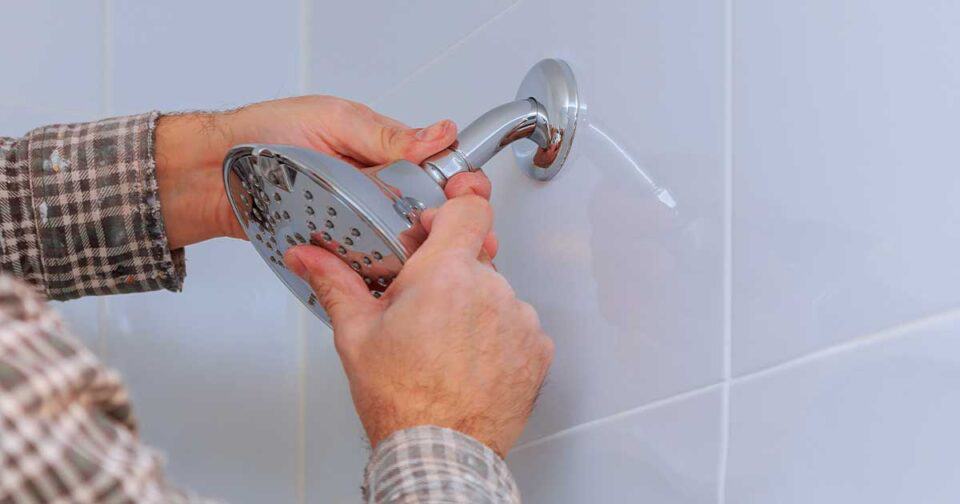
Removing The Shower Head
Removing the shower head can seem tricky without a wrench. Many people think they need special tools. The good news is that you can do it with common household items. This section explains easy ways to remove the shower head safely.
Using Household Items
Start by gathering simple items like rubber gloves, a cloth, or pliers. Wrap the cloth around the shower head base to protect it from scratches. Use rubber gloves to improve your grip.
Pliers can help if you don’t have a wrench. Grip the shower head gently with pliers wrapped in the cloth. Turn it counterclockwise to loosen the connection.
- Use a cloth to avoid damaging the finish.
- Rubber gloves prevent slipping.
- Pliers offer extra turning power.
Loosening Techniques
Apply some force carefully. If the shower head is tight, try using hot water. Soak a cloth in hot water and wrap it around the joint for a few minutes. The heat helps loosen the mineral buildup.
Another trick is to use a little cooking oil or vinegar. Dab it on the connection and let it sit. This softens any rust or grime holding the shower head tight.
- Warm the joint with a hot cloth.
- Use oil or vinegar for stuck fittings.
- Turn slowly to avoid damage.
Cleaning The Shower Arm
Cleaning the shower arm is a crucial step after removing the shower head without a wrench. The arm often holds buildup and debris that can affect water flow and damage fittings over time. Taking the time to clean it properly ensures your shower works smoothly and lasts longer.
Removing Debris
Start by wiping the shower arm with a damp cloth to remove loose dirt. Hard water deposits and soap scum can build up around the threads, so use a soft brush or an old toothbrush to scrub these areas gently.
If deposits feel stubborn, soak a cloth in white vinegar and wrap it around the arm for 15-20 minutes. This natural solution helps break down mineral buildup without harsh chemicals. After soaking, scrub again and rinse with warm water.
Don’t forget to check inside the arm’s opening. Use a small brush or a toothpick to clear out any trapped debris that might block water flow. Have you ever noticed a weak shower spray? Blocked debris could be the culprit.
Checking For Damage
Once clean, inspect the shower arm carefully. Look for cracks, corrosion, or worn threads that might cause leaks. Even minor damage can lead to bigger problems if ignored.
Run your fingers along the threads to feel for rough spots or irregularities. Damaged threads can prevent the shower head from sealing properly, causing drips or water loss.
If you spot corrosion, consider replacing the shower arm. Continuing to use a damaged arm risks water damage to your wall or ceiling. Have you checked your shower arm recently? Catching issues early saves time and money.
Installing A New Shower Head
Installing a new shower head refreshes your bathroom and improves water flow. It also helps save water and enhances your shower experience. After removing the old fixture, the next step is choosing the right new shower head and securing it properly.
Choosing The Right Shower Head
Select a shower head that fits your water pressure and pipe size. Consider the spray pattern you prefer, such as rain, massage, or mist. Check the material for durability; chrome and stainless steel last longer. Look for water-saving models to reduce water use. Also, match the style to your bathroom decor for a clean look.
Securing The New Fixture
Wrap plumber’s tape around the shower arm threads to prevent leaks. Screw the new shower head onto the arm by hand, turning clockwise. Tighten it firmly, but avoid over-tightening to stop damage. Use a cloth to protect the finish if you need extra grip. Turn on the water to test for leaks and adjust if needed.
Credit: www.drewandjonathan.com
Testing The Installation
Testing the installation after removing and replacing a shower head is essential. It helps ensure everything works correctly and prevents water damage. Carefully checking the setup saves time and frustration later.
Checking For Leaks
Turn on the water slowly to spot any leaks around the shower head. Look closely where the shower head connects to the pipe. If you see water dripping or spraying, tighten the connection by hand. Use plumber’s tape if leaks continue. Dry the area with a towel to see new leaks clearly.
Ensuring Proper Water Flow
Watch how water flows from the shower head. It should be steady and strong, not weak or uneven. Adjust the shower head angle to check full coverage. Low water pressure might mean a clog or loose parts. Clean the shower head holes or check the pipe connection if flow is poor.
Maintenance Tips
Keeping your shower head in good shape doesn’t have to be complicated. Regular maintenance can extend its life and improve your shower experience without needing special tools like a wrench. Let’s look at some practical tips that you can easily apply to keep your shower head working smoothly.
Regular Cleaning
Build-up from hard water and soap can clog your shower head over time. You don’t need to remove it to clean it thoroughly. Try soaking the shower head in a mixture of equal parts vinegar and water for about an hour to dissolve mineral deposits.
After soaking, scrub gently with an old toothbrush to clear any remaining residue. Running water through the shower head after cleaning flushes out loosened debris. Doing this once a month can keep water flowing evenly and prevent blockages.
Avoiding Common Problems
Small issues can turn into bigger headaches if ignored. Check your shower head regularly for leaks or unusual spray patterns. These signs often mean there’s a clog or a loose connection.
To prevent damage, avoid tightening the shower head too much when adjusting it by hand. Over-tightening can crack the fittings or strip the threads, making removal harder later. If you notice any wear, consider replacing washers or seals promptly to stop leaks.
Have you ever struggled with a stuck shower head? Maintaining it gently can save you from that frustration. What maintenance habit will you start today to keep your shower running effortlessly?

Credit: www.reddit.com
Frequently Asked Questions
How To Remove A Shower Head Without A Wrench?
You can use rubber gloves or a cloth for grip. Twist the shower head counterclockwise by hand. Applying penetrating oil helps loosen tight fittings.
Can I Use Household Items To Remove Shower Heads?
Yes, items like pliers with a cloth or adjustable straps work. Avoid metal tools that can scratch the shower head.
How To Avoid Damaging The Shower Head During Removal?
Wrap the shower head with a cloth to protect its finish. Turn gently and avoid excessive force to prevent cracks or dents.
Is It Safe To Remove A Shower Head By Hand?
Yes, removing by hand is safe if the fitting isn’t too tight. Use gloves for better grip and apply lubricant if needed.
Conclusion
Removing a shower head without a wrench is simple and doable. Use household items like pliers or a cloth for grip. Turn slowly to avoid damage. Clean the threads before installing a new head. Taking time helps prevent leaks and breaks.
Small steps can save money and effort. Try these easy tips next time you need a quick fix. No need for special tools or skills. Just patience and care will get the job done.


