
Is your old shower head leaving you with weak water flow or annoying drips? You don’t have to live with that frustration any longer.
Removing an old shower head is easier than you might think, and you can do it yourself without calling a plumber. In this guide, you’ll discover simple, step-by-step instructions to help you replace your shower head quickly and smoothly. By the end, you’ll know exactly how to get rid of that outdated fixture and enjoy a fresh, powerful shower experience.
Keep reading—you’re just minutes away from upgrading your bathroom!
Tools Needed
Before you start removing that old shower head, gather the right tools to make the job smooth and hassle-free. Having everything on hand saves you from mid-task frustrations and unnecessary trips to the hardware store. Let’s look at the essential tools you’ll need to tackle this task confidently.
Adjustable Wrench
An adjustable wrench is your best friend for loosening the shower head’s connection to the pipe. It fits various sizes, so you don’t need multiple wrenches. Make sure to protect the finish of your shower arm by wrapping the jaws with a cloth before gripping it.
Plumber’s Tape (teflon Tape)
Once you remove the old shower head, you’ll want to seal the threads properly before installing the new one. Plumber’s tape prevents leaks by creating a watertight seal on threaded connections. Keep a roll handy—you’ll be surprised how often this small tape saves the day.
Rubber Gloves
Using rubber gloves improves your grip and protects your hands from grime and any sharp edges. They also help if the shower head is stuck due to mineral buildup, giving you better control without hurting your skin. Plus, it keeps your hands clean throughout the process.
Old Toothbrush Or Small Scrub Brush
Mineral deposits often accumulate around the shower arm threads. An old toothbrush or small scrub brush helps clean these areas before attaching the new head. Removing buildup ensures a tighter fit and reduces the chance of leaks.
Penetrating Oil (optional)
If your shower head is stuck tight, a few drops of penetrating oil can help loosen rust or mineral deposits. Let it sit for a few minutes before attempting to unscrew. This small step can save you from damaging the plumbing or struggling for hours.

Credit: www.instagram.com
Safety Precautions
Removing an old shower head involves simple tools but requires care. Safety is key to avoid injuries or damage. Prepare your workspace and tools before starting. Take time to understand the risks. Follow these safety tips to protect yourself and your bathroom fixtures.
Turn Off The Water Supply
Stop water flow before removing the shower head. Locate the main water valve or shower valve and close it. This prevents water from spraying out unexpectedly. Test by turning on the shower to confirm no water flows.
Use Proper Tools
Choose the right wrench or pliers for the job. Avoid using tools that may slip or damage the fixture. Wrap the shower arm with a cloth to protect the finish. Grip firmly but gently to loosen the shower head.
Wear Protective Gear
Use gloves to protect your hands from sharp edges and grime. Safety glasses shield your eyes from debris or water splashes. Wear old clothes to avoid stains from rust or mineral deposits.
Work In A Dry Area
Keep the floor and surrounding area dry to prevent slips. Use a towel or mat to catch any drips. Good lighting helps you see clearly and avoid mistakes. Clean workspace reduces the chance of accidents.
Handle Parts Carefully
Old shower heads may be fragile or corroded. Avoid forcing parts to prevent breakage. Place removed pieces on a soft surface. Inspect for cracks or damage before installing new fixtures.
Shutting Off Water Supply
Before removing an old shower head, shut off the water supply. This step stops water flow and avoids leaks or sprays.
Turning off the water protects your bathroom and keeps the process clean. It also makes removing the shower head easier and safer.
Locate The Main Water Valve
Find the main water valve in your home. It is usually near the water meter or where the water line enters the house.
Turning off this valve stops water to the entire home. Use it if there is no separate valve for the bathroom.
Find The Bathroom Shut-off Valve
Look for a smaller valve near the bathroom or under the sink. This valve controls water to the shower only.
Turning off this valve saves time and avoids shutting water to the whole house. If you find it, use this valve first.
Turn Off The Valve Properly
Use your hand or a wrench to turn the valve clockwise. Stop when the valve feels tight and won’t turn further.
Do not force the valve or use too much strength. This can break or damage the valve.
Test The Water Supply
Turn on the shower faucet to check if water stops flowing. If water still comes out, check the valve again.
Make sure the valve is fully closed before starting to remove the shower head.
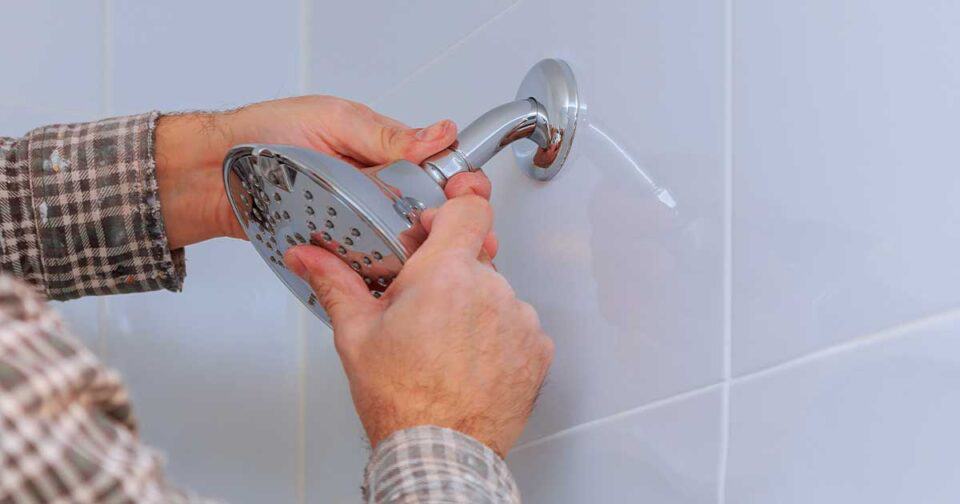
Removing The Old Shower Head
Removing the old shower head is the first crucial step before installing a new one. It might seem straightforward, but sometimes the fixture can be stuck due to mineral buildup or old sealant. With the right approach, you can avoid damaging your pipes and make the process smooth.
Loosening With A Wrench
Start by turning off the water supply to avoid any mess. Use an adjustable wrench to grip the base of the shower head firmly. Turn the wrench counterclockwise to loosen the fixture.
If the shower head feels stuck, try applying some penetrating oil and wait about 10 minutes. This helps break down rust and mineral deposits. Remember to protect the shower arm with a cloth to avoid scratches from the wrench.
Using Thread Seal Tape
Once the old shower head is removed, clean the threads of the shower arm carefully. Wrap new thread seal tape (also called plumber’s tape) around the threads in a clockwise direction. This tape ensures a tight, leak-free seal when you install the new shower head.
Make sure the tape covers the threads evenly without overlapping too much. This small step can save you from annoying drips and water damage later on. Have you checked if your tape is the right type for plumbing jobs?
Cleaning Shower Arm
Cleaning the shower arm is a crucial step after removing an old shower head. It ensures a smooth fit for the new fixture and prevents leaks. Taking time to properly clean this part can save you from future plumbing troubles and enhance your shower’s performance.
Removing Residual Tape
Old plumber’s tape often sticks stubbornly to the shower arm’s threads. If you skip this step, your new shower head won’t seal properly. Use a cloth or your fingers to peel off as much tape as possible.
For leftover bits, gently scrape with a plastic scraper or an old credit card. Avoid metal tools that can damage the threads. Have you noticed your shower head wobbling? Residual tape might be the culprit.
Scrubbing Away Mineral Deposits
Mineral buildup from hard water can clog the threads and cause poor connections. Use a brush—an old toothbrush works well—to scrub the shower arm. Dip the brush in white vinegar for better results; it dissolves minerals effectively.
Rinse with warm water after scrubbing to remove loosened deposits. If deposits are stubborn, let the shower arm soak in vinegar for 15-20 minutes. How much better do your fixtures work after a simple cleaning like this?
Installing New Shower Head
Installing a new shower head is a straightforward task that can transform your daily routine. After removing the old fixture, the next steps are crucial to ensure a secure and leak-free setup. Paying attention to detail here saves you time and effort later.
Applying New Thread Tape
Before attaching the new shower head, wrap plumber’s tape around the threads of the shower arm. This tape helps create a watertight seal and prevents leaks. Make sure to wrap the tape clockwise to match the direction you’ll screw on the shower head.
Around two to three layers of tape are usually enough. Too little tape might cause leaks, while too much can make it hard to screw on the shower head. Have you ever dealt with a dripping shower? Proper taping can stop that problem from the start.
Tightening The New Head
Once the thread tape is in place, screw the new shower head onto the shower arm by hand. Turn it clockwise until it’s snug. Avoid over-tightening with tools right away—it’s easy to damage the fixture or strip the threads.
If you need extra tightness, use an adjustable wrench, but protect the shower head with a cloth to prevent scratches. Check for leaks by running water and adjust if necessary. A firm but careful approach here ensures your shower head stays secure and leak-free for a long time.
Testing The Installation
After installing your new shower head, testing the installation is crucial to ensure everything works perfectly. This step helps you catch any issues early, avoiding water damage or frustration later. Let’s look closely at how to check for leaks and adjust your water flow for the best shower experience.
Checking For Leaks
Turn on the water slowly and watch the connection between the shower arm and the new head. Look closely for any drips or moisture forming around the threads. Even a small leak can waste water and cause damage over time.
If you spot a leak, try tightening the shower head by hand first. If it still leaks, turn off the water and remove the head to apply plumber’s tape around the threads. This simple step often seals the connection perfectly.
Have you ever ignored a tiny drip only to face a bigger problem later? Catching leaks early saves both water and money.
Adjusting Water Flow
Once there are no leaks, test the water flow to make sure it matches your preference. Some shower heads have adjustable settings—try switching between spray patterns to see which feels best. Pay attention to both pressure and coverage.
If the water feels weak, check if the flow restrictor inside the shower head needs cleaning or removal. Sometimes mineral buildup blocks the flow and cleaning it can improve your shower instantly.
Think about how a simple adjustment changed your shower comfort. Would you want stronger pressure or a gentler spray for your daily routine? Make sure the shower head suits your needs perfectly before finishing up.
Credit: www.drewandjonathan.com
Troubleshooting Common Issues
Troubleshooting common issues helps smooth the process of removing an old shower head. Some problems may slow you down or cause damage. Knowing how to fix these problems saves time and effort. Focus on leaks and fit problems, the most frequent obstacles.
Dealing With Leaks
Leaks often appear after removing or replacing a shower head. They usually happen because of worn-out thread tape or loose connections. To stop leaks:
- Wrap plumber’s tape tightly around the pipe threads.
- Make sure the tape covers all the threads evenly.
- Tighten the new shower head securely but avoid over-tightening.
- Check the rubber washer inside the shower head. Replace if cracked or missing.
These steps help create a strong seal to prevent water from escaping.
Ensuring Proper Fit
Not all shower heads fit every pipe size. Pipes usually have standard sizes, but there are exceptions. To ensure a good fit:
- Measure the pipe threads before buying a new shower head.
- Choose a shower head compatible with your pipe size (usually ½ inch).
- Use adapters if the sizes do not match.
- Test fit the shower head before fully tightening.
Proper fit avoids leaks and ensures the shower head stays in place.
Maintenance Tips
Maintaining your shower head helps it last longer and work better. Simple care prevents problems like clogging and leaks. Keeping the shower head clean ensures steady water flow. Regular upkeep saves time and money on replacements.
Regular Cleaning
Clean the shower head once a month. Use a soft cloth or sponge to wipe away dirt. Soak the shower head in white vinegar to remove grime. Rinse well with warm water after soaking. This routine stops buildup and keeps the spray strong.
Preventing Mineral Buildup
Hard water causes mineral deposits inside the shower head. These deposits block water flow and reduce pressure. Use a vinegar soak or a commercial descaler to dissolve minerals. Run water through the shower head after treatment. Repeat this process every few months to avoid clogs.

Credit: www.reddit.com
Frequently Asked Questions
How Do I Safely Remove An Old Shower Head?
Turn off the water supply before removal. Use a wrench or pliers to unscrew the shower head. Protect the fixture with a cloth to avoid scratches. Twist counterclockwise until it detaches. Clean the pipe threads before installing a new shower head.
What Tools Are Needed To Remove A Shower Head?
You need an adjustable wrench or pliers, a cloth for protection, and optionally plumber’s tape. These tools help safely grip and unscrew the shower head without damaging it or the plumbing.
Can I Remove A Shower Head Without Shutting Off Water?
Yes, but it’s not recommended. Water may spray out when you unscrew the shower head. Turning off the water supply prevents mess and potential water damage.
How Do I Remove A Stuck Or Rusty Shower Head?
Apply penetrating oil to loosen rust and debris. Let it sit for 10-15 minutes. Use a wrench with a cloth to protect the fixture. Turn counterclockwise with steady pressure until it loosens. Avoid forcing it to prevent damage.
Conclusion
Removing an old shower head is simple and saves money. Just gather basic tools and follow clear steps. Take care not to damage plumbing during removal. Cleaning the threads helps new installation fit better. With patience, anyone can update their bathroom easily.
Enjoy a fresh shower experience after the change. Try it yourself and see the difference today.


