Imagine having a tool that gives you or your loved ones the freedom to move safely without worry. What if you could build this tool yourself using simple, affordable parts?
You’ll discover how to make a smart blind stick using Arduino. This device can help detect obstacles and guide you smoothly through your surroundings. By the end, you’ll have the knowledge to create your own helpful companion that brings confidence and independence to daily life.
Ready to learn how? Let’s dive in!
Credit: www.htebd.com
Materials And Tools
Building a smart blind stick with Arduino is an exciting project that combines technology with practical assistance. The first step is gathering the right materials and tools to ensure your device works flawlessly. Having everything ready before you start saves time and prevents frustration during assembly.
Essential Components
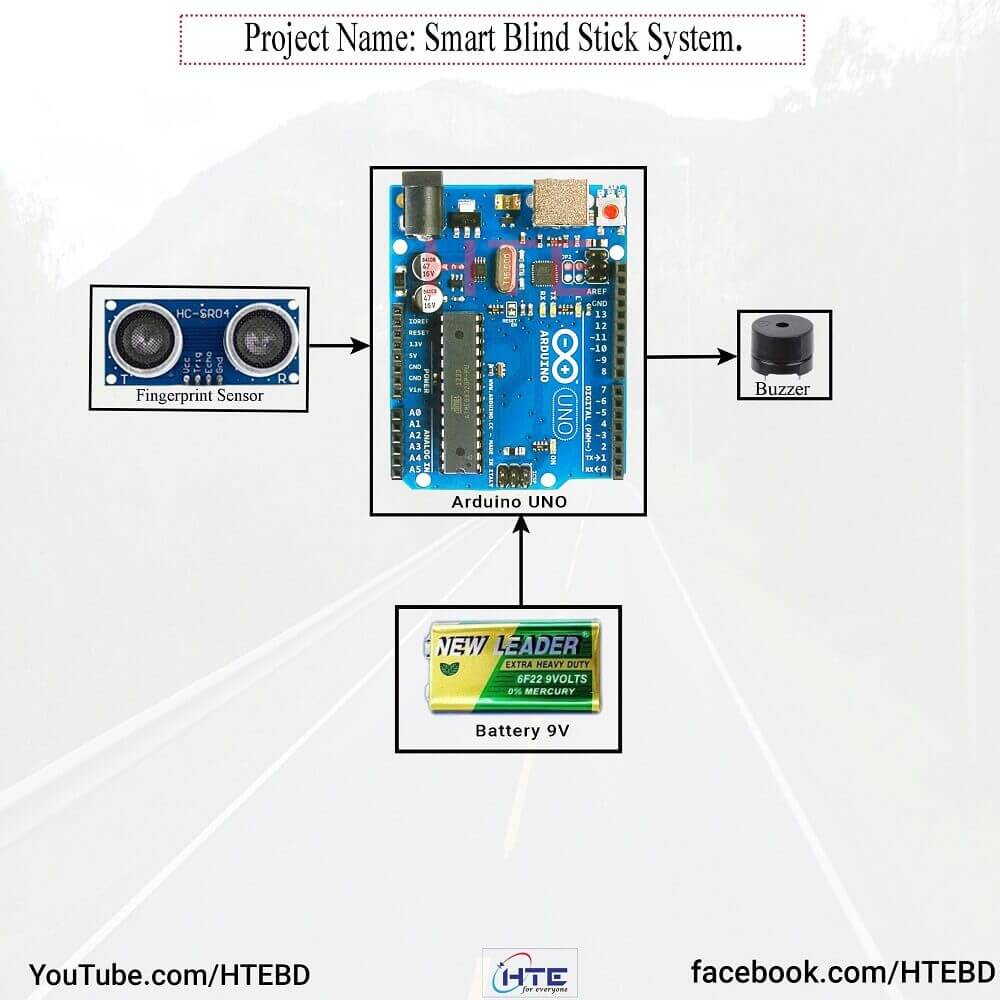
- Arduino Board (Uno or Nano):This is the brain of your smart blind stick. It processes sensor data and controls outputs.
- Ultrasonic Sensor (HC-SR04):Detects obstacles by measuring distance using sound waves.
- Vibration Motor:Alerts the user with a gentle vibration when an obstacle is nearby.
- Buzzer:Provides an audible warning for obstacles in the path.
- Battery Pack (Li-ion or 9V):Powers the entire setup, so choose a reliable and rechargeable option.
- Switch:Lets you turn the device on or off easily.
- Jumper Wires and Breadboard:Connect components without soldering, perfect for prototyping.
- Enclosure or Stick Handle:Protects your electronics and gives the device a sturdy form.
Choosing components that fit your budget and availability is key. Have you checked if local stores stock these parts or if online delivery times fit your schedule?
Required Tools
- Soldering Iron:Needed if you want permanent connections instead of using a breadboard.
- Wire Strippers:Makes removing insulation from wires easy and safe.
- Screwdrivers:Helpful for assembling the enclosure and securing components.
- Multimeter:A lifesaver for testing your circuits and ensuring correct voltages.
- Hot Glue Gun or Electrical Tape:Keeps parts in place and prevents loose connections.
- Computer with Arduino IDE Installed:Essential for programming your board with the smart stick logic.
Having these tools ready improves your building experience. Imagine spending hours troubleshooting only to find a loose wire—tools like a multimeter prevent such headaches. What tools do you already own that can speed up this project?
Understanding Arduino Basics
Understanding the basics of Arduino is essential for creating a smart blind stick. Arduino is a small, easy-to-use computer that controls electronic devices. It reads inputs from sensors and sends commands to other parts like motors or lights. Learning how Arduino works helps you build projects that assist visually impaired people.
This section explains the foundation of Arduino and how to prepare the software for programming. These basics make the rest of your project easier to handle.
Introduction To Arduino
Arduino is a tiny circuit board with a microcontroller. It can connect to sensors, buttons, and motors. The microcontroller reads signals and processes information. Then, it sends signals to control outputs.
The board comes in many types, but the Arduino Uno is the most common. It has digital and analog pins to connect devices. Arduino is beginner-friendly and has a large community for support.
Setting Up Arduino Ide
The Arduino IDE is the software used to write and upload code to the board. It runs on Windows, Mac, and Linux. Installing it is simple and free.
After installation, connect your Arduino board to the computer using a USB cable. Open the IDE and select the correct board model and port. This setup allows communication between the computer and Arduino.
The IDE provides tools for writing code, verifying it, and sending it to the Arduino. It also has examples to help beginners start coding quickly.
Designing The Smart Blind Stick
Designing the smart blind stick requires careful thought and planning. The design must focus on ease of use and safety. It should help users navigate their surroundings with confidence. Every detail matters, from shape to the technology used. A good design blends functionality and comfort seamlessly.
Conceptualizing The Design
Start by imagining how the stick will look and work. The stick should be lightweight and strong. It needs to be easy to hold for long periods. Consider the height and grip size for comfort.
The electronic parts must fit inside the stick without making it bulky. Think about the placement of sensors and buttons for easy access. The design should allow quick charging or battery replacement. Also, plan for durability to handle daily use.
Features To Include
- Obstacle detection with ultrasonic sensors to alert users of nearby objects.
- Vibration alerts for obstacles to provide clear, non-verbal feedback.
- GPS tracking for location awareness and emergency help.
- Bluetooth connectivity for pairing with smartphones or other devices.
- Rechargeable battery for long-lasting power.
- Simple user interface with easy-to-press buttons.
- LED indicators for battery status and connectivity.
Building The Circuit
Building the circuit is a key part of making a smart blind stick using Arduino. This step connects all the components, allowing the device to work properly. Careful wiring and sensor placement are essential for accuracy and safety. Follow the instructions carefully for best results.
Wiring Connections
Start by connecting the Arduino board to the power source. Use a breadboard for easy and neat connections. Connect the ground (GND) and 5V pins of the Arduino to the breadboard rails. This provides power to all components.
Attach jumper wires from the Arduino input/output pins to the sensors and other parts. Make sure each wire is secure and in the correct pin. Loose or wrong connections can cause errors or damage.
- Connect ultrasonic sensor’s VCC to 5V, GND to GND
- Attach ultrasonic sensor’s Trig pin to Arduino digital pin 9
- Attach ultrasonic sensor’s Echo pin to Arduino digital pin 10
- Connect vibration motor to a digital pin with a resistor
Double-check all connections before powering the circuit.
Integrating Sensors
Ultrasonic sensors detect obstacles by sending sound waves. Connect the sensor’s trigger and echo pins to the Arduino. The Arduino reads the echo time to calculate distance.
Place the sensor at the front of the stick for better obstacle detection. Position it so it faces forward and has a clear path.
Use a vibration motor to alert the user about obstacles. Connect it to a digital pin on Arduino. The motor vibrates when an object is near. This simple feedback helps users avoid collisions.
Ensure all sensors and motors receive proper power. Test the sensor readings with the Arduino code before final assembly.
Programming The Arduino
Programming the Arduino is the heart of creating a smart blind stick. This step turns your hardware into a functional device that assists visually impaired users. Clear and simple code makes the stick reliable and responsive. It controls sensors and motors, processes signals, and reacts to obstacles.
Writing The Code
Start by setting up the Arduino IDE on your computer. Write code to read data from distance sensors like ultrasonic or infrared. Use simple commands to control vibration motors or buzzers that alert the user.
Include these key parts in your program:
- Initialize sensors and motors in the setup function.
- Continuously check sensor readings in the loop function.
- Trigger alerts when obstacles are detected within a certain range.
- Use delays wisely to prevent constant buzzing.
Keep the code clean and well-commented. This helps in understanding and future updates.
Testing And Debugging
Upload the code to your Arduino and test the smart blind stick in a safe area. Watch how sensors respond to objects. Check if the alerts activate correctly.
Use the Serial Monitor in Arduino IDE to see sensor values in real time. It helps find errors or wrong readings. If something does not work:
- Check wiring connections.
- Verify sensor power supply.
- Review the code for typos or logic mistakes.
- Add print statements to understand program flow.
Fix problems step by step. Testing ensures your smart blind stick is accurate and dependable.

Credit: www.youtube.com
Assembling The Stick
Assembling the smart blind stick is a crucial part of the project. This process brings together all electronic and mechanical parts. Careful assembly ensures the stick works smoothly and lasts long. Focus on placing each component correctly and securing them firmly to avoid loose connections or damage.
Attaching Components
Start by fixing the Arduino board to the stick’s handle. Use strong double-sided tape or screws for a tight fit. Connect the ultrasonic sensors near the top, facing forward and downward. These sensors detect obstacles and ground level changes. Secure the buzzer and vibration motor close to the handle for easy access and response. Route the wires neatly along the stick, using zip ties or adhesive clips to keep them in place. Make sure all connections are firm and insulated to prevent short circuits.
Ensuring Durability
Protect the electronic parts from dust and water by covering them with a small plastic box or waterproof case. Reinforce the sensor mounts with extra glue or brackets to avoid movement. Use heat shrink tubing on exposed wires to prevent wear and tear. Choose a sturdy stick material like aluminum or strong plastic to withstand daily use. Test the assembled stick by gently shaking it to check for loose parts. A well-built stick will last longer and give reliable performance.
Using The Smart Blind Stick
Using the smart blind stick is simpler than you might expect. It offers a reliable way to navigate your surroundings with confidence and independence. Once you get comfortable with its features, you’ll find it becomes an essential part of your daily routine.
Operating Instructions
Before you start, make sure the stick is fully charged and switched on. Hold the stick firmly and walk at a normal pace, letting the sensors detect obstacles ahead.
- The ultrasonic sensor will alert you with vibrations when an object is nearby.
- Pay attention to the intensity of the vibrations; stronger vibrations mean the obstacle is closer.
- If the stick has a buzzer, listen carefully for audio warnings that complement the vibrations.
Try to keep your hand steady to allow accurate readings. If you’re in a crowded area, slow down to give yourself more reaction time. Have you noticed how this feedback helps you adjust your path smoothly without sudden stops?
Maintaining The Device
Keeping your smart blind stick in good shape ensures it works properly every time you use it. Wipe the sensors gently with a soft cloth to remove dust or dirt that might block signals.
- Charge the battery regularly; avoid letting it drain completely to prolong battery life.
- Check the stick’s body for cracks or loose parts, especially after accidental drops.
- Update the device’s firmware if your model supports it, to improve performance and add new features.
Have you ever ignored small maintenance tasks only to face bigger issues later? Staying proactive with simple care routines can save you from unexpected troubles on the go.

Credit: www.youtube.com
Troubleshooting Common Issues
Building a smart blind stick with Arduino is rewarding, but you might face some hiccups along the way. Troubleshooting common issues early can save you hours of frustration. Understanding where problems typically arise helps you fix them quickly and keep your project on track.
Sensor Malfunctions
Sensors are the heart of your smart blind stick. If your ultrasonic or infrared sensors give inconsistent readings, start by checking their placement. Sensors too close to reflective surfaces can send false signals.
Sometimes, dust or dirt on the sensor lens causes poor detection. Cleaning the sensors gently with a soft cloth often improves performance immediately.
Have you tested your sensors with a simple code sketch to verify their output? This helps isolate hardware issues from coding bugs. Also, keep in mind that some sensors need a warm-up time to stabilize.
Connection Problems
Loose or incorrect wiring is the most common culprit in connection problems. Double-check each jumper wire and ensure they match your circuit diagram exactly.
Using a breadboard? Make sure the power rails are properly connected and there are no broken connections. A multimeter can be your best friend here to verify continuity.
Another point to consider is power supply. If your Arduino or sensors reset unexpectedly, insufficient current might be the cause. Try powering your setup with a reliable external source rather than just USB.
What’s your approach to testing connections? Taking the time to systematically check each connection can prevent hours of debugging later.
Frequently Asked Questions
What Components Are Needed For A Smart Blind Stick?
You need an Arduino board, ultrasonic sensors, a buzzer, a vibration motor, and a power source. Additional items include a stick, wires, and a breadboard for connections. These components help detect obstacles and alert the user effectively.
How Does The Arduino Smart Blind Stick Work?
The ultrasonic sensors detect obstacles by sending sound waves. Arduino processes the data and triggers alerts via buzzer or vibration motor. This helps visually impaired users navigate safely by sensing objects in their path.
Can I Customize The Smart Blind Stick Features?
Yes, you can add GPS, Bluetooth, or more sensors to enhance functionality. Customization depends on your coding skills and hardware compatibility. Arduino’s open platform allows easy modifications to meet specific user needs.
Is The Smart Blind Stick Easy To Build For Beginners?
Yes, basic knowledge of Arduino and electronics is enough to start. Numerous tutorials and code examples simplify the process. It’s a practical project for learning while creating an assistive device.
Conclusion
Building a smart blind stick with Arduino helps improve daily life. It detects obstacles and alerts users quickly. This project uses simple parts and basic coding skills. Anyone can try it at home with patience. It offers safety and independence for visually impaired people.
Small steps like this make a big difference. Keep experimenting and learning to make it better. Smart technology can be easy and useful for everyone.


