Are you tired of that old, weak shower spray? Installing a new shower head right in your wall can completely change your bathroom experience.
It might sound tricky, but with the right steps, you can do it yourself and save money. In this guide, you’ll discover simple, clear instructions to help you install your shower head quickly and confidently. Ready to upgrade your shower and enjoy a better wash every day?
Keep reading, and you’ll see how easy it really is.
Choosing The Right Shower Head
Choosing the right shower head is a key step before you start the installation process. It affects not only how your shower looks but also how it feels every day. Picking the perfect one means considering your needs, bathroom space, and personal style carefully.
Types Of Shower Heads
There are several types of shower heads, each offering a unique experience. Fixed shower heads attach directly to the wall and provide a steady spray. Handheld shower heads come with a flexible hose, giving you more control and flexibility.
Rain shower heads deliver a gentle, wide spray that mimics rainfall. If you enjoy a spa-like feel, this might be your best choice. Low-flow shower heads help save water without sacrificing pressure, which is great if you want to be eco-friendly.
Features To Consider
Think about the spray settings before you buy. Some shower heads let you switch between massage, mist, or full spray modes, which can change your shower experience dramatically. Water pressure compatibility is also crucial — will your water system support the shower head you choose?
Material and finish matter too. Stainless steel or brass lasts longer than plastic and often looks better. Also, check if the shower head has anti-clog nozzles; they reduce maintenance and keep your water flow strong.
Budget And Style
Your budget will narrow down your options, but it doesn’t mean you have to sacrifice style or function. You can find elegant and durable shower heads in a wide price range. Setting a clear budget helps you avoid overspending on features you don’t need.
Style should match your bathroom’s design. A modern bathroom pairs well with sleek, minimalist heads, while traditional spaces might look better with classic, rounded designs. Ask yourself: does the shower head enhance your bathroom’s look or clash with it?

Credit: www.youtube.com
Gathering Necessary Tools And Materials
Before you start installing your new shower head in the wall, gathering the right tools and materials is crucial. Having everything ready saves time and prevents frustrating interruptions during the project. Knowing exactly what you need also helps avoid unnecessary trips to the hardware store.
Essential Tools
- Adjustable wrench:Perfect for tightening or loosening nuts without damaging fixtures.
- Pipe wrench:Provides extra grip on stubborn plumbing parts.
- Plumber’s tape (Teflon tape):Ensures a watertight seal on threaded connections.
- Drill with appropriate bits:Needed if you have to make new holes or secure the shower arm bracket.
- Screwdriver set:Both flathead and Phillips head types are useful for various screws.
- Measuring tape:Helps position the shower head at the ideal height and spot.
- Level:Guarantees your shower head is installed straight for proper water flow.
Required Materials
- New shower head:Choose one that fits your water pressure needs and style preferences.
- Shower arm and flange:These connect the shower head to the water supply inside the wall.
- Replacement washers and O-rings:Prevent leaks by creating tight seals.
- Pipe joint compound (optional):Adds extra protection against leaks in threaded connections.
Safety Equipment
- Safety goggles:Protect your eyes from debris when drilling or handling pipes.
- Work gloves:Shield your hands from sharp edges and improve grip.
- Mask:Useful if you are drilling into walls that may contain dust or old paint.
Have you ever started a project only to realize mid-way that you’re missing a vital tool? It’s frustrating, but easily avoidable. Take a moment now to assemble everything. Your future self will thank you as the installation goes smoothly and efficiently.
Preparing The Work Area
Preparing the work area is the first important task before installing a new shower head. A clean, clear space makes the job easier and safer. It helps avoid damage to walls and plumbing. Proper preparation ensures a smooth installation process.
Removing Old Shower Head
Start by turning off the water supply. Use a wrench or pliers to loosen the old shower head. Turn it counterclockwise until it comes off. Protect the fixture by wrapping a cloth around it before using tools. Remove any leftover plumber’s tape or debris on the pipe threads.
Cleaning The Wall Surface
Clear the area around the pipe opening. Use a cloth or sponge with mild soap and water. Remove soap scum, dirt, and mold to ensure a clean surface. Dry the wall completely to prevent moisture damage. A clean wall helps the new shower head fit properly and look neat.
Inspecting Plumbing Connections
Check the pipe threads for damage or rust. Look for leaks or signs of water damage around the pipe. Tighten any loose fittings carefully. Replace worn-out washers or seals. Ensure the plumbing is in good condition before attaching the new shower head.
Credit: www.homedepot.com
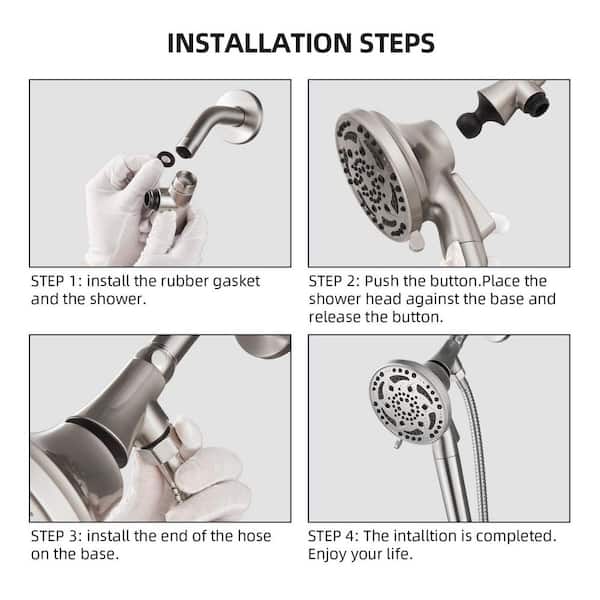
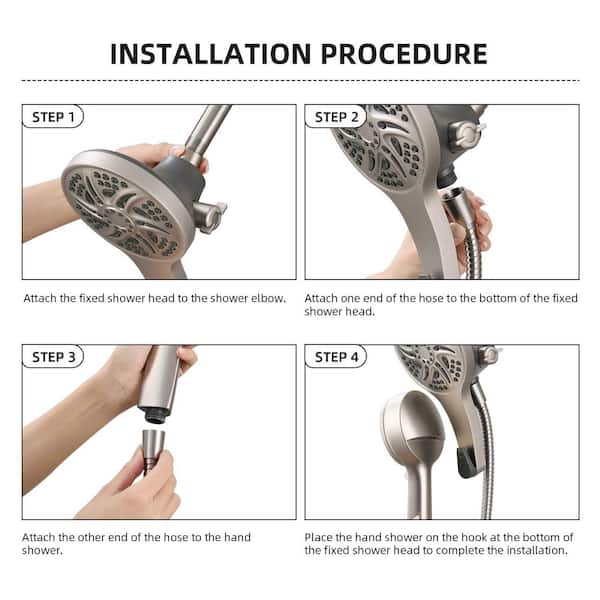
Installing The Shower Head
Installing the shower head correctly ensures a leak-free and enjoyable shower experience. This part of the process involves securing the mounting bracket, attaching the shower arm, and finally connecting the shower head itself. Each step requires attention to detail to avoid common pitfalls like loose fittings or water leaks.
Attaching The Mounting Bracket
The mounting bracket holds your shower arm firmly in place inside the wall. Start by locating the plumbing stub-out where the shower arm will connect. Use a pencil to mark the screw holes for the bracket on the wall surface.
Drill pilot holes at the marks and insert wall anchors if needed for extra support. Screw the mounting bracket tightly to the wall, ensuring it sits flush. This stability prevents wobbling once the shower arm and head are attached.
Securing The Shower Arm
Wrap plumber’s tape around the threads of the shower arm to create a watertight seal. Insert the arm into the plumbing stub-out and twist it clockwise by hand until snug. Use a pipe wrench or adjustable pliers to tighten it further, but avoid over-tightening which can damage the threads.
Make sure the arm is angled correctly to direct water flow properly. If you feel resistance before the arm is aligned, back it out and try again instead of forcing it. A well-positioned arm makes a big difference in shower comfort.
Connecting The Shower Head
Apply plumber’s tape to the threads of the shower arm where the shower head will attach. Screw the shower head onto the arm by hand until it’s tight. Check the fit and adjust the direction of the shower head to your liking.
Turn on the water briefly to test for leaks around the connections. If you spot drips, tighten the connections slightly or add more plumber’s tape. A secure connection means you won’t have to deal with annoying water drips during your showers.
Testing The Installation
Testing the installation of your new shower head is essential. It ensures everything works well and prevents future problems. Take your time to check every detail. This step saves you from leaks, low pressure, or poor performance.
Checking For Leaks
Turn on the water slowly. Watch the connection points closely. Look for any drops or moisture around the shower head base and wall pipe. Use a dry cloth to detect wet spots easily. Leaks can cause water damage if ignored. Tighten connections gently if you find leaks. Avoid over-tightening to prevent damage.
Adjusting Water Pressure
Feel the water flow from the shower head. It should be steady and strong. If the pressure is too low, check for blockages or debris inside. Clean the shower head holes carefully with a brush or vinegar. Adjust your home’s main water valve if needed. Proper pressure ensures a comfortable shower experience.
Ensuring Proper Functionality
Test all spray settings on the shower head. Switch between modes to confirm smooth operation. Each setting should deliver a clear water stream. Check the angle of the shower head to suit your needs. Make sure it stays firmly in place. Proper functionality means a relaxing, enjoyable shower every time.

Credit: www.mineralstream.co
Maintenance And Care Tips
Maintaining your shower head helps it last longer and work well. Simple care keeps water flowing freely and avoids damage. A clean shower head improves water pressure and hygiene. Follow these tips to keep your shower head in good shape.
Regular Cleaning Advice
Clean your shower head every few weeks. Use a soft cloth or sponge with mild soap. Rinse with warm water to remove soap residue. Avoid harsh chemicals that can damage the finish. Regular cleaning stops dirt and grime buildup.
Preventing Mineral Buildup
Mineral deposits block water flow and lower pressure. Soak the shower head in a vinegar solution for 30 minutes. Use a toothbrush to scrub away stubborn deposits. Rinse thoroughly to remove all vinegar. Repeat monthly to keep minerals under control.
Troubleshooting Common Issues
Low water pressure may mean a clogged shower head. Remove the shower head and check for blockages. Clear holes with a needle or toothpick carefully. Leaks can happen at connections—tighten fittings with a wrench. Replace worn washers to stop drips.
Frequently Asked Questions
How Do I Install A Shower Head In The Wall?
First, turn off the water supply. Remove the old shower head and arm. Attach the new shower arm into the wall pipe. Apply plumber’s tape on threads for a secure fit. Screw in the new shower head and test for leaks.
What Tools Are Needed To Install A Wall Shower Head?
You will need an adjustable wrench, plumber’s tape, a screwdriver, and a pipe wrench. Optionally, use a drill if new holes are needed. These tools help securely fit the shower arm and head without leaks or damage.
Can I Install A Shower Head Without A Plumber?
Yes, installing a shower head is a DIY-friendly task. Basic plumbing knowledge and the right tools are enough. Follow step-by-step guides carefully to avoid leaks or damage. If unsure, consult an expert for safety.
How Do I Prevent Leaks When Installing Shower Heads?
Use plumber’s tape on all threaded connections. Tighten fittings firmly but avoid overtightening. Check for leaks by turning on water slowly. Reapply tape or adjust connections if leaks appear.
Conclusion
Installing a shower head in the wall is simple with clear steps. Start by turning off the water supply and gathering tools. Measure and mark the spot carefully for a perfect fit. Attach the shower arm and secure the head tightly to avoid leaks.
Test the water flow and adjust as needed. Taking time and working patiently ensures a strong, lasting shower setup. Enjoy your new shower head and the improved bathroom experience. Small efforts make big changes. You can do this!


