
Are you tired of struggling with a fixed shower head that just doesn’t give you the flexibility you want? Installing a removable shower head can change your daily routine for the better.
Imagine being able to rinse every corner easily or adjust the water flow exactly how you like it. This simple upgrade can make your shower experience more comfortable and convenient. In this guide, you’ll learn exactly how to install a removable shower head step-by-step, even if you’ve never done it before.
Keep reading, and by the end, you’ll have the confidence to transform your shower in no time.

Credit: anorganizedseason.com
Choosing The Right Shower Head
Choosing the right removable shower head can transform your daily shower into a relaxing or invigorating experience. It’s not just about looks; the right shower head affects water flow, pressure, and even water usage. Think about your needs and preferences before making a choice to avoid frustration later.
Types Of Removable Shower Heads
There are several types of removable shower heads, each designed for different uses and preferences.
- Handheld Shower Heads:These are attached to a flexible hose, allowing you to direct water exactly where you want. Great for rinsing kids, pets, or hard-to-reach places.
- Fixed Removable Shower Heads:These mount on the wall but can be detached for cleaning or focused use. They combine the stability of a fixed head with some flexibility.
- Dual Shower Heads:These offer both a fixed and handheld head, giving you options for your shower routine.
- Massage Shower Heads:Designed to provide pulsating water streams, they can relieve muscle tension during showers.
Which type suits your lifestyle? If you have kids or pets, a handheld might be essential. For a spa-like feel, a massage model could be worth the investment.
Features To Consider
Beyond type, certain features will affect your satisfaction with the shower head.
- Water Pressure and Flow Rate:Check the flow rate (measured in gallons per minute). Some heads conserve water without sacrificing pressure.
- Spray Settings:Multiple spray patterns—from gentle mist to strong massage—add versatility.
- Material and Finish:Stainless steel or brass heads last longer and resist corrosion better than plastic ones.
- Ease of Installation:Look for models with universal fittings and clear instructions to save time.
- Hose Length:A longer hose provides more flexibility but might reduce water pressure slightly.
Think about what matters most to you: is it water conservation, massage features, or simple maintenance? Your shower head should fit your daily routine, not complicate it.
Gathering Necessary Tools
Before starting the installation of a removable shower head, gather all the tools needed. Having the right tools makes the job easier and faster. It helps avoid damage to the shower or the new head. Prepare your workspace to keep tools within reach. Check each item to ensure it is in good condition.
Essential Tools List
- Adjustable wrench – for loosening and tightening connections
- Plumber’s tape (Teflon tape) – to seal threads and prevent leaks
- Old cloth or rag – to protect fixtures from scratches
- Bucket or towel – to catch any water drips
- Screwdriver – for removing any screws on the existing shower head
Optional Accessories
- Pipe cleaner or brush – to clean the shower arm threads
- Silicone grease – to lubricate seals for a better fit
- Thread sealant paste – an alternative to plumber’s tape
- Flashlight – to see clearly in tight or dim spaces
Preparing The Shower Area
Preparing the shower area is the first step before installing a removable shower head. A clean and clear space makes the process smoother. It helps avoid damage and ensures a better fit for your new shower head.
Cleaning The Shower Space
Start by clearing away any soap scum or mineral buildup around the shower arm. Use a mild cleaner and a soft cloth to wipe the area. This prevents dirt from entering the new fixture. Also, dry the space completely to avoid slipping during installation.
Removing The Old Shower Head
Loosen the old shower head by turning it counterclockwise. Use an adjustable wrench if it is too tight. Protect the shower arm by wrapping it with a cloth before using tools. Once loose, carefully remove the shower head and set it aside. Check the shower arm for any damage or corrosion before proceeding.

Credit: www.theshowerheadstore.com
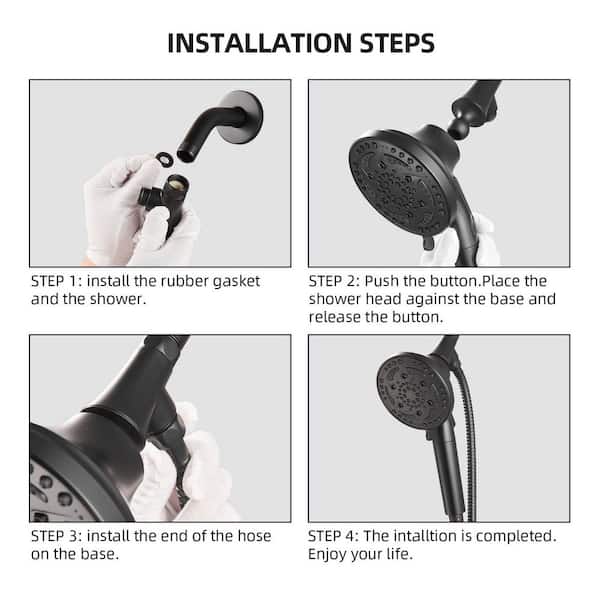
Installing The New Shower Head
Installing the new shower head is a straightforward process that can transform your daily routine. The key is to ensure each connection is tight and leak-free to enjoy a steady water flow. Let’s break down the crucial steps of attaching the shower arm and securing the shower head properly.
Attaching The Shower Arm
Start by wrapping plumber’s tape around the threads of the shower arm to create a watertight seal. This simple step prevents leaks and is often overlooked, causing frustration later. Screw the shower arm into the wall fitting, turning it clockwise until it feels snug.
Be careful not to overtighten, as this can damage the threads or the wall pipe. If you have a wrench, use it gently with a cloth to avoid scratching the metal. Can you feel how a properly sealed connection can save you from future water damage?
Securing The Shower Head
Once the arm is in place, attach the removable shower head by screwing it onto the shower arm threads. Again, use plumber’s tape on the threads of the shower head to ensure no leaks occur. Hand-tighten the shower head, then give it a slight turn with a wrench if needed.
Make sure the shower head is aligned to your preferred angle before fully tightening. A loose shower head can wobble and cause drips, while one that’s too tight might break the parts. Have you ever experienced a shower head that suddenly spins out of position? Proper securing prevents that annoying problem.
Testing The Installation
After installing your removable shower head, the real test begins. Ensuring everything works perfectly means checking for leaks and confirming the spray settings suit your preferences. These final checks save you from future headaches and help you enjoy your new shower experience right away.
Checking For Leaks
Turn on the water slowly and watch every connection point closely. Pay attention to the joint between the shower arm and the removable head. Even a tiny drip can waste water and cause damage over time.
If you spot leaks, try tightening the connections by hand first. Avoid over-tightening, which can crack plastic parts or strip threads. Adding plumber’s tape to the threads often fixes leaks quickly and securely.
Have you ever ignored a small leak only to face bigger problems later? Catching these early prevents costly repairs and keeps your bathroom dry and safe.
Adjusting Spray Settings
Most removable shower heads come with multiple spray settings. Test each setting by switching through them while the water runs. Notice the difference in water pressure and spray patterns.
Adjust the settings to what feels most comfortable and effective for your needs. Whether you want a gentle mist or a strong massage spray, make sure the transition between modes is smooth and easy to handle.
Think about how you use your shower daily. Would a focused stream help rinse shampoo better? Or does a wider spray cover more area for quick showers? Customizing these settings enhances your shower routine significantly.
Maintaining Your Shower Head
Maintaining your removable shower head keeps it working well and lasting longer. Regular care stops buildup and clogs, ensuring a steady water flow. A clean shower head also helps prevent bacteria and mold. Simple steps can save time and money on repairs.
Regular Cleaning Tips
Remove the shower head regularly for cleaning. Soak it in white vinegar for 30 minutes to dissolve mineral deposits. Use a soft brush to scrub nozzles gently. Rinse thoroughly with water before reattaching. Wipe the exterior with a damp cloth to remove soap scum. Clean every few weeks to keep water flowing smoothly.
Handling Clogs And Repairs
Check for clogged nozzles if water pressure drops. Use a needle or toothpick to clear blockages carefully. Avoid harsh tools that may damage the shower head. For tough clogs, soak the head longer in vinegar. Inspect rubber washers and replace if worn out. Tighten connections if leaks appear to prevent water waste.
Credit: www.homedepot.com
Frequently Asked Questions
How Do I Install A Removable Shower Head?
To install, first turn off the water supply. Remove the old shower head. Wrap plumber’s tape on the shower arm threads. Screw on the new removable shower head by hand, then tighten with a wrench if needed. Turn on water to check for leaks.
Can I Install A Removable Shower Head Myself?
Yes, installing a removable shower head is simple and doable by most homeowners. Basic tools like a wrench and plumber’s tape are required. Follow step-by-step instructions carefully. It usually takes less than 30 minutes and no professional help is needed.
What Tools Are Needed For Installation?
You only need a few tools: an adjustable wrench, plumber’s tape (Teflon tape), and a cloth to protect the finish. These tools help ensure a tight, leak-free fit and prevent damage to the shower arm or new shower head during installation.
How Do I Prevent Leaks When Installing?
Wrap plumber’s tape tightly around the shower arm threads before screwing on the new head. This seals gaps and prevents leaks. Avoid over-tightening the shower head, which can damage threads. After installation, check for leaks and tighten gently if necessary.
Conclusion
Installing a removable shower head is simple and quick. Follow the steps carefully to avoid leaks. Use plumber’s tape on the threads for a tight fit. Test the shower head to check the water flow. Cleaning and maintenance become easier with a removable head.
Enjoy the flexibility of adjusting your shower spray. A small change that improves your daily routine. Try it yourself and feel the difference today.


