
Are you looking to brighten up your outdoor space and add a touch of style to your home? Installing outdoor wall lighting is a simple way to enhance your curb appeal, improve safety, and create a warm, inviting atmosphere.
But if you’ve never done it before, the idea might feel overwhelming. Don’t worry—you’re about to learn easy, step-by-step tips that will help you install your outdoor wall lights like a pro. Keep reading, and you’ll discover how to transform your exterior with lighting that works perfectly for your needs.

Credit: www.amazon.com
Choosing The Right Outdoor Wall Lights
Choosing the right outdoor wall lights is key for safety and style. The perfect fixture brightens your space and complements your home. It must handle weather and fit your design taste. Consider the light type, durability, and look before buying. This guide helps you pick the best outdoor wall lights.
Types Of Outdoor Wall Lighting
Different lights serve different purposes. Consider these common types:
- Sconce lights:Mounted on walls, they add charm and soft light.
- Floodlights:Bright and wide, perfect for security and large areas.
- Lantern lights:Classic style with a warm glow, ideal near entrances.
- Step lights:Small lights near stairs for safety and subtle lighting.
- String lights:Decorative and cozy, good for patios or porches.
Selecting Weather-resistant Fixtures
Outdoor lights must resist rain, wind, and sun. Look for these features:
- Waterproof rating:Check IP ratings like IP44 or higher for protection.
- Rust-resistant materials:Choose aluminum, stainless steel, or plastic finishes.
- UV protection:Prevents fading and cracking from sunlight.
- Durable glass:Use tempered or shatterproof glass for safety.
Matching Style With Home Exterior
Light fixtures should blend with your home’s design. Here are tips to match styles:
- Modern homes:Pick sleek, simple designs in black or metal tones.
- Traditional houses:Choose lanterns or sconces with classic details.
- Rustic or farmhouse:Use fixtures with warm finishes and vintage looks.
- Coastal styles:Go for light colors and weathered metal finishes.
Gathering Necessary Tools And Materials
Before you embark on the journey of installing outdoor wall lighting, it’s crucial to gather all the tools and materials you’ll need. Preparation is the key to a smooth installation process. By having everything on hand, you avoid unnecessary trips to the hardware store and ensure a seamless workflow. Let’s break down the essential components to get you started.
Essential Tools For Installation
Having the right tools can make or break your project. Imagine halfway through the installation, you realize you lack a crucial tool. It’s frustrating, right? Here’s a list to keep you prepared:
- Drill:A good electric drill is necessary for making holes in walls.
- Screwdriver Set:Ensure you have both flathead and Phillips screwdrivers.
- Wire Strippers:Essential for safely handling electrical wires.
- Tape Measure:Accuracy is key; use it to measure distances.
Safety Gear And Precautions
Safety should never be an afterthought. Protecting yourself is as important as the installation itself. Are you prepared to handle electrical components safely?
- Safety Glasses:Protect your eyes from debris and sparks.
- Gloves:Use insulated gloves to safeguard against electrical shocks.
- Ladder:Ensure it’s stable and suitable for outdoor use.
- Voltage Tester:Double-check that wires are not live before handling them.
Materials Checklist
Beyond tools, the materials you select will impact both the functionality and aesthetics of your lighting. Are you ready with all the necessary materials?
- Outdoor Light Fixture:Choose a fixture that complements your home’s style.
- Light Bulbs:Ensure they are compatible with your fixture and suitable for outdoor use.
- Electrical Tape:Necessary for securing wire connections.
- Mounting Hardware:Screws and brackets specific to your fixture.
With this comprehensive checklist, you’re well on your way to a successful installation. Remember, preparation and safety are your best allies. Ready to light up your outdoors?
Planning The Installation Location
Planning where to install your outdoor wall lighting sets the foundation for both aesthetics and functionality. The right location can enhance your home’s curb appeal while improving safety and usability of your outdoor spaces. Take time to carefully evaluate your walls and surroundings before making a final decision.
Assessing Wall Surface And Structure
Start by examining the type of wall you have—brick, wood, stucco, or concrete all require different mounting techniques and hardware. Check for any damage or moisture issues that might affect the fixture’s stability or durability. A solid, dry surface ensures your light will stay secure and last longer.
Think about the wall’s orientation too. South-facing walls get more sunlight, which might cause some fixtures to fade faster. Have you noticed peeling paint or cracks that need repair before installation? Fixing these first can save you headaches later.
Determining Optimal Light Placement
Consider what you want to illuminate: a pathway, entrance, seating area, or decorative feature. Position the lights so they highlight these areas without causing glare or shadows that could hinder visibility. A good rule is to place fixtures about 6 to 8 feet above the ground for balanced lighting.
Ask yourself how the light will affect your neighbors or passersby. Will it shine directly into windows or create unwanted brightness? Adjusting angles or adding shields can help you avoid disturbing others while maintaining effective lighting.
Considering Electrical Access Points
Locate existing outdoor outlets or wiring that can power your new light fixtures. Running new wiring might require professional help, which can affect your timeline and budget. If you spot a convenient access point, it simplifies installation and keeps things safer.
Think about how you will connect the wiring—will you need a junction box or conduit for protection? Planning these details upfront reduces surprises and ensures your outdoor lighting meets local electrical codes. Have you checked if your planned location allows easy access for future maintenance?
Preparing The Installation Site
Preparing the installation site is a crucial step to ensure your outdoor wall lighting looks great and functions safely. Taking the time to get this right saves you from headaches later, like crooked fixtures or electrical issues. Let’s look at how to prepare your wall properly before mounting the lights.
Marking Mounting Points
Start by holding the light fixture against the wall where you want it installed. Use a pencil to mark the exact spots for the screws or bolts. Make sure the marks are level—grab a spirit level or use a smartphone app to check.
Double-check the height and position. Imagine how the light will shine and whether it might cause glare or shadows. Would you want it higher or lower? Marking accurately now prevents needing to patch holes later.
Drilling And Anchoring
Choose the right drill bit for your wall material—masonry bits for brick or concrete, wood bits for wooden walls. Drill holes at your marked points carefully, keeping the drill steady to avoid cracking the surface.
Use wall anchors if you’re drilling into drywall or hollow bricks. They give your screws a firm grip. Without anchors, your fixture might loosen or fall over time. If you’ve ever seen lights sagging after a few weeks, this is usually why.
Handling Wiring Safely
Turn off power at the circuit breaker before touching any wiring. Confirm with a voltage tester that no current is flowing. Safety here is non-negotiable—electric shocks can cause serious injury.
Use waterproof connectors and outdoor-rated wiring to protect against moisture. If your wiring runs through conduit, check that it’s sealed properly at entry points. Have you checked if your wiring complies with local electrical codes? Doing so avoids costly fixes and keeps your setup safe.
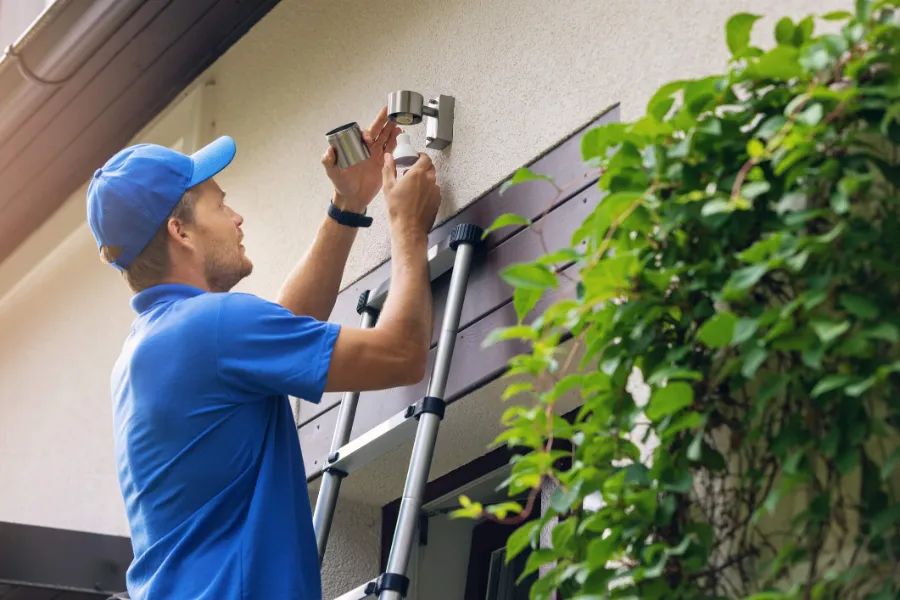
Installing The Outdoor Wall Lights
Installing outdoor wall lights can transform your home’s exterior, adding both style and safety. The process might seem technical, but breaking it down into clear steps makes it manageable. Focus on how you connect wires, secure the fixtures, and test everything to ensure a perfect setup.
Connecting Electrical Wires
Start by turning off the power at the breaker box to avoid any accidents. Carefully strip the ends of the wires and match the colors—usually black to black (live), white to white (neutral), and green or bare copper to ground. Use wire connectors to join the wires securely and wrap them with electrical tape for extra protection.
Have you checked if your wiring is compatible with the new lights? Sometimes, outdoor fixtures require a specific voltage or type of wire, so double-checking saves you from future headaches. Always tuck the wires neatly into the electrical box to prevent pinching or damage.
Mounting The Fixtures Securely
Choose a sturdy mounting surface like wood or masonry that can support the weight of your light fixture. Use a drill to create holes for the mounting screws, and if you’re attaching to brick or concrete, insert anchors first. Align the fixture’s mounting plate with the holes, then tighten the screws firmly to keep it from wobbling.
Think about the angle and height of your lights for optimal coverage. You want the light to illuminate pathways and entrances without glaring into windows or neighbors’ yards. Taking a moment to adjust the fixture before final tightening can make a big difference in function and appearance.
Testing The Lights
Once the fixture is mounted and wired, restore power at the breaker and switch on the lights. Look for steady illumination without flickering or dimming, which could indicate loose connections or voltage issues. If the light doesn’t turn on, double-check your wiring and ensure the bulb is properly installed.
Testing in different conditions, like nighttime or during rain, can help you confirm that the lights work reliably. Have you considered adding a timer or motion sensor? These features can increase convenience and energy savings while enhancing security around your home.
Credit: electricianportertx.com
Enhancing Lighting Effects
Enhancing the lighting effects of your outdoor wall lights can transform your space from ordinary to inviting. Small adjustments and thoughtful additions can make your lighting both functional and visually appealing. Let’s explore ways to make your outdoor lighting truly shine.
Adjusting Angles For Best Illumination
The angle of your outdoor lights affects how well they illuminate your space. You can tilt fixtures up or down to highlight garden features or walkways. Experiment with different angles until the light covers the desired area without creating harsh shadows or glare.
Consider how the light interacts with your wall and surroundings. Sometimes a slight turn can soften the light or create interesting patterns. Have you noticed how just a small change in angle can change the entire mood of your outdoor area?
Adding Timers And Sensors
Timers and motion sensors add convenience and efficiency to your outdoor lighting setup. They ensure lights turn on only when needed, saving energy and enhancing security. Imagine never having to worry if you left the lights on or being alerted when someone approaches your door.
Installing these devices is often straightforward and can be done alongside your lighting installation. You can set timers for specific hours or sensors to activate lights based on movement or daylight. What would you do with the extra energy savings and peace of mind?
Incorporating Decorative Elements
Decorative elements can add character and charm to your outdoor wall lights. Think about using lantern-style fixtures, colored glass, or metal designs that match your home’s style. These details turn simple lighting into a statement piece.
You might also add plants or textured backgrounds near your lights to enhance the overall effect. These touches create layers of interest and make your lighting feel more intentional. How could a few decorative tweaks change the vibe of your outdoor space?
Maintaining Outdoor Wall Lighting
Maintaining your outdoor wall lighting ensures it stays functional and attractive through changing weather and daily wear. Regular care not only extends the life of your fixtures but also keeps your outdoor spaces safe and inviting at night. Let’s look at practical ways you can keep your lighting in top shape without much hassle.
Cleaning And Upkeep Tips
Outdoor lights collect dust, dirt, and insect debris, which can dim the light and damage the fixture over time. Clean your lights gently with a soft cloth and mild soapy water every few months. Avoid harsh chemicals that could corrode the finish or cloud the glass.
Check for spider webs or nests regularly, especially in corners and crevices. A quick brush or a blast of compressed air can clear these out without damaging the fixture. Also, inspect seals and weatherproofing elements to prevent moisture from sneaking inside.
Replacing Bulbs Safely
Always turn off the power at the breaker before changing bulbs to avoid electrical shock. Use a sturdy ladder and have a helper if the fixture is out of reach. Choose bulbs that match the recommended wattage and type for your fixture to prevent overheating or damage.
Handle bulbs with a clean cloth or gloves to avoid transferring oils from your skin, which can shorten the bulb’s life. If your fixture uses LED bulbs, you’ll enjoy longer intervals between replacements, but keep spares handy for unexpected outages.
Troubleshooting Common Issues
If your outdoor wall light flickers or won’t turn on, check the bulb first—it’s often the simplest fix. Loose connections or corroded wiring can cause intermittent problems, so inspect wiring for wear or exposure to moisture.
Consider whether outdoor sensors or timers are properly set and functioning. Sometimes, adjusting the sensitivity or cleaning sensor lenses can resolve issues without professional help. Have you experienced a lighting problem that was surprisingly simple to fix?

Credit: www.amazon.com
Frequently Asked Questions
What Tools Are Needed For Outdoor Wall Lighting Installation?
You need a drill, screwdriver, wire strippers, voltage tester, and mounting hardware. Safety gear like gloves is essential. These tools ensure secure and safe installation.
How Do I Choose The Right Outdoor Wall Light?
Consider brightness, style, and weather resistance. Choose LED for energy efficiency and durability. Match lighting with your home’s exterior design.
Can I Install Outdoor Lighting Without An Electrician?
Yes, if you have basic electrical knowledge and follow safety rules. Turn off power before installation. For complex wiring, hiring a professional is safer.
How Do I Waterproof Outdoor Wall Lights?
Use weatherproof fixtures and seal all wire connections with silicone. Ensure the light has an IP rating suitable for outdoor use. Proper sealing prevents water damage.
Conclusion
Installing outdoor wall lighting can brighten your home and improve safety. Choose the right lights and tools before starting. Follow each step carefully to avoid mistakes. Check all connections to ensure they work properly. Enjoy the warm glow and enhanced look of your outdoor space.
Regular maintenance keeps your lights shining bright. Simple tasks, great results. You can do this!


