Is your Delta kitchen faucet leaking and driving you crazy? A constant drip not only wastes water but can also raise your bills and damage your sink area.
The good news is, you don’t have to call a plumber right away. You can fix that leak yourself—quickly and easily. In this guide, you’ll discover simple steps to stop the drip and save money. Keep reading, and you’ll have your faucet working perfectly again in no time.
Identifying The Leak Source
Finding where your Delta kitchen faucet is leaking is the key to fixing it fast. Before you grab tools or parts, you need to know exactly where the water is escaping. This saves you time and avoids replacing components that are still working perfectly.
Common Leak Areas
Leaks often show up in a few predictable spots on your Delta faucet. Check around the base where the faucet meets the sink. If water pools here, the problem might be a worn-out O-ring or seal.
Another frequent leak area is the spout itself. Sometimes, water drips from the spout even when the faucet is off, which can mean the cartridge inside needs replacement. Also inspect the handle area closely; a loose or damaged handle can cause leaks.
Don’t forget the connections under the sink. Loose or cracked supply lines can mimic a faucet leak, so tighten these and look for any signs of water.
Signs Of A Faucet Leak
How can you tell if your faucet is leaking? One clear sign is a constant drip or trickle of water after you turn off the faucet. This wastes water and can hike your bills without you noticing immediately.
Listen closely. A hissing or dripping noise when the faucet is off often points to a leak inside the faucet mechanism. You might also spot water stains or corrosion marks near the faucet base or under the sink.
Has your water meter been running when no water is in use? That’s a strong indication of a hidden leak. Catching these signs early helps you avoid bigger damage and costly repairs.

Credit: www.youtube.com
Gathering Necessary Tools
Before fixing a Delta kitchen faucet leak, gather all necessary tools. Having the right tools ready makes the repair smoother and faster. It reduces mistakes and keeps the process safe.
Prepare a clean workspace near the sink. Keep a towel or small container to catch water drips. This helps avoid mess and damage.
Essential Tools List
- Adjustable wrench
- Phillips and flathead screwdrivers
- Allen wrench (hex key)
- Plumber’s grease
- Replacement O-rings and seals
- Cleaning cloth or rag
- Bucket or bowl for water
- Flashlight for better visibility
Safety Precautions
- Turn off the water supply before starting work
- Wear gloves to protect your hands
- Work in a dry area to avoid slips
- Use tools properly to prevent injury
- Keep small parts away from children and pets
- Check for sharp edges on faucet parts
Turning Off Water Supply
Before you dive into fixing a Delta kitchen faucet leak, turning off the water supply is a crucial first step. This prevents any unexpected water flow that could make the repair messier or cause damage. Taking a moment to properly shut off the water can save you time and stress later on.
Locating The Shut-off Valve
Look under your kitchen sink to find the shut-off valves. Typically, there are two valves—one for hot water and one for cold. They are small, round knobs or lever handles connected to the pipes.
If you don’t see valves under the sink, check near your main water supply or the basement. Knowing exactly where these valves are can speed up your repair process and reduce frustration.
Draining Remaining Water
After turning off the valves, open the faucet to drain any water left in the pipes. This step helps avoid water spills when you start working on the faucet.
Keep the faucet open until no more water flows out. It’s a simple move that ensures a dry workspace and makes spotting leaks easier during your repair.

Credit: www.youtube.com
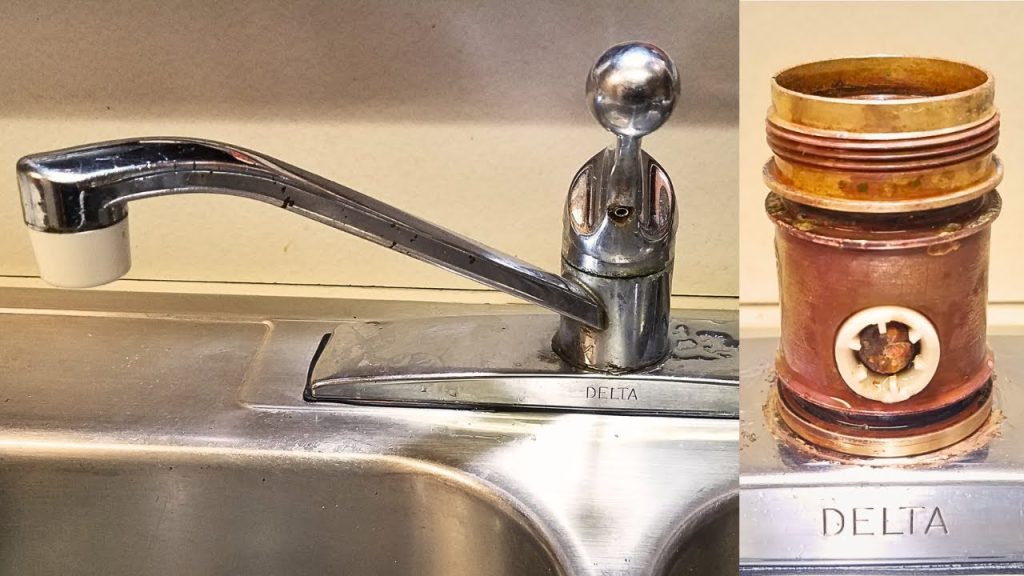
Removing The Faucet Handle
Removing the faucet handle is the first task in fixing a Delta kitchen faucet leak. This step gives you access to the parts inside. You need to be careful to avoid damaging the handle or other pieces. Clear space around the sink to work comfortably.
Unscrewing The Handle
Start by locating the screw that holds the handle. It is often hidden under a cap or decorative cover. Use a flathead screwdriver to gently pry off the cap. Next, use the correct size Allen wrench or screwdriver to remove the screw.
Turn the screw counterclockwise to loosen it. Keep the screw in a safe place to avoid losing it. Once the screw is out, the handle should lift off easily. If it sticks, wiggle it gently from side to side. Avoid using force to prevent damage.
Accessing Internal Components
With the handle removed, you can now see the cartridge or valve inside. These parts control water flow and often cause leaks. Remove any additional covers or retaining clips carefully. Use pliers if needed, but grip gently to avoid breaking parts.
Inspect the area for wear or damage. Clean away any mineral buildup or debris. This cleaning helps you see the problem clearly. Now you are ready to replace faulty parts or perform further repairs.
Inspecting And Replacing O-rings
Inspecting and replacing O-rings is a key step to stop your Delta kitchen faucet from leaking. O-rings are small but crucial parts that create a tight seal to prevent water from escaping. Over time, they wear out, crack, or get damaged, causing leaks.
Knowing how to identify worn O-rings and replace them correctly can save you from costly repairs or a full faucet replacement. You don’t need to be a plumber to handle this fix—just a bit of patience and the right tools.
Identifying Worn O-rings
Start by turning off the water supply to your faucet. Then, carefully remove the handle to access the cartridge where the O-rings are located.
Look closely at the O-rings for any signs of wear such as cracks, flattening, or brittleness. If the O-rings look dry or have lost their elasticity, they likely need to be replaced.
Have you noticed your faucet dripping even after tightening the handle? That’s often a sign that the O-rings have failed to seal properly. Make sure to check both the cartridge and the stem for multiple O-rings.
Installing New O-rings
Before installing new O-rings, clean the groove where they sit to remove mineral build-up or debris. This ensures a smooth fit and a proper seal.
Lubricate the new O-rings with a plumber’s grease—this helps them slide into place easily and extends their lifespan.
- Place the new O-ring gently in its groove without stretching it too much.
- Reassemble the cartridge and handle carefully to avoid pinching the O-ring.
- Turn the water supply back on and test for leaks by running the faucet.
Replacing O-rings can feel fiddly, but it’s a straightforward fix once you get the hang of it. If a small rubber ring can stop a leak, what other simple fixes could you tackle around your home?

Credit: www.youtube.com
Checking And Replacing The Cartridge
Checking and replacing the cartridge in your Delta kitchen faucet is a key step to stop leaks and restore smooth water flow. The cartridge controls water temperature and pressure, so if it’s damaged or worn out, leaks often follow. Understanding how to remove the old cartridge and install a new one can save you both time and money.
Removing The Old Cartridge
Start by turning off the water supply under your sink to avoid any mess. Then, open the faucet to release any remaining water pressure.
Use a flathead screwdriver or an Allen wrench to remove the handle screw. Carefully lift the handle off. You might need to gently wiggle it if it feels stuck.
Next, remove the retaining clip or nut holding the cartridge in place. Keep track of small parts so they don’t get lost.
Pull the old cartridge straight up and out. If it resists, try using pliers with a gentle twisting motion. Note how the cartridge is positioned for easier installation of the new one.
Installing A New Cartridge
Before installing, compare the new cartridge with the old one to ensure they match perfectly. This helps avoid leaks caused by incorrect parts.
Insert the new cartridge carefully, aligning it exactly as the old one was. Press it firmly into place without forcing it.
Replace the retaining clip or nut to secure the cartridge. Reattach the handle and tighten the screw, but avoid overtightening to prevent damage.
Turn the water supply back on and test the faucet. Watch for leaks and check if the handle moves smoothly. Could this simple fix improve your kitchen’s daily routine?
Reassembling The Faucet
Reassembling the faucet is a crucial part of fixing a Delta kitchen faucet leak. This step brings all parts back together securely. Proper reassembly ensures the faucet works smoothly without dripping.
Take your time to align each component correctly. Loose parts can cause leaks again. Follow the sequence carefully for the best results.
Securing The Handle
Place the handle onto the faucet stem. Make sure it fits snugly without forcing it. Tighten the handle screw using the right tool, usually a screwdriver or Allen wrench.
Check that the handle moves smoothly up and down. It should not wobble or feel loose. A secure handle helps control water flow precisely.
Testing For Leaks
Turn the water supply back on slowly. Watch the faucet closely for any drips or water escaping. Test the handle by turning water on and off several times.
Inspect around the base and under the sink. Use a dry cloth to spot any moisture. If leaks appear, tighten connections or recheck seals.
Preventive Maintenance Tips
Keeping your Delta kitchen faucet leak-free is easier when you focus on preventive maintenance. Small habits can save you from bigger repairs down the road. Let’s look at some practical tips that help you catch issues early and keep your faucet working smoothly.
Regular Inspections
Check your faucet regularly for any signs of leaks or drips. Look closely at the base, spout, and handles, especially after heavy use. Even a tiny drip can indicate a worn-out washer or seal that needs attention.
Ask yourself: How often do you inspect your faucet? Making it a monthly habit can prevent unexpected leaks.
Also, listen for unusual sounds like squeaks or hisses when turning the faucet on or off. These noises often hint at internal problems that can be fixed early.
Cleaning Strategies
Mineral buildup is a common cause of faucet leaks and poor performance. Use a soft cloth and mild vinegar solution to clean around the spout and handles every few weeks. Avoid harsh chemicals that can damage the finish or internal parts.
Don’t forget to clean the aerator—it often traps debris that affects water flow and causes pressure changes leading to leaks.
- Remove the aerator by twisting it off gently.
- Soak it in vinegar for 30 minutes.
- Rinse thoroughly and reinstall.
These simple cleaning steps help maintain smooth water flow and extend the life of your faucet’s seals and cartridges.
Frequently Asked Questions
How Do I Stop A Delta Kitchen Faucet From Leaking?
To stop a Delta faucet leak, first turn off the water supply. Next, disassemble the faucet and inspect the O-rings and cartridge. Replace any damaged parts with genuine Delta replacements. Reassemble the faucet carefully and test for leaks to ensure the issue is fixed.
What Tools Are Needed To Fix A Delta Faucet Leak?
You need an adjustable wrench, Phillips screwdriver, Allen wrench, and pliers. Also, have replacement parts like O-rings or cartridges ready. A towel and bucket help catch water. These tools ensure a smooth and efficient repair process for your Delta kitchen faucet leak.
Why Does My Delta Kitchen Faucet Keep Dripping?
A dripping Delta faucet usually indicates worn-out O-rings or a faulty cartridge. Mineral buildup or loose parts can also cause leaks. Regular maintenance and timely replacement of damaged components help prevent continuous dripping and save water.
Can I Fix A Delta Faucet Leak Myself?
Yes, fixing a Delta faucet leak is doable for most DIYers. Basic plumbing tools and replacement parts are required. Follow step-by-step instructions carefully, and ensure the water supply is off before starting. If unsure, consulting a professional plumber is advisable.
Conclusion
Fixing a Delta kitchen faucet leak is easier than you think. Start by turning off the water supply. Check the parts carefully for wear or damage. Replace the worn parts with new ones. Tighten connections to stop water dripping. A small drip can waste a lot of water over time.
Taking action quickly saves you money and stress. Keep tools and replacement parts ready for future leaks. With simple steps, you can keep your faucet working well. Don’t let a leak ruin your kitchen comfort.


