
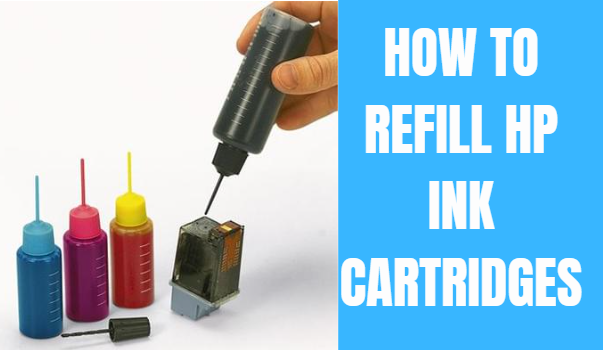
Are you tired of constantly buying new ink cartridges? What if you could save money and reduce waste by refilling your own?
Drilling a hole in your ink cartridge might sound tricky, but with the right steps, you can do it safely and easily. In this guide, you’ll learn exactly how to drill a hole in your ink cartridge for a smooth refill process.
Keep reading to discover simple tips that will make your ink last longer and your printing cheaper.
Tools And Materials Needed
To drill a hole in an ink cartridge for refill, gather the right tools and materials first. Using proper equipment helps avoid damage to the cartridge. It also makes the process easier and cleaner. Prepare a safe workspace with good lighting and a flat surface.
Drill Or Pin Vice
A small drill or pin vice is essential for making a precise hole. Choose a drill bit size that matches the cartridge’s refill hole requirements. A pin vice offers better control for delicate cartridges.
Protective Gloves
Wear gloves to keep your hands clean and safe. Gloves prevent ink stains and protect against sharp edges. Use disposable gloves for easy cleanup.
Ink Cartridge
Have the empty ink cartridge ready to refill. Confirm the cartridge type and size before drilling. Keep it stable on your work surface.
Marker Or Tape
Mark the spot where you will drill. Use a permanent marker or small piece of tape. This helps to drill accurately without mistakes.
Cleaning Cloth Or Paper Towels
Keep cloth or paper towels nearby. They help wipe any ink spills or dust from drilling. Clean the cartridge surface before and after drilling.
Protective Eyewear
Wear safety glasses to protect your eyes from tiny ink droplets or debris. Safety is important, even for small tasks.
Credit: www.tiktok.com
Preparing The Workspace
Preparing the workspace is key before drilling a hole in the ink cartridge. A clean and organized area helps avoid spills and mistakes. It also keeps tools within easy reach, saving time and effort.
Choose a flat surface with good lighting. This helps you see the cartridge clearly and work precisely. Protect the surface with old newspapers or a plastic sheet. Ink can stain, so coverage is important.
Gather all needed tools before starting. This includes a small drill or pin, gloves, and paper towels. Having everything ready prevents interruptions during the process.
Choose A Well-lit And Flat Surface
Pick a sturdy table or desk that does not wobble. Make sure the light is bright to see small details. Natural light or a desk lamp works well.
Protect The Work Surface
- Cover the area with old newspapers or a plastic sheet
- Use paper towels to catch any ink spills
- Keep cleaning wipes nearby for quick cleanup
Gather Necessary Tools And Materials
- Small drill bit or sharp pin for making the hole
- Disposable gloves to protect your hands
- Paper towels or cloths for wiping ink
- A container to hold the ink cartridge securely
Ensure Proper Ventilation
Work in a well-ventilated room to avoid ink fumes. Open windows or use a fan if possible. Fresh air helps keep the workspace comfortable.
Identifying The Correct Spot
Identifying the correct spot to drill a hole in your ink cartridge is crucial for a successful refill. Drilling in the wrong place can cause leaks or damage your cartridge permanently. Understanding exactly where to drill ensures you maintain the cartridge’s functionality and get the most out of your refill.
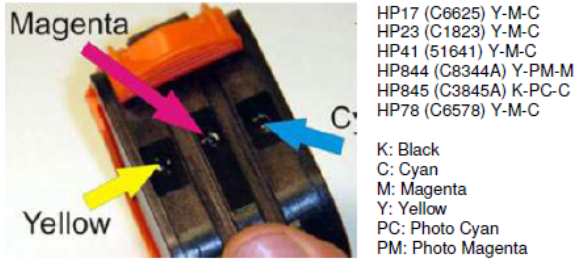
Locating The Ink Refill Port
Most ink cartridges have a small, designated spot meant for refilling. This spot is usually covered by a sticker or a plastic plug. Carefully inspect your cartridge for any markings or removable seals—these often hide the perfect drilling point.
If you can’t find a clear indicator, look for a small, flat area on the top or side of the cartridge. This area should be away from the electrical contacts and nozzles. Drilling here reduces the risk of damaging essential parts.
Using Cartridge Diagrams And Labels
Many manufacturers provide diagrams on their packaging or websites. These diagrams show the correct refill location clearly. You can also search online by your cartridge model to find specific instructions and images.
Labels on the cartridge itself sometimes give clues. Look for tiny icons or text like “refill here” or “do not puncture.” These hints can save you from guesswork and costly mistakes.
Testing With A Pin Before Drilling
Before drilling, test the spot with a small pin or needle. Gently press to check if the plastic feels soft or hollow underneath. A soft spot often indicates a refill area.
This quick test helps you avoid drilling into solid plastic or sensitive components. If the pin meets resistance, try a different spot. Your careful approach will pay off with a clean refill.
Considering Cartridge Shape And Ink Flow
Think about how the ink flows inside the cartridge. Drilling near the center of the ink reservoir ensures the refill reaches all the ink. Avoid edges or corners where ink might not reach evenly.
Have you ever wondered why some refills cause air bubbles or ink clogs? The drilling spot plays a key role. Place your hole where ink can flow smoothly to prevent these issues.
Safety Precautions
Drilling a hole in an ink cartridge might seem straightforward, but it comes with safety risks you cannot ignore. Taking the right precautions protects you from harm and ensures your refill process goes smoothly. Ignoring these safety steps might lead to ink spills, damage to the cartridge, or even personal injury.
Use Protective Gear
Always wear gloves to avoid direct contact with ink, which can stain your skin and cause irritation. Safety goggles are essential to protect your eyes from ink splashes or tiny plastic fragments. If you don’t have goggles, even regular glasses can reduce the risk of eye injury.
Work In A Well-ventilated Area
Ink cartridges contain chemicals that can release fumes when pierced. These fumes might cause headaches or dizziness if inhaled in a closed space. Open a window or work near a fan to keep fresh air flowing as you drill.
Choose The Right Tools
Use a small, sharp drill bit designed for plastic to avoid cracking the cartridge. A manual hand drill gives you better control than an electric one, reducing the risk of slipping. Have a steady surface to work on—wobbling can make accidents more likely.
Secure The Cartridge Properly
Hold the cartridge firmly or clamp it to your workspace before drilling. If the cartridge moves, the drill can slip, damaging it or hurting your hand. Taking a moment to stabilize your setup can save you a lot of trouble later.
Prepare For Ink Spills
Place paper towels or old newspapers under your workspace to catch any ink that leaks. Keep cleaning materials like wet wipes or a damp cloth nearby to wipe spills immediately. Have patience—rushing can cause messy accidents and wasted ink.
Have you ever underestimated a simple task and ended up with unexpected mess or injury? Taking these safety steps seriously will keep your refill process safe and effective.
Drilling The Hole
Drilling the hole in your ink cartridge is a crucial step for a successful refill. It allows the ink to flow smoothly without damaging the cartridge. Taking your time here can save you from leaks or cartridge failure later on.
Choosing The Right Drill Bit
Picking the right drill bit is key to avoiding cracks or spills. Use a small, sharp bit—usually around 1.5mm to 2mm works best for most cartridges. Too large a bit can cause ink to leak, while too small may block ink flow.
Look for a bit made of high-speed steel (HSS) or carbide. These materials stay sharp longer and make cleaner holes. If you have a set of precision drill bits, that’s even better for accuracy.
Step-by-step Drilling Process
- Secure the cartridge firmly on a flat surface to prevent movement.
- Mark the spot where you want to drill the hole, usually near the top or side, away from electrical contacts.
- Use a steady hand and drill slowly. Rushing can crack the plastic or make uneven holes.
- Pause occasionally to check the hole size and clear away any plastic debris.
- After drilling, gently wipe the area to remove dust before refilling.
Have you ever tried drilling without securing the cartridge? It’s tempting to hold it by hand, but that often leads to slips and damage. Taking a moment to stabilize your cartridge can make all the difference.
What’s your experience with drilling ink cartridges? Do you have tips or tricks that worked well? Sharing your insights can help others avoid common mistakes and get better results.
Credit: medium.com
Refilling The Ink Cartridge
Refilling your ink cartridge can save you money and reduce waste, but it requires careful attention to detail. Knowing the right ink to use and how to fill the cartridge properly makes all the difference in print quality and cartridge longevity. Let’s look closely at what you need to get right before you start filling.
Selecting The Correct Ink
Choosing the right ink is crucial for your printer’s performance. Not all inks work with every cartridge, so check your printer’s manual or the cartridge label for compatibility.
Using the wrong ink can cause clogs or damage the cartridge’s internal parts. If you want vibrant colors or sharp text, pick ink specifically designed for your printer model.
Think about what you usually print. Are you doing photo printing or just documents? This will guide your choice between dye-based or pigment-based inks.
Filling Techniques
Before drilling the hole, gather all materials: the correct ink, a syringe or dropper, gloves, and a clean workspace. This helps avoid spills and messes.
Once you’ve drilled the hole, gently insert the syringe and add ink slowly. Overfilling can cause leaks and affect print quality, so take your time and add ink in small amounts.
After filling, seal the hole with tape or a special plug to prevent air from entering and ink from leaking out. Have you noticed your prints fading after refills? This step often makes a big difference in maintaining ink flow.
Sealing The Cartridge
Sealing the cartridge properly after drilling is crucial to prevent ink leaks and maintain the printer’s performance. A well-sealed cartridge ensures that the ink flows smoothly without spilling, which can save you from messy cleanups and potential damage to your printer. Paying attention to this step can make your refill process much more reliable and efficient.
Using Sealant
Choose a sealant that is compatible with plastic and safe for use with ink. Silicone sealants or epoxy putty work well because they create a strong, flexible barrier that won’t crack over time.
Apply a small amount of sealant around the drilled hole using a toothpick or a fine brush. Avoid adding too much—just enough to cover the edges and fill any gaps.
Allow the sealant to dry completely before moving to the next step. This usually takes a few hours, but checking the product instructions is a smart move.
Testing For Leaks
After the sealant has dried, it’s time to test your work. Gently squeeze the cartridge to see if any ink leaks out from the sealed area.
If you notice any leaks, add a bit more sealant and let it dry again. Testing might feel tedious, but it saves you from bigger problems down the road.
Have you ever skipped this step and ended up with ink all over your desk? Taking a few extra minutes here can keep your workspace clean and your refill job successful.
Troubleshooting Common Issues
Troubleshooting common issues is key to a smooth ink cartridge refill. Small mistakes during drilling can cause problems. Knowing how to fix these helps save time and ink. Below are common issues and simple fixes.
Ink Leakage
Ink leakage often happens if the hole is too big or drilled incorrectly. Use a small drill bit for a precise hole. Avoid pushing too hard to prevent cracks.
Check the cartridge seal. If the seal breaks, ink can leak. Replace or repair the seal before refilling. Always clean the cartridge surface to remove dirt.
After drilling, cover the hole with tape or a plug designed for cartridges. This stops ink from spilling during printing.
Printing Errors
Printing errors occur if the cartridge is not refilled properly. Too much or too little ink can cause streaks or blank pages. Fill the cartridge slowly to control the ink level.
Air bubbles inside the cartridge block ink flow. Tap the cartridge gently to release trapped air. Avoid shaking the cartridge hard.
Reset the printer or clean the printhead if errors persist. This ensures the printer reads the refilled cartridge correctly.
Maintenance Tips
Maintaining your ink cartridge after drilling a hole for refill is crucial to ensure smooth printing and avoid damage. Proper care can extend the life of your cartridge and save you money. Small habits and attention to detail make a big difference in performance and durability.
Keep The Hole Clean And Clear
After drilling, ink residue and tiny plastic bits often clog the hole. Use a soft cloth or a cotton swab dipped in rubbing alcohol to gently clean the hole. This prevents blockages that could affect ink flow and printing quality.
Seal The Hole Properly
Leaving the hole open can cause ink to dry out or leak. Use a small piece of tape or a silicone plug to seal the hole tightly after refilling. This simple step keeps the ink fresh and prevents messes inside your printer.
Store Cartridges In A Cool, Dry Place
Heat and humidity can affect the ink’s consistency and cartridge material. Store refilled cartridges in a drawer or box away from direct sunlight and moisture. Have you noticed ink cartridges drying out faster when left near windows or heaters?
Refill Only When Necessary
Over-refilling can cause ink to spill or damage the cartridge’s internal components. Check the ink level before refilling and avoid topping up too frequently. Keeping track of your printer’s ink usage helps avoid unnecessary refills and ensures optimal cartridge health.
Test The Cartridge Before Installing
After refilling and sealing, test the cartridge by printing a few pages. This helps identify any leaks or flow issues early on. Catching problems before installation can save you time and prevent printer damage.
Credit: medium.com
Frequently Asked Questions
How Do I Safely Drill A Hole In An Ink Cartridge?
Use a small, sharp drill bit and steady hands. Wear gloves and eye protection. Drill slowly to avoid cracking the cartridge.
What Tools Are Needed To Drill An Ink Cartridge?
You need a small drill bit, a hand drill or rotary tool, gloves, and eye protection. A steady surface helps.
Where Is The Best Spot To Drill On An Ink Cartridge?
Drill on the designated refill port or a flat, thin area. Avoid the chip and ink nozzles for best results.
Can Drilling An Ink Cartridge Damage It?
Yes, drilling can crack or puncture the cartridge if done improperly. Use caution and the right tools to prevent damage.
Conclusion
Drilling a hole in the ink cartridge is simple and safe when done carefully. Use the right tools and follow the steps closely. This method helps refill your cartridge and saves money. Take your time to avoid damage. Clean the cartridge after drilling to prevent leaks.
Now, you can print more without buying new cartridges often. Try this method for easy refills and better printer use. It’s a small skill that makes a big difference.


