
Have you ever noticed your shower head spraying unevenly or clogging up with mineral buildup? Before you rush to buy a new one, there’s a simple fix you can try yourself.
Learning how to disassemble a shower head is easier than you think—and it can save you time and money. In this guide, you’ll discover step-by-step tips to take apart your shower head safely and effectively. Keep reading, and you’ll be back to enjoying a powerful, refreshing shower in no time.
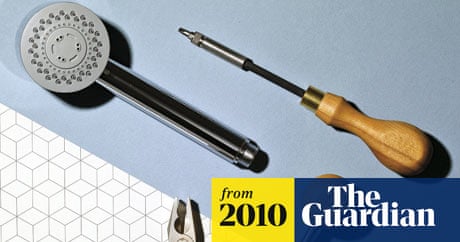
Tools Required
Disassembling a shower head needs the right tools for safety and ease. Having the correct tools saves time and avoids damage. Gather these items before starting your task. Each tool has a specific role in the process.
Adjustable Wrench
An adjustable wrench helps loosen the shower head from the pipe. It fits various sizes, making it versatile. Use it carefully to avoid scratching the finish.
Rubber Strap Wrench
A rubber strap wrench grips the shower head without damage. Ideal for delicate or polished surfaces. It provides a firm hold and prevents slipping during removal.
Needle-nose Pliers
Needle-nose pliers help remove small parts and clean inside areas. Their narrow tips reach tight spaces easily. Use them gently to avoid bending or breaking components.
Cloth Or Towel
Wrap a cloth or towel around the shower head before using tools. This protects the surface from scratches or dents. It also gives extra grip for turning.
Bucket Or Container
A bucket or container catches water or small parts during disassembly. Keeps your work area clean and organized. Prevents losing screws or washers.
Cleaning Brush
A small cleaning brush removes dirt and mineral build-up inside the shower head. Helps keep parts clean for better function. Use it after disassembly for maintenance.
Credit: www.theguardian.com
Safety Precautions
Before you start taking apart your shower head, safety should be your top priority. Handling plumbing fixtures involves tools, water, and sometimes built-up grime or mineral deposits that can surprise you. Taking the right precautions protects you from injury and prevents damage to your bathroom setup.
Turn Off The Water Supply
Always shut off the water supply to your shower before you begin. This step prevents unexpected bursts of water that can cause slips or water damage. If your home doesn’t have a dedicated valve for the shower, consider turning off the main water supply.
Wear Protective Gloves And Eyewear
Mineral deposits and old grime can be sharp or irritating to your skin and eyes. Wearing gloves protects your hands from cuts and exposure to cleaning chemicals. Safety glasses keep debris or splashes out of your eyes while you work.
Use Proper Tools For The Job
Using the right tools reduces the risk of slipping and damaging the shower head or injuring yourself. Adjustable wrenches or pliers with a rubber grip work best. Avoid using excessive force—if a part won’t budge, try applying a lubricant first.
Be Mindful Of Hot Water Residue
If you recently used the shower, be cautious of hot water left in the pipes or shower head. Let the water cool down to avoid burns. Running the tap for a few seconds after turning off the supply can help clear out residual heat.
Clear The Area And Protect Surfaces
Remove any rugs or items around the shower that might get wet or damaged. Lay down towels or a plastic sheet to catch drips and keep your floor dry. This small step can save you from slips and cleanup headaches later.
Shutting Off Water Supply
Before you start taking apart your shower head, the most important thing is to shut off the water supply. If you don’t, water will spray everywhere the moment you loosen the parts. This can cause a mess and might even damage your bathroom.
Locate The Main Water Valve
Start by finding the main water valve for your home. It’s usually near the water meter or where the main pipe enters your house. Turning this off stops water flow to every fixture, including your shower.
Not sure where your valve is? Check near the basement, garage, or outside walls. If you live in an apartment, ask building management.
Turn Off The Shower’s Local Valve
Some showers have a local shut-off valve just for the bathroom or even the shower. Look under the sink or behind an access panel in the bathroom wall. Turning off this valve can save you from shutting water to the whole house.
This is especially useful if you want to work on the shower without affecting other water uses. Have you checked your bathroom for this handy feature yet?
Test The Water Flow
After you turn off the valve, open the shower faucet to see if water stops flowing. If water still comes out, the valve might not be fully closed or you might have turned off the wrong one.
Try turning the valve a bit more or double-check your main shut-off. Confirming no water flows is crucial before dismantling your shower head.
Prepare For Any Water Left In Pipes
Even after shutting off the supply, some water may remain in the pipes and shower head. Place a towel or bucket under the shower head to catch any drips when you start unscrewing it.
This simple precaution keeps your floor dry and prevents slipping accidents. Have you ever been surprised by leftover water when fixing plumbing?

Credit: www.youtube.com
Removing The Shower Head
Removing the shower head is the first crucial step in disassembling it for cleaning, repair, or replacement. It might seem tricky at first, but with the right approach, you can do it without damaging your plumbing. Pay attention to the connections and tools you use to make the process smooth.
Loosening The Connections
Start by turning off the water supply to avoid any unexpected sprays. Then, check the connection between the shower arm and the shower head. This joint is usually threaded and can often be loosened by hand if it’s not too tight.
If it feels stuck, try twisting it gently back and forth to break any mineral buildup. Applying a little penetrating oil can help dissolve rust or calcium deposits. Let it sit for a few minutes before attempting to loosen it again.
Using A Wrench
If hand pressure isn’t enough, grab an adjustable wrench or a pair of pliers. Protect the finish of your shower head by wrapping the connection with a cloth or masking tape before gripping it with the tool.
Turn the wrench counterclockwise to loosen the connection slowly. Avoid applying excessive force to prevent stripping the threads or cracking the fixture. If it resists, step back and consider applying more penetrating oil or heating the joint gently with warm water.
Disassembling The Shower Head
Disassembling a shower head is a simple task that helps with cleaning or replacing parts. It requires only a few tools and a little patience. Taking the shower head apart lets you reach inside to remove mineral buildup and check for damage.
Separating Components
Start by turning off the water supply. Use a wrench or pliers to loosen the connection between the shower arm and the shower head. Wrap a cloth around the shower head to avoid scratching it.
Once unscrewed, separate the main parts carefully. These usually include:
- The shower head body
- The spray faceplate
- The rubber or plastic gasket
- The flow restrictor or filter
Some models have more parts, but these are common. Keep track of each piece to make reassembly easier.
Inspecting Parts
Look closely at each component for damage or wear. Check the gasket for cracks or stiffness. Examine the spray faceplate for clogged holes or mineral deposits.
Use a small brush or toothpick to clean blocked holes gently. Inspect the flow restrictor for debris or buildup. Replace any parts that look worn or broken.
Clean all parts with vinegar or a mild cleaner to remove mineral deposits. Rinse thoroughly before putting the shower head back together.

Credit: www.reddit.com
Cleaning The Shower Head
Cleaning the shower head helps keep water flowing smoothly. Over time, mineral deposits build up inside. These block water and reduce pressure. Regular cleaning restores performance and keeps your shower fresh. Start by removing tough mineral buildup. Then use a simple vinegar solution to clean deeply.
Removing Mineral Deposits
Mineral deposits look like white or green crusts. They form from hard water minerals. Use a soft brush or an old toothbrush. Gently scrub the shower head surface and holes. Avoid harsh tools that can scratch the finish. Soak the shower head in warm water first. This softens the deposits. Rinse well after scrubbing.
Using Vinegar Solution
Vinegar is a natural cleaner for mineral buildup. Mix equal parts white vinegar and water in a container. Submerge the shower head in the solution. Let it soak for at least 30 minutes. For heavy buildup, soak it overnight. Remove the shower head and rinse thoroughly. Wipe with a soft cloth to remove residue. Vinegar breaks down minerals and kills germs.
Reassembling The Shower Head
Reassembling the shower head is where all your careful work comes together. It’s important to put each piece back correctly to avoid leaks and ensure smooth water flow. Take your time and pay close attention to how parts fit together—it makes a big difference in performance.
Reattaching Components
Start by placing the rubber washer or O-ring back into its groove. These small parts are crucial for sealing the connection and preventing leaks. Next, screw the shower head body onto the arm by hand to avoid cross-threading.
Use a wrench to tighten the connection gently. Don’t overtighten—it can damage the fittings or strip the threads. If you used plumber’s tape before, check it’s still properly wrapped around the shower arm threads before reattaching.
Testing For Leaks
Turn on the water slowly and watch carefully for any drips around the connections. A small leak might mean the washer is out of place or the head isn’t tight enough. If you see water escaping, turn off the water and tighten the fittings a bit more.
Check the spray pattern too. Uneven or weak water flow could signal debris inside the head or a misaligned part. Fixing these issues now saves you from frustration during your next shower.
Troubleshooting Common Issues
Disassembling a shower head often reveals common issues that can be fixed quickly once identified. Troubleshooting these problems helps you avoid unnecessary replacements and saves you time. Let’s look at two frequent concerns: low water pressure and leaking connections.
Low Water Pressure
Low water pressure can turn a refreshing shower into a frustrating experience. Before disassembling, check if the problem is isolated to the shower head or affects the entire bathroom. If it’s only the shower head, mineral buildup inside might be blocking the flow.
After removing the shower head, examine the small holes. Use a needle or a toothpick to clear any clogged nozzles gently. Soaking the parts in vinegar for 30 minutes can dissolve stubborn deposits.
Also, inspect the flow restrictor—a small plastic piece designed to limit water flow. Removing it can increase pressure, but be mindful of water conservation rules in your area.
Leaking Connections
Leaks around your shower head connections can waste water and cause damage over time. Start by checking the rubber washers inside the joints. Worn or misplaced washers often cause drips.
If washers look fine, apply plumber’s tape (Teflon tape) around the threads before reattaching the shower head. This simple fix creates a tighter seal and usually stops leaks. Be careful not to overtighten, as this can crack fittings.
Have you ever noticed water pooling on the shower arm after turning off the tap? This might signal a hidden leak that only appears under pressure. Watch for this when testing after reassembly to catch problems early.
Frequently Asked Questions
How Do I Safely Remove A Shower Head?
To safely remove a shower head, turn off the water supply first. Use an adjustable wrench to loosen the connection. Protect the fixture with a cloth to avoid scratches. Turn counterclockwise until it detaches completely.
What Tools Are Needed To Disassemble A Shower Head?
You will need an adjustable wrench, pliers, a cloth, and possibly a screwdriver. These tools help loosen connections and remove components without damage.
How Can I Clean A Shower Head After Disassembly?
Soak the shower head parts in vinegar for 30 minutes. Use a soft brush to remove mineral deposits. Rinse with water and dry thoroughly before reassembling.
Is It Necessary To Turn Off Water Before Disassembling?
Yes, always turn off the water supply to prevent leaks and water damage. This ensures a safe and dry working area.
Conclusion
Disassembling a shower head is simple with the right steps. Start by turning off the water supply. Use basic tools like a wrench or pliers carefully. Clean each part to remove dirt and buildup. Take your time to avoid damage.
Regular cleaning helps keep water flow strong and steady. You can save money by doing this yourself. A clean shower head feels better and works well. Try these tips next time your shower needs care. Easy and effective.


