
Are you ready to give your walls a fresh new look but worried about messy paint jobs? Knowing how to back roll paint can make a huge difference in achieving a smooth, even finish without streaks or drips.
This simple technique will not only save you time but also help your paint last longer and look professional. Keep reading, and you’ll learn the easy steps to master back rolling—so your next painting project turns out flawless and stress-free.
Your walls deserve it!
Credit: www.tiktok.com
Choosing The Right Roller
Choosing the right roller for back rolling paint can make all the difference in achieving a flawless finish. A roller isn’t just a tool; it’s your ticket to a smooth, professional-looking paint job. But with so many options available, how do you decide which roller is right for you? Let’s break it down.
Types Of Rollers
Not all rollers are created equal. Each type serves a unique purpose, catering to different surfaces and paint types. Foam rollers, for instance, are perfect for smooth finishes and can be your best friend when painting cabinets or doors. Wool rollers, on the other hand, excel on rough surfaces, like textured walls or ceilings. Consider the surface you’re working on before making your choice.
Selecting The Perfect Nap
Nap length is crucial in determining the texture and finish of your paint job. A short nap, usually around ¼ inch, is ideal for smooth surfaces and will give you a sleek finish. If you’re tackling rough surfaces, opt for a longer nap, such as ¾ inch, to ensure even coverage. Remember, the right nap can save you time and effort.
Material Matters
The roller material impacts both the application and the end result. Synthetic materials, like polyester, are great for latex paints and offer durability. Natural materials, such as lambswool, provide excellent coverage with oil-based paints. Think about the paint you’re using and choose a roller material that complements it.
Have you ever struggled with roller marks or uneven coverage? Reflecting on these experiences might help you realize the importance of choosing the right roller. Taking the time to select the right type, nap, and material can transform your painting project from a chore to a rewarding experience.
What’s your go-to roller choice, and why? Share your insights or challenges in the comments below!

Credit: www.facebook.com
Preparing The Surface
Preparing the surface is a crucial step before you back roll paint. It ensures the paint adheres properly and the finish looks smooth and professional. Skipping this step can lead to peeling, bubbling, or uneven texture that ruins all your hard work.
Cleaning And Repairing
Start by cleaning the surface thoroughly. Dirt, grease, and dust can prevent paint from sticking well. Use a mild detergent and water, then rinse and let it dry completely.
Check for cracks, holes, or peeling paint. Patch these with spackle or filler, then sand the area smooth. I once ignored a small crack and ended up with an ugly bump after painting—don’t make the same mistake.
Priming Essentials
Priming sets the foundation for your paint. It helps cover stains and creates a uniform base that enhances paint adhesion. Choose a primer that suits your surface—wood, drywall, or metal all need different types.
Apply a thin, even coat of primer and let it dry fully. This step can feel like extra work, but it saves you from repainting later. Have you ever noticed paint peeling off a newly painted wall? That’s often because of poor priming.
Taping And Protecting
Protect areas you don’t want painted by using painter’s tape. Carefully tape around trim, windows, and outlets. This keeps your edges crisp and clean.
Also, cover floors and furniture with drop cloths or plastic sheets. Paint splatters can happen even with the best roller control, and cleanup is easier when you’re prepared.
Mixing And Loading Paint
Mixing and loading paint properly is crucial to achieve a smooth, even finish when back rolling. If the paint isn’t mixed well or the roller isn’t loaded correctly, you risk uneven coverage and wasted materials. Let’s dive into how you can prepare your paint and roller to get the best results every time.
Stirring For Consistency
Paint can separate while sitting, with pigment settling at the bottom and liquids rising to the top. Stirring brings everything back together into a uniform color and texture. Use a paint stick or a mechanical mixer to stir thoroughly, scraping the sides and bottom of the can as you go.
Don’t rush this step. Stir for at least 2-3 minutes until the paint looks smooth and consistent. Have you ever noticed streaks or patches after painting? That’s often caused by poorly mixed paint.
Loading The Roller Correctly
Loading your roller the right way avoids drips and uneven application. Pour paint into a shallow tray and roll your roller into the paint, then roll it back and forth on the tray’s textured ramp. This helps spread the paint evenly over the roller’s surface.
- Ensure the roller is saturated but not dripping wet.
- If you see paint dripping, roll off the excess on the tray’s slope.
- Reload the roller frequently to maintain a consistent layer of paint.
I once tried to save time by overloading the roller. The result was splatters and a messy wall that took extra work to fix. Do you want your painting job to look professional or rushed? Loading your roller properly makes all the difference.
Mastering The Back Roll Technique
Mastering the back roll technique is essential for achieving a smooth, professional paint finish. This method helps you cover surfaces evenly without leaving streaks or roller marks. With a bit of practice, you can save time and get results that look like they were done by a pro.
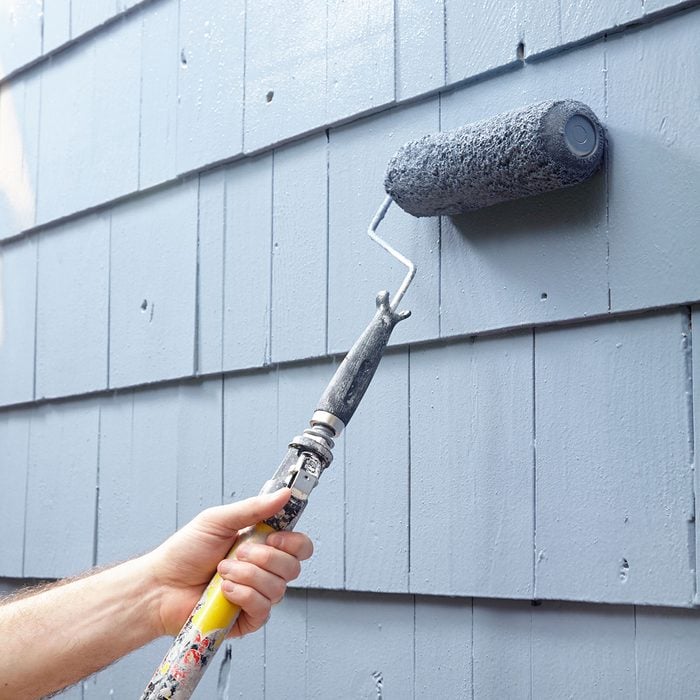
Applying Paint Evenly
Start by loading your roller with the right amount of paint—too much causes drips, too little leads to patchy coverage. Roll the paint onto the wall with steady pressure to spread it evenly. Think of it as laying down a thin, consistent layer rather than a thick coat.
Keep an eye on areas where paint looks heavier or thinner, and gently even them out. This approach helps avoid uneven drying and reduces touch-ups later. Have you ever noticed how uneven paint can ruin the whole look? Paying attention here makes all the difference.
Using The ‘w’ And ‘m’ Patterns
Using the ‘W’ or ‘M’ patterns guides your roller movement and ensures full coverage. Start by rolling in a large ‘W’ shape, then fill in the gaps without lifting the roller. This helps spread paint uniformly and prevents missed spots.
These patterns also reduce roller lines and help blend edges seamlessly. Try switching between ‘W’ and ‘M’ to find what feels more comfortable for you. Which pattern do you think would suit your painting style better?
Maintaining A Wet Edge
Maintaining a wet edge is crucial to avoid lap marks and color inconsistencies. Always work quickly enough so the paint edges stay wet when you overlap them. If the edge dries before you blend the next section, you’ll see visible lines.
Plan your painting in manageable sections to keep the wet edge intact. Use consistent strokes and avoid stopping mid-wall. Have you experienced those annoying streaks caused by dry edges? Staying mindful of this keeps your finish flawless.
Troubleshooting Common Issues
Back rolling paint can be a straightforward task, but it often comes with challenges that can affect the final look of your project. Identifying and fixing common issues quickly saves time and frustration. Let’s look at practical ways to troubleshoot problems that might arise during your back rolling process.
Avoiding Roller Marks
Roller marks can ruin the smooth finish you want. To prevent them, make sure your roller is evenly loaded with paint. Don’t overload the roller; excess paint causes streaks and uneven texture.
Roll in a consistent direction and maintain a wet edge to blend each stroke. If you notice marks forming, lightly go over the area with a dry roller before the paint dries. Have you tried using a high-quality roller cover? It often makes a big difference in avoiding marks.
Preventing Drips And Splatter
Drips and splatter happen when there’s too much paint on the roller or you apply paint too fast. To keep control, roll slowly and evenly. After dipping the roller, roll it on the tray’s ridged area to remove excess paint.
Protect your surroundings with drop cloths and painter’s tape to avoid surprises. If you’re working on vertical surfaces, consider using a roller with a shorter nap to reduce splatter. Have you noticed how a slower pace can reduce mess and give you more precision?
Fixing Uneven Coverage
Uneven coverage shows as patches where the paint looks thinner or lighter. This usually happens because the roller isn’t loaded properly or the paint isn’t spread out enough. Always roll in overlapping strokes to blend the paint smoothly.
If you spot thin areas after the first coat dries, apply a second coat focusing on those spots. Using a primer before painting can also help achieve consistent coverage, especially on new or patched walls. What’s your strategy for spotting and fixing these uneven patches early?
Cleaning And Storing Equipment
Cleaning and storing your paint roller equipment properly keeps it in good shape for future use. Dirt and dried paint can damage the roller and shorten its life. Taking time to clean and store your tools right saves money and effort later.
Proper Cleaning Methods
Start by removing excess paint from the roller using a scraper or a putty knife. Rinse the roller under warm water to wash off as much paint as possible.
For water-based paints, wash the roller with warm, soapy water. Work the soap into the fibers and rinse thoroughly until the water runs clear.
For oil-based paints, use a solvent like mineral spirits or paint thinner. Soak the roller briefly, then rinse with clean solvent. Use gloves to protect your skin.
Shake out excess water and spin the roller to remove moisture. This helps the roller dry faster and prevents mold.
Storing For Longevity
Allow the roller to dry completely before storing. Damp rollers can develop mildew and bad odors.
Store rollers in a clean, dry place away from direct sunlight. Sunlight can weaken the fibers and cause fading.
Use plastic wrap or a sealable bag to keep rollers clean and dust-free between uses. This also helps preserve the nap texture.
Keep handles and trays clean and dry. Store these items separately or in a toolbox to avoid damage.
Credit: www.familyhandyman.com
Frequently Asked Questions
What Is Back Rolling In Painting?
Back rolling is a painting technique using a roller to smooth out paint. It ensures even coverage and removes brush marks. It helps paint stick better on textured surfaces, improving durability and appearance.
Why Should I Back Roll Paint After Spraying?
Back rolling after spraying fills gaps and evens out paint layers. It prevents drips, streaks, and uneven texture, giving a flawless finish. This method enhances adhesion and extends paint life.
How Do I Properly Back Roll Paint?
To back roll, load the roller evenly with paint. Roll in a consistent, overlapping pattern on wet paint. Use light pressure to avoid splatters and ensure smooth, uniform coverage.
Can Back Rolling Improve Paint Durability?
Yes, back rolling improves paint durability by pressing paint into surfaces. It enhances adhesion and creates a thicker, more resilient coat. This reduces peeling and extends the lifespan of your paint job.
Conclusion
Back rolling paint helps achieve smooth, even coverage on walls. Using the right roller and technique makes a big difference. Take your time to avoid streaks or patches. Clean tools after painting to keep them ready for next use. Practice this method to improve your painting skills.
Paint jobs look better and last longer with back rolling. Give it a try on your next project for a neat finish. Simple steps lead to great results every time.


