
Are you tired of struggling with a fixed shower head that just doesn’t give you the flexibility you need? Adding a hand held shower head can transform your daily routine, making shower time more comfortable and convenient.
Imagine being able to rinse every corner easily, wash your pets, or even clean your shower with no hassle. In this guide, you’ll discover simple, step-by-step instructions to install a hand held shower head yourself—no expert needed. Ready to upgrade your bathroom experience?
Keep reading and take the first step toward a smarter, more enjoyable shower.
Choosing The Right Shower Head
Choosing the right handheld shower head can change your daily routine. It’s not just about style—it’s about comfort, functionality, and durability. Before you buy, think about what matters most to you in a shower experience.
Types Of Shower Heads
Handheld shower heads come in various designs, each offering unique benefits. You’ll find:
- Fixed handheld shower heads:These attach to a wall bracket and can be removed for handheld use.
- Slide bar shower heads:Allow height adjustment, great for families or shared bathrooms.
- Dual shower heads:Combine a fixed shower head with a handheld option for versatile use.
Think about your bathroom layout and how flexible you want your showering options to be. Would you prefer a simple handheld or something that adjusts easily for different users?
Features To Consider
Look beyond the basics and ask yourself what features will improve your showering experience. Some key points include:
- Spray settings:Multiple spray options like massage, rain, or mist add variety.
- Water pressure:Some models boost pressure, which is great if your water flow is weak.
- Material and finish:Stainless steel or chrome-plated options resist corrosion and last longer.
- Ease of installation:Choose models with simple connectors if you’re doing the installation yourself.
- Hose length:A longer hose adds flexibility but can be bulky if too long.
Ask yourself: which feature will make your shower more enjoyable or practical? I once switched to a handheld with adjustable spray and noticed an immediate improvement in how relaxing my showers became.
Credit: www.homedepot.com
Gathering Necessary Tools
Gathering the right tools is the first step to install a hand held shower head smoothly. Having everything ready saves time and avoids frustration during the process. Some tools are essential, while others can make the job easier. Knowing what you need helps keep the project simple and quick.
Basic Tools Required
- Adjustable wrench – for loosening and tightening nuts
- Screwdriver – to remove or secure screws
- Plumber’s tape (Teflon tape) – prevents leaks at connections
- Utility knife – for opening packaging or trimming hoses
- Bucket or small container – catches water during removal
Optional Accessories
- Silicone lubricant – eases hose installation
- Shower arm bracket – for mounting the shower head holder
- Extra washers – ensure tight seals if originals wear out
- Cleaning brush – removes mineral buildup before fitting new parts
- Protective gloves – keep hands clean and safe
Preparing The Shower Area
Preparing the shower area is essential before installing a hand held shower head. Proper preparation ensures a smooth installation and avoids damage or leaks. It helps to create a clean and functional space for the new fixture.
Cleaning The Old Fixture
Remove the old shower head carefully. Use a cloth to wipe away dirt and soap scum. If mineral deposits are present, apply vinegar to loosen them. Let the vinegar sit for 10 to 15 minutes. Scrub gently with a brush to clear buildup. Clean threads on the pipe to ensure a tight seal. Dry the area completely before proceeding.
Ensuring Proper Water Flow
Turn on the water supply briefly to check the flow. Watch for leaks or low pressure. Clear any blockages in the pipe if needed. Make sure the water pressure matches the new shower head’s requirements. Adjust the water valve to avoid sudden bursts. Proper flow guarantees a comfortable shower experience and protects the fixture.
Removing The Old Shower Head
Removing the old shower head is the first task before installing a new handheld model. It may seem simple but requires care to avoid damage. Taking time to unscrew it properly protects your plumbing and makes the process smooth. The right tools and a gentle approach help remove the fixture without strain.
Steps To Unscrew Safely
- Turn off the water supply to avoid leaks.
- Wrap a cloth around the shower arm to protect the finish.
- Use an adjustable wrench or pliers to grip the base.
- Turn the wrench counterclockwise to loosen the shower head.
- If it feels stuck, try rocking it gently back and forth.
- Once loose, unscrew the shower head completely by hand.
- Clean the threads on the shower arm before adding a new head.
Handling Stubborn Fixtures
Some shower heads stick due to mineral build-up or rust. Apply a penetrating oil or vinegar to the joint. Let it sit for 10-15 minutes to loosen the grip. Use a wrench with steady, firm pressure to avoid slipping.
If the fixture still resists, try heating the joint with a hairdryer. Warmth helps expand the metal and breaks the seal. Avoid using excessive force that could bend or damage the pipe.
Patience is key. Small adjustments and repeated attempts usually free the shower head safely.
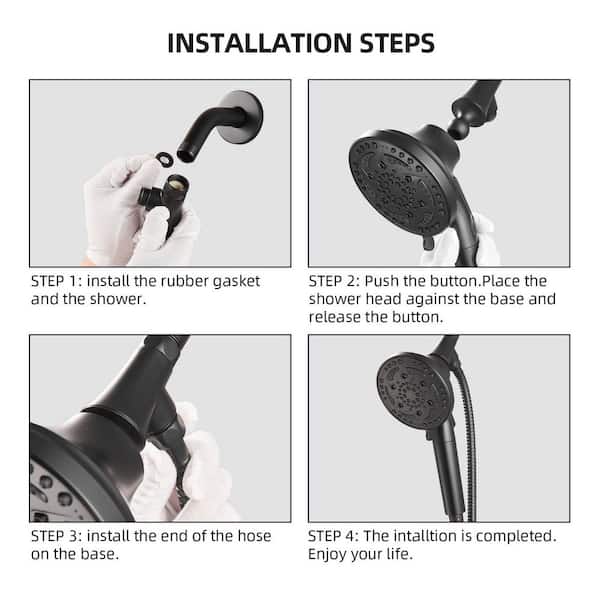
Installing The Hand Held Shower Head
Installing a hand held shower head improves your shower experience. It allows flexibility and easy cleaning. The process is simple and requires few tools. This section guides you through attaching the mounting bracket and connecting the hose.
Attaching The Mounting Bracket
Choose a comfortable height for the bracket. Use a drill or screwdriver to fix it firmly on the wall. Make sure the bracket holds the shower head securely. Check for any loose screws and tighten them as needed.
Connecting The Hose
Attach one end of the hose to the water outlet. Screw it on by hand until tight. Connect the other end to the hand held shower head. Use a wrench if necessary, but avoid over-tightening. Test for leaks by turning on the water gently.
Credit: www.amazon.com
Securing Connections
Securing connections is a crucial part of adding your hand held shower head. If the fittings aren’t tight enough or leaks appear, you’ll end up with water everywhere and a frustrating cleanup. Taking the time to ensure every connection is secure saves you from future headaches.
Tightening The Fittings
Start by hand-tightening the shower head’s fittings. Use your fingers to twist the connectors firmly but avoid over-tightening, which can damage the threads.
After hand-tightening, grab an adjustable wrench or pliers for an extra quarter turn. This extra bit of tightening often makes the difference between a solid seal and a slow drip.
Wrap plumber’s tape around the threads before connecting if you haven’t done so already. This tape helps create a watertight seal and prevents leaks.
Testing For Leaks
Turn on your water supply slowly and watch every connection point closely. Look for any drops or moisture forming around the fittings.
If you spot a leak, try tightening the fitting a bit more. Sometimes a small adjustment fixes the problem immediately.
Still leaking? Remove the fitting, add a new layer of plumber’s tape, and reconnect it. Testing carefully avoids surprises once you’re done.
Adjusting The Shower Head Position
Adjusting the position of your handheld shower head can transform your daily shower experience. Proper placement ensures comfort, efficiency, and even water conservation. It’s about finding that sweet spot where the water hits just right and feels relaxing without any awkward stretches or splashes.
Setting The Ideal Height
Start by considering who will use the shower most often. The height should allow water to reach your shoulders without forcing you to bend or stretch. If multiple people use the shower, aim for a middle ground or an adjustable mount that moves up and down easily.
Think about how you prefer to stand under the water. Do you like the spray hitting your head directly, or do you prefer it slightly angled? Adjust the holder so the shower head points where you want it, reducing water waste and keeping the bathroom floor dry.
Adjusting Spray Settings
Most handheld shower heads come with multiple spray options like massage, mist, or pulse. Try each setting to see which one suits your mood or needs for the day. A gentle mist can be refreshing in summer, while a stronger pulse might help relax sore muscles after a workout.
Don’t forget to check how easy it is to switch between sprays while showering. You want a smooth transition without interrupting your routine. If your shower head has a dial or button, test its responsiveness and make sure it stays in place once set.
Final Touches And Maintenance
Adding a handheld shower head is exciting, but the job isn’t finished once it’s installed. Taking care of your new fixture ensures it works smoothly and lasts longer. Paying attention to final touches and regular upkeep can save you from frustrating leaks and reduced water flow.
Cleaning The Shower Head
Over time, mineral deposits can clog the spray nozzles, reducing water pressure. To keep your shower head clean, remove it periodically and soak it in a mixture of equal parts white vinegar and water for about 30 minutes.
After soaking, gently scrub the nozzles with an old toothbrush to remove any remaining buildup. This simple routine will restore your shower head’s performance without needing expensive replacements.
Regular Maintenance Tips
Check the hose connections every few months to make sure there are no leaks. Tighten fittings if you notice any dripping to avoid water waste and potential damage.
Also, wipe down the shower head and hose after each use to prevent soap scum and grime buildup. This small habit keeps your fixture looking new and prevents corrosion over time.
Do you know how often you should replace your handheld shower head? Typically, after 3-5 years, depending on water quality and usage. Watching for signs like uneven spray or rust spots can guide you on when it’s time for a replacement.

Credit: anorganizedseason.com
Frequently Asked Questions
How Do I Install A Hand Held Shower Head?
To install, turn off water supply first. Remove the old shower head, wrap plumber’s tape on threads, then screw on the new hand held shower head. Tighten by hand and check for leaks. Follow the manufacturer’s instructions for best results.
What Tools Are Needed For Installation?
You need an adjustable wrench, plumber’s tape, and possibly a screwdriver. These basic tools help remove the old shower head and secure the new hand held shower head. No special tools are usually required, making the process simple and quick.
Can I Install A Hand Held Shower Head Myself?
Yes, most hand held shower heads are designed for easy DIY installation. It usually takes under 30 minutes and requires minimal tools. Just follow the step-by-step instructions, and you can upgrade your shower without professional help.
Will A Hand Held Shower Head Fit My Existing Shower?
Most hand held shower heads fit standard shower arms. Check your shower arm size, usually ½ inch NPT thread, before buying. If your setup is unusual, adapters are available to ensure compatibility and easy installation.
Conclusion
Adding a hand held shower head is simple and useful. It gives you more control while showering. You can clean hard-to-reach places easily. Most installations take less than an hour. Just follow the steps carefully for best results. Enjoy a flexible and comfortable shower experience every day.
This small change can improve your bathroom routine a lot. Try it yourself and see the difference.


