If you love painting with oil colors, you know how important your brushes are. But cleaning them properly can be tricky.
If you don’t clean your oil paint brushes the right way, they can get ruined fast. Imagine spending time and money on your art tools, only to lose them because of poor cleaning. Don’t worry—this guide will show you simple, effective steps to keep your brushes in top shape.
By the end, you’ll know exactly how to clean your oil paint brushes so they last longer and work better every time you pick them up. Keep reading to protect your tools and improve your painting experience!
Choose The Right Cleaning Materials
Choosing the right materials is key to cleaning oil paint brushes effectively. The cleaning products must remove paint without damaging the bristles. Using improper materials can ruin your brushes or leave paint behind. It is important to understand the types of solvents and soaps that work best. This helps keep brushes in good shape and ready for the next painting session.
Types Of Solvents For Oil Paint
Solvents break down oil paint and remove it from brush fibers. Common solvents include:
- Turpentine:Traditional and strong, it cleans well but has a strong smell.
- Mineral Spirits:Milder than turpentine and less smelly, good for gentle cleaning.
- Odorless Thinner:A refined solvent with very low odor, ideal for indoor use.
- Citrus-based Solvents:Natural and less toxic, work well but can be slower.
Choose a solvent based on your comfort and the paint’s stubbornness. Always work in a ventilated space to avoid fumes.
Selecting Soap And Water
Soap and water help remove remaining paint and solvent residues. Use a mild soap that is gentle on brushes. Options include:
- Dish Soap:Effective at cutting grease and easy to find.
- Brush Cleaner Soap:Specially made for artists, protects bristles and removes paint.
- Baby Shampoo:Gentle and safe for delicate brushes.
Warm water softens paint and soap. Gently work the soap into the bristles. Rinse thoroughly to avoid soap buildup. Proper soap and water use extend your brush’s life.

Credit: www.youtube.com
Remove Excess Paint
Remove extra paint by gently wiping the brush on a cloth or paper towel. This helps avoid thick paint build-up and makes cleaning easier. Act quickly to keep brushes in good shape.
Cleaning oil paint brushes is an essential part of maintaining their longevity and performance. Removing excess paint is the first crucial step in ensuring your brushes stay in top condition. This process not only prevents the bristles from becoming stiff and unusable but also saves you time when it comes to the actual cleaning. Plus, it helps maintain the vibrancy of your future artwork. But how exactly do you go about removing that stubborn extra paint? Let’s dive into two effective methods.Wiping Brushes On A Rag
Grab an old rag or cloth that you don’t mind getting paint on. Lay it flat on a surface where you can easily manage your brushes. Hold the brush at an angle, and gently wipe it back and forth across the rag. Apply enough pressure to remove the paint without damaging the bristles. You’ll notice the paint transferring onto the rag, leaving your brush visibly cleaner. This simple act can significantly reduce the amount of solvent needed later. Consider keeping a dedicated rag for each painting session. This minimizes the risk of mixing colors and ensures cleaner results.Using A Brush Comb
A brush comb is a handy tool designed to help you tackle stubborn paint residue. It looks much like a regular comb but is specifically crafted for brushes. Start by holding your brush with the bristles facing upward. Gently comb through the bristles from the base to the tip. This action dislodges paint trapped between the bristles. Be mindful of the pressure applied. Excessive force can damage your brush, rendering it ineffective. Have you ever tried using a brush comb before? You might be surprised by the difference it makes in preserving the quality of your brushes. Which method do you prefer for removing excess paint? Exploring different techniques can lead you to discover what works best for your art practice.Clean With Solvent
Cleaning oil paint brushes with solvent is essential to maintain their quality and extend their lifespan. Solvents break down the thick oil paint that water alone can’t remove. Using the right technique ensures your brushes stay soft and ready for your next masterpiece.
Soaking Brushes Safely
Start by choosing a proper solvent like mineral spirits or turpentine. Pour a small amount into a glass or metal container—avoid plastic, as it can react with the solvent.
Submerge only the bristles, not the handle or ferrule. Leaving the handle soaked can loosen the glue and ruin your brush.
Let your brush soak for about 10 to 15 minutes. Check it often to avoid over-soaking, which can damage the bristles.
Swirling And Agitating
After soaking, gently swirl the brush in the solvent to loosen paint trapped deep in the bristles. Avoid harsh scrubbing, which can splay the bristles and reduce brush precision.
You can also use a brush comb or your fingers to carefully separate the bristles while swirling. This helps remove stubborn paint without damaging the brush.
Once most paint is gone, rinse the brush in clean solvent until the liquid runs clear. Have you noticed how much cleaner your brushes feel after this step?
Wash Brushes With Soap
Washing your oil paint brushes with soap is a crucial step to keep them in good condition for your next painting session. Soap helps break down the oil and paint residues trapped in the bristles, making it easier to clean deeply without damaging the brush. Choosing the right soap and using the correct technique ensures your brushes last longer and perform better.
Lathering The Bristles
Start by wetting your brush with warm water. Then, apply a small amount of mild soap—like dish soap or specialized brush cleaner—directly onto the bristles.
Gently work the soap into a lather by rubbing the bristles in the palm of your hand or on a textured surface. This action helps loosen the dried oil paint stuck in the brush.
Have you noticed how stubborn paint can cling if you skip this step? Taking the time to create a good lather makes the rest of the cleaning process much easier.
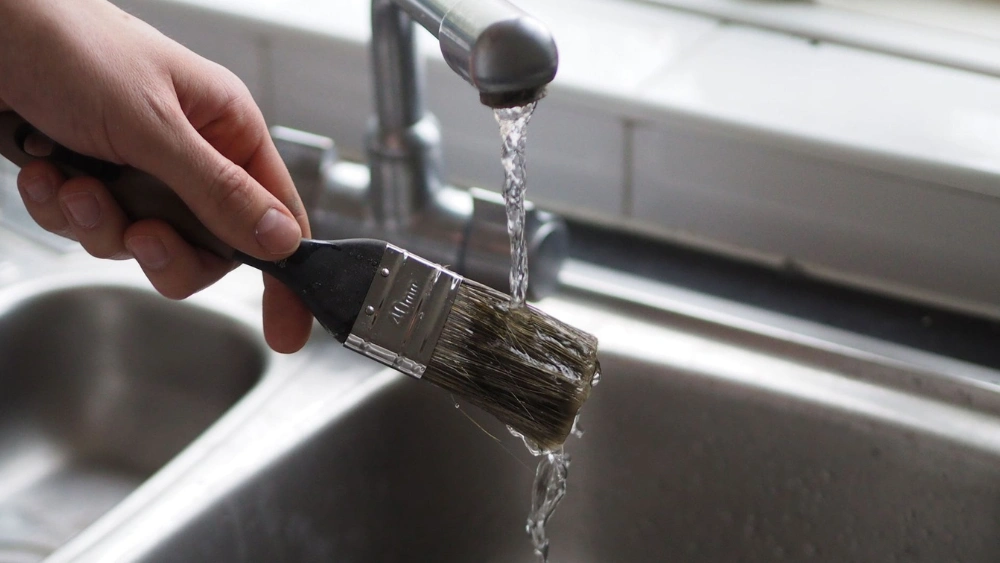
Rinsing Thoroughly
After lathering, rinse your brush under running warm water. Use your fingers to comb through the bristles to ensure all soap and paint residue wash away.
Check the brush by gently squeezing the bristles; if you still see color or feel stiffness, repeat the lathering and rinsing steps. It’s better to be patient here than to let paint harden inside the brush.
Remember, rinsing thoroughly prevents soap buildup, which can cause bristles to become sticky or brittle over time. A clean brush feels soft and looks fresh, ready for your next masterpiece.
Dry And Store Brushes
Drying and storing oil paint brushes properly helps keep their shape and quality. After cleaning, the brushes must be dried well to avoid damage. Storing them correctly prevents bristle bending and extends brush life.
Shaping The Bristles
Gently reshape the bristles with your fingers after rinsing. Smooth out any stray hairs to their original form. Avoid pulling or twisting the bristles as it can cause damage. Make sure the brush tip is neat and pointed.
Pat the brush dry with a clean cloth or paper towel. Do not rub harshly, as this can break bristles. Let the brush air dry flat or hanging with the bristles pointing down. This prevents water from reaching the handle and loosening the glue.
Proper Storage Tips
- Store brushes in a dry, cool place away from direct sunlight.
- Keep brushes upright in a jar or container with bristles up.
- Use brush guards or covers to protect bristles from dust and bending.
- Avoid storing brushes in tight spaces where bristles can get crushed.
- Clean brushes fully before storing to prevent paint buildup and hardening.

Credit: www.youtube.com
Maintain Brushes For Longevity
Maintaining your oil paint brushes properly extends their life and keeps them performing at their best. Brushes that are cleaned and stored correctly won’t lose their shape or bristles, saving you money and frustration. Let’s look at practical ways you can care for your brushes to make sure they last through many painting sessions.
Regular Cleaning Routine
After every painting session, clean your brushes immediately to prevent paint from drying on the bristles. Use a solvent like mineral spirits or brush cleaner to remove the oil paint gently. Swirl the brush in the solvent until the paint starts to lift, then rinse with warm soapy water to remove any residue.
Don’t forget to reshape the bristles with your fingers before laying the brush flat to dry. This step keeps the tip sharp and ready for your next project. How often have you grabbed a brush only to find it stiff and unusable? A quick clean right after painting saves you from that frustration.
Avoiding Common Mistakes
- Never let paint dry on your brush:Dried oil paint is almost impossible to remove and ruins the bristles.
- Don’t soak brushes too long:Prolonged soaking in solvents can loosen the glue holding bristles together, causing shedding.
- Avoid harsh scrubbing:Vigorous scrubbing can bend or break the bristles, reducing the brush’s effectiveness.
Instead, be gentle but thorough with cleaning. Rinse your brushes well and store them with bristles facing up or flat to prevent damage. Have you ever noticed your favorite brush losing bristles or changing shape? Adjusting your care routine can prevent that from happening again.

Credit: www.instagram.com
Frequently Asked Questions
How Do You Remove Oil Paint From Brushes?
To remove oil paint, first wipe off excess paint with a cloth. Then, soak the brush in mineral spirits or paint thinner. Rinse with warm soapy water to clean thoroughly. Repeat if necessary until the brush is free of paint residue.
What Is The Best Solvent For Cleaning Oil Paint Brushes?
Mineral spirits are the most effective solvent for cleaning oil paint brushes. They dissolve oil paint well without damaging bristles. Always use in a well-ventilated area and follow safety instructions. Avoid harsh solvents that can ruin your brushes.
How Can I Keep Oil Paint Brushes Soft After Cleaning?
After cleaning, reshape the bristles gently with your fingers. Let the brushes air dry flat or hanging with bristles down. Store brushes in a dry place, away from direct sunlight. Proper care maintains brush softness and extends their lifespan.
Can I Use Household Items To Clean Oil Paint Brushes?
Yes, common household items like vegetable oil can help loosen dried oil paint. Use it before applying mineral spirits for thorough cleaning. Avoid water alone, as it won’t effectively remove oil-based paints from brushes.
Conclusion
Cleaning oil paint brushes takes patience and care. Use the right solvent and gentle soap. Work until paint no longer appears on the brush. Rinse well to remove all residue. Dry brushes flat or hang them to keep their shape.
Clean brushes last longer and perform better. Remember, regular cleaning protects your tools and saves money. Keep your brushes ready for your next painting session. Simple steps make a big difference in brush care.


